In this App Store Connect Guide, you’ll learn how to upload and release iOS apps to Apple’s App Store using App Store Connect. You’ll also learn how to use App Store Connect to manage your apps, view and understand app analytics, look at sales reports, test your iOS app with TestFlight, and more.
What is App Store Connect?
App Store Connect is Apple’s application that allows developers to manage their iOS apps. Through App Store Connect, you can submit your app to the App Store, invite users to test with TestFlight, reply to App Store reviews, manage updates and releases, analyze reports, and more.
How to use App Store Connect
Within your App Store Connect dashboard, you’ll see icons titled My Apps, App Analytics, Sales and Trends, Payments and Financial Reports, Users and Access, Agreements, Tax, and Banking, and Resources and Help.
In this App Store Connect Guide, we’ll discuss each section of the App Store Connect platform. You’ll learn what each section is, and how to use each one. The first four sections are used to take various actions within your App Store Connect account, as detailed below.

My Apps
Developers can use the My Apps section of App Store Connect to manage their iOS apps. In this section, you can upload your apps, add app information, create new app versions, and submit your app to the App Store. You can also invite users to TestFlight in the My Apps section.
App Analytics
In this section of App Store Connect, developers can view the app analytics reports. Within the App Analytics section, you can report on metrics like user engagement, traffic sources, conversion rates, pre-orders, and download numbers. You can also track user app acquisition to drive app downloads.
Sales and Trends
In the Sales and Trends section of App Store Connect, developers can track sales and in-app purchases. Use this section to report on next-day sales data and record when a user makes an App Store transaction. You can also view subscriptions, pre-orders, sales, and more.
Payments and Financial Reports
In the Payments and Financial Reports section of App Store Connect, you’ll find monthly financial reports containing a list of payments you’ve received from Apple. These financial reports also contain a list of the transactions that were included in the payments.
The next three sections of App Store Connect are for administrative tasks, like managing users, banking information, and accessing Apple’s help resources.
Users and Access
In the Users and Access section, account Admins, Account Holders, or App Managers (that are enrolled in The Apple Developer Program) can add and edit App Store Connect users. Here, you can also add users to sandbox testing environments using TestFlight or another test app distribution platform.
Agreements, Tax, and Banking
In this section of App Store Connect, you can sign Apple’s Paid Applications Agreement (if you are charging for your app or adding in-app purchases), enter your banking information to receive payments, and submit tax forms.
Resources and Help
In the Resources and Help section of App Store Connect, you’ll find Apple’s official developer help resources. Here, you’ll learn more about adding apps, testing, submitting to the App Store, and more.
How to release an iOS app to the App Store
To release an iOS app to the App Store, you must first upload and submit your app to App Store Connect. Next, we’ll detail the step-by-step process of adding an app record, uploading your build, using TestFlight, and submitting to the App Store via App Store Connect.
Step 1: Set up code signing, create an iOS distribution provisioning profile, and generate a distribution certificate
Developers must sign an app before uploading it to App Store Connect to ensure that the code has not been changed or altered since it was signed, and that it’s being uploaded with an authorized Apple Developer ID. While this helps put security in place for app users’ safety, it also introduces a cumbersome task for iOS developers.
Note: Before you start, you need an Apple Developer ID to be able to create a provisioning profile, generate a certificate, or archive an application. You can create your account in your Apple Developer Program, or ask the account admin to create your account. Once that is set up, you can proceed.
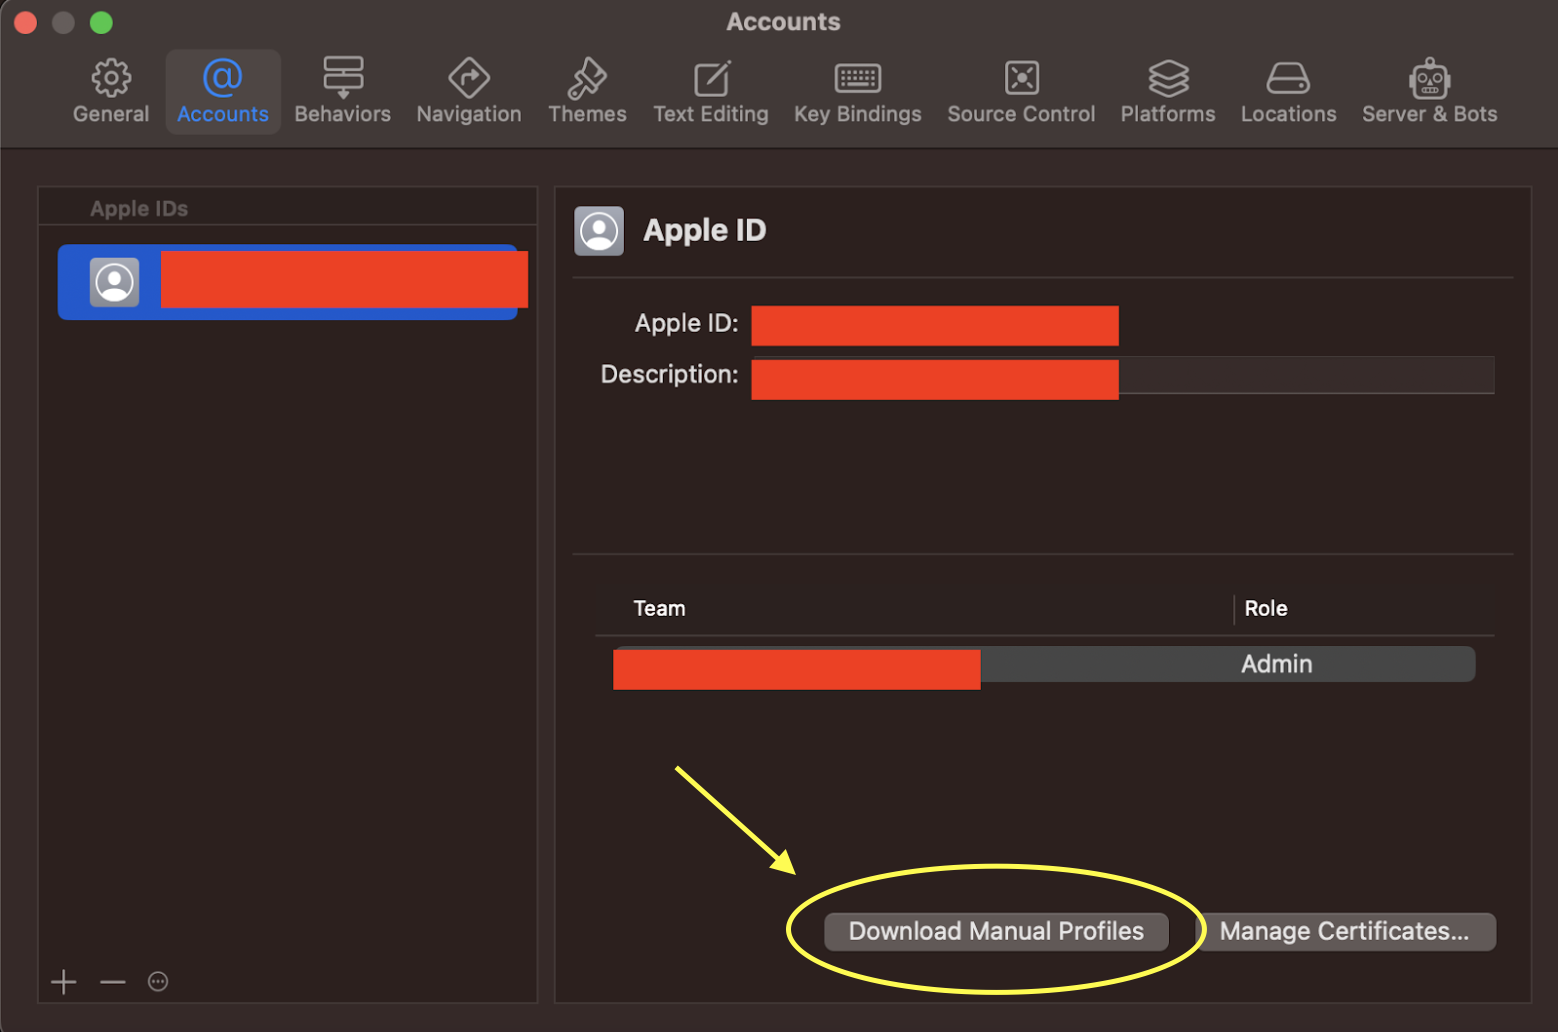
In Xcode, find the ‘Accounts’ section under the ‘Settings’ menu. Here you can find your Apple ID, associated team, and role — or the option to “Manage Certificates…” or “Download Manual Profiles”. You’ll want to download your manual provisioning profile by clicking “Download Manual Profiles”.
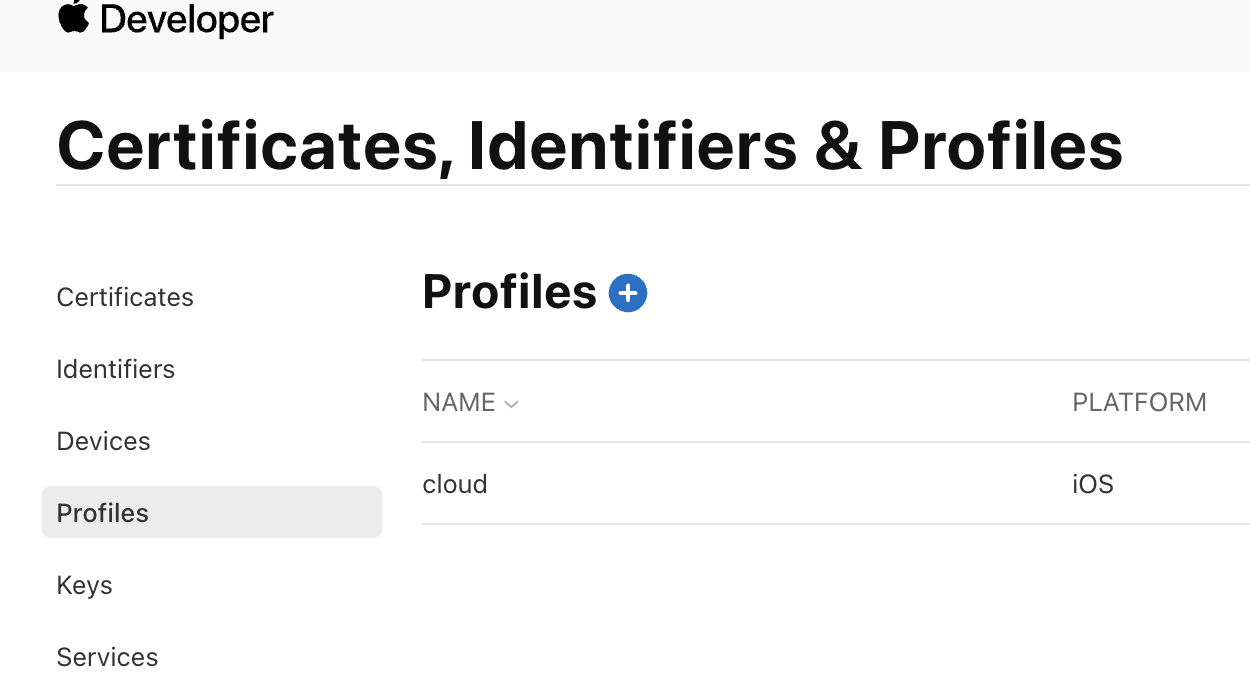
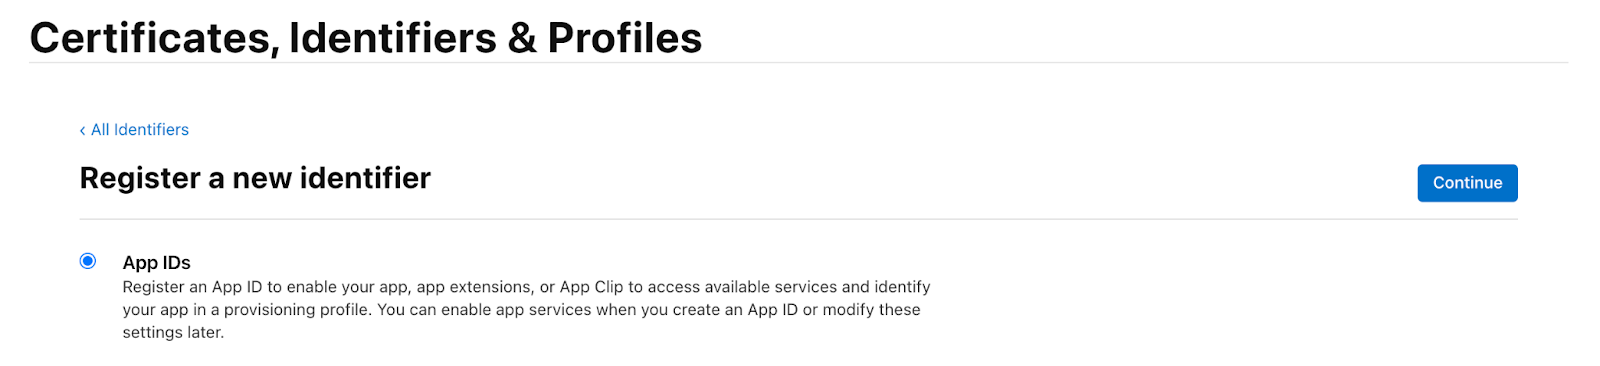
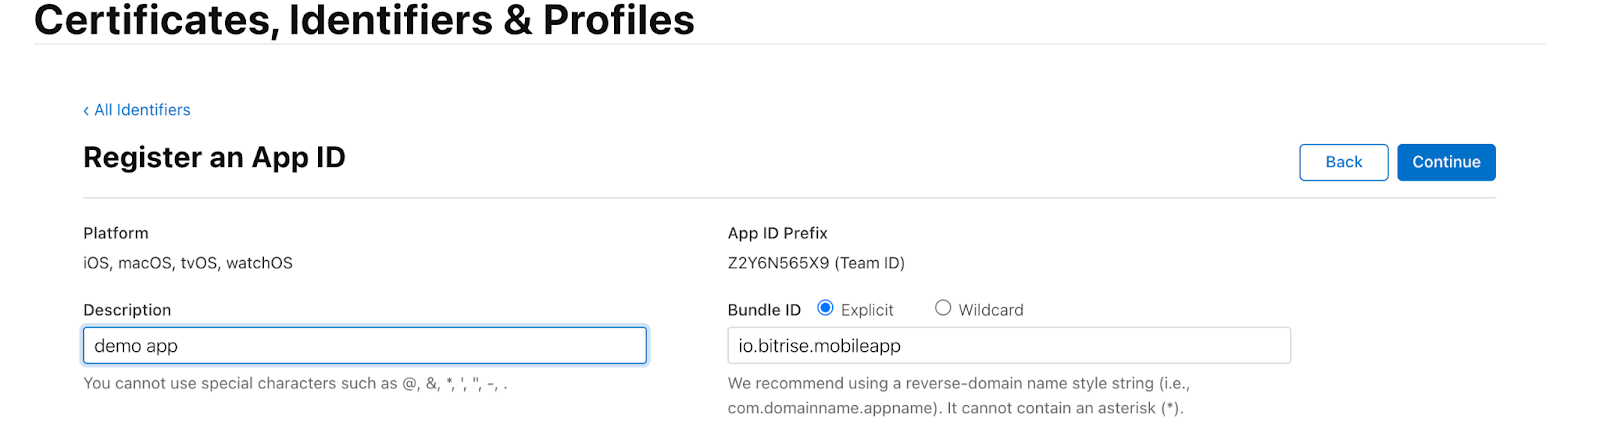
Next, you need to manage your provisioning profiles and certificates in your App Developer Program. Under “Certificates, Identifiers & Profiles”, register a unique identifier for your app by selecting the “App ID” option. You need to create a short description and a Bundle ID. Here, you can also add capabilities (like Apple Pay) or app services (like MusicKit). It’s recommended to set your Bundle ID using reverse-domain name style. For example, “io.bitrise.mobileapp”.


💡TIP: To automate code signing your apps in your mobile CI, use Bitrise to upload the code signing certificate(s) and establish an Apple Service connection (either via App Store Connect API key or through an Apple ID). Bitrise can download, create, or renew the provisioning profile(s). Bitrise also handles App ID and test device registration automatically. More information can be found in this guide.
Step 2: Create an app record in App Store Connect
Creating an app record in App Store Connect saves your app’s information and creates a place for you to upload your app. This is a prerequisite step to using App Store Connect to release your app.
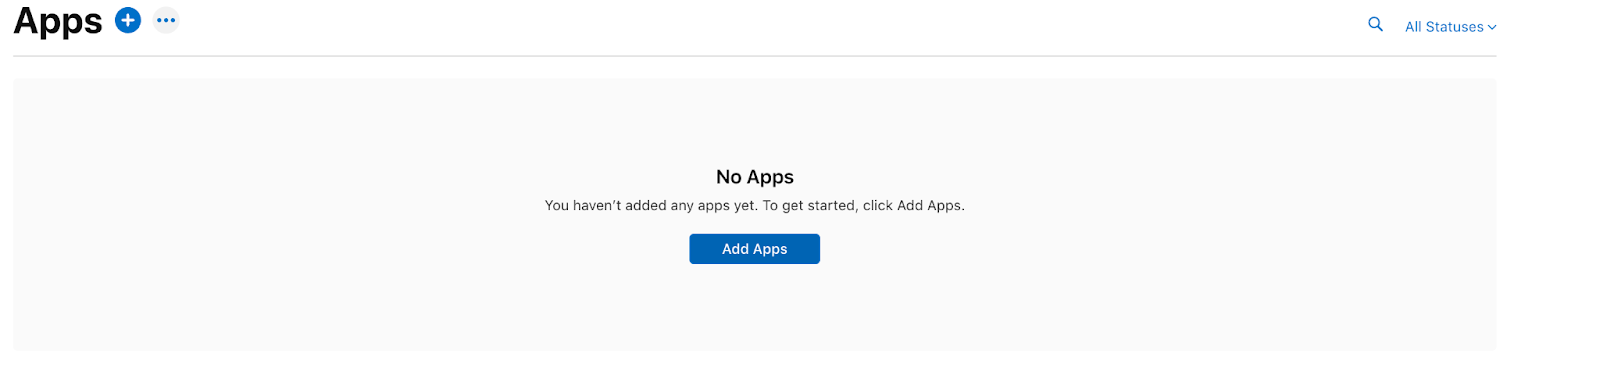
Under the “My Apps” section of App Store Connect, you can add an app record. When setting up your app record, choose from relevant platforms (iOS, macOS, or tvOS). In this case, select iOS.
Set a name for your new app and pick your primary app language. Next, select the Bundle ID we created in your Apple Developer Program from step 1. Add in a SKU, which is an internal identifier for your app. It can be helpful to establish SKUs you recognize when you have multiple apps in your App Store Connect account to reference.

Next, select your user access level from “Limited Access” or “Full Access”. By selecting “Limited Access”, you can set which users can see this app, and only those invited to your App Store Connect account can access the app. More often than not, you’ll want to select “Full Access” so all users can access your app.
Now, you’ve created your app record in App Store Connect. This effectively “reserves a space” for your app in your App Store Connect account. Now, you need to further prepare your app by adding the metadata.
Step 3: Configure your app metadata in App Store Connect
Next, configure your app metadata in your App Store Connect account. Your app metadata includes your app description, keywords, localizations, screenshots across devices, app categories, and age ratings. You may have to involve several teams across your organization to configure your app’s metadata. For example, metadata may be written by your marketing team to ensure that the description, design, and app positioning reflect the overall marketing strategy. On the other hand, you may need a multi-lingual engineer to translate your app into different languages and upload localized metadata.
💡TIP: Save time by ensuring that your app screenshots have the right metadata before uploading them to the App Store.

This is how app users find your app in the App Store. Updating/changing this information takes time so be sure the information is correct before you publish.
Step 4: Upload and archive your app using Xcode
Before you submit your app to the App Store, you need to upload and archive your app using Xcode. To do this, you have a few options:
- Manually upload and archive your app using Xcode and App Store Connect, which takes up engineering time and is hard to repeat.
- Use Bitrise’s Release Management (currently in beta) to repeat and automate steps during the release management process for the native iOS apps.
- Use the Bitrise fastlane Step to automate the archiving of your app. However, in this article, we won’t discuss this option, as fastlane requires specialized fastlane knowledge.
Manually upload and archive your app with Xcode and App Store Connect
To upload your app, you’ll use Xcode to either create a new project, clone an existing project in Xcode, or upload an existing project or file. Next, you need to choose a template for your project from “App”, “Document App”, or “Game”.
First, you’ll need to set the Identify Information within Xcode:
- Your app Display Name: This is what people see on the App Store when they download your app.
- The Bundle Identifier: This is your app’s unique identifying number. You can register a new Bundle ID with POST https://api.appstoreconnect.apple.com/v1/bundleIds
- The app’s Version: This number needs to change for every upload so you can keep track of your versions
- The app’s Build: This number also needs to change for every upload so you can keep track of your builds
Then, you’ll need to set the Deployment info:
- iOS version: You can change the iOS version, though the default is the latest OS
- Devices you want to support: Choose from iPhone, iPad, and/or Mac
- If you choose Mac, you need to enable Mac support to link Mac-compatible content
- Device orientation: Choose from Portrait, Upside Down, Landscape Left and/or Landscape Right
- Status Bar Style: You can set styles and conditions that dictate how the status bar on the iPhone is presented. For example, you can change the text or background color.
Next, you need to upload the App Icons and Launch Images. You can add your App Icon (1024x1024 px) to your assets in Xcode. This is the icon that will be displayed on the App Store.
💡TIP: Use appicon.co to take your App Icon and convert it into the various sizes that Apple requires.
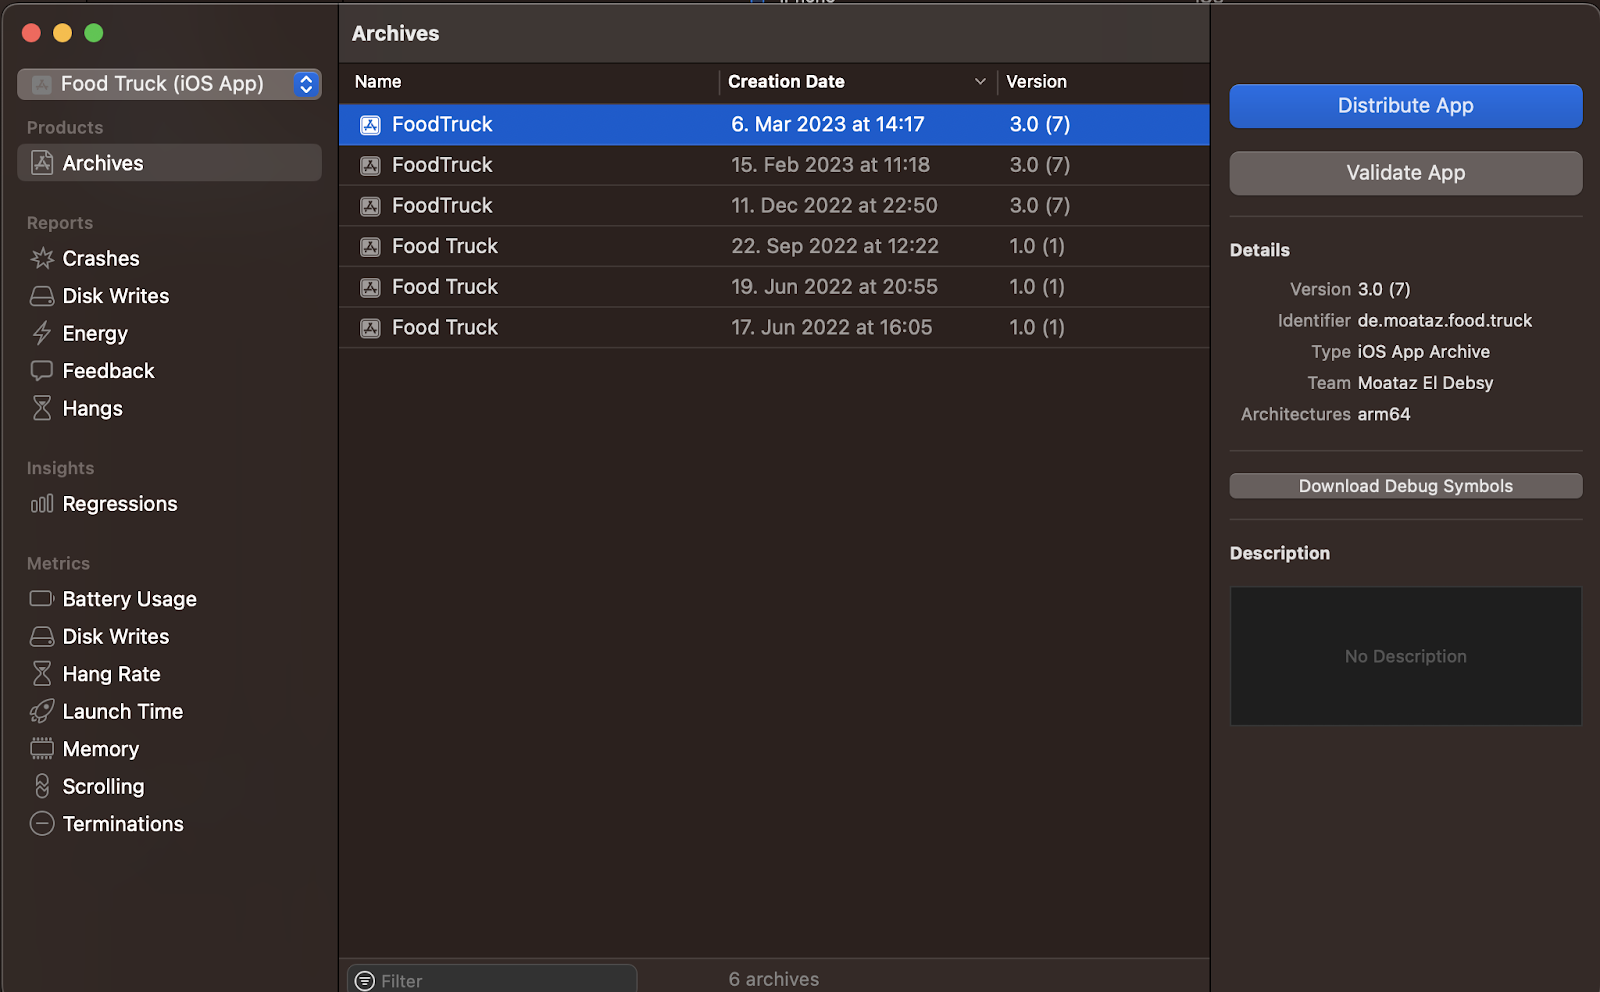
Once all that is done, in the top navigation menu, choose the device that you want to use to archive the app. Under “Product”, choose “Archive” and Xcode will archive your application.

Use Bitrise Release Management to submit iOS apps to the App Store
When you use Bitrise Release Management to submit your iOS apps for approval, it automates the traditionally complicated, time-consuming release tasks. Over manually uploading to App Store Connect, this process saves your engineers time and streamlines release processes.
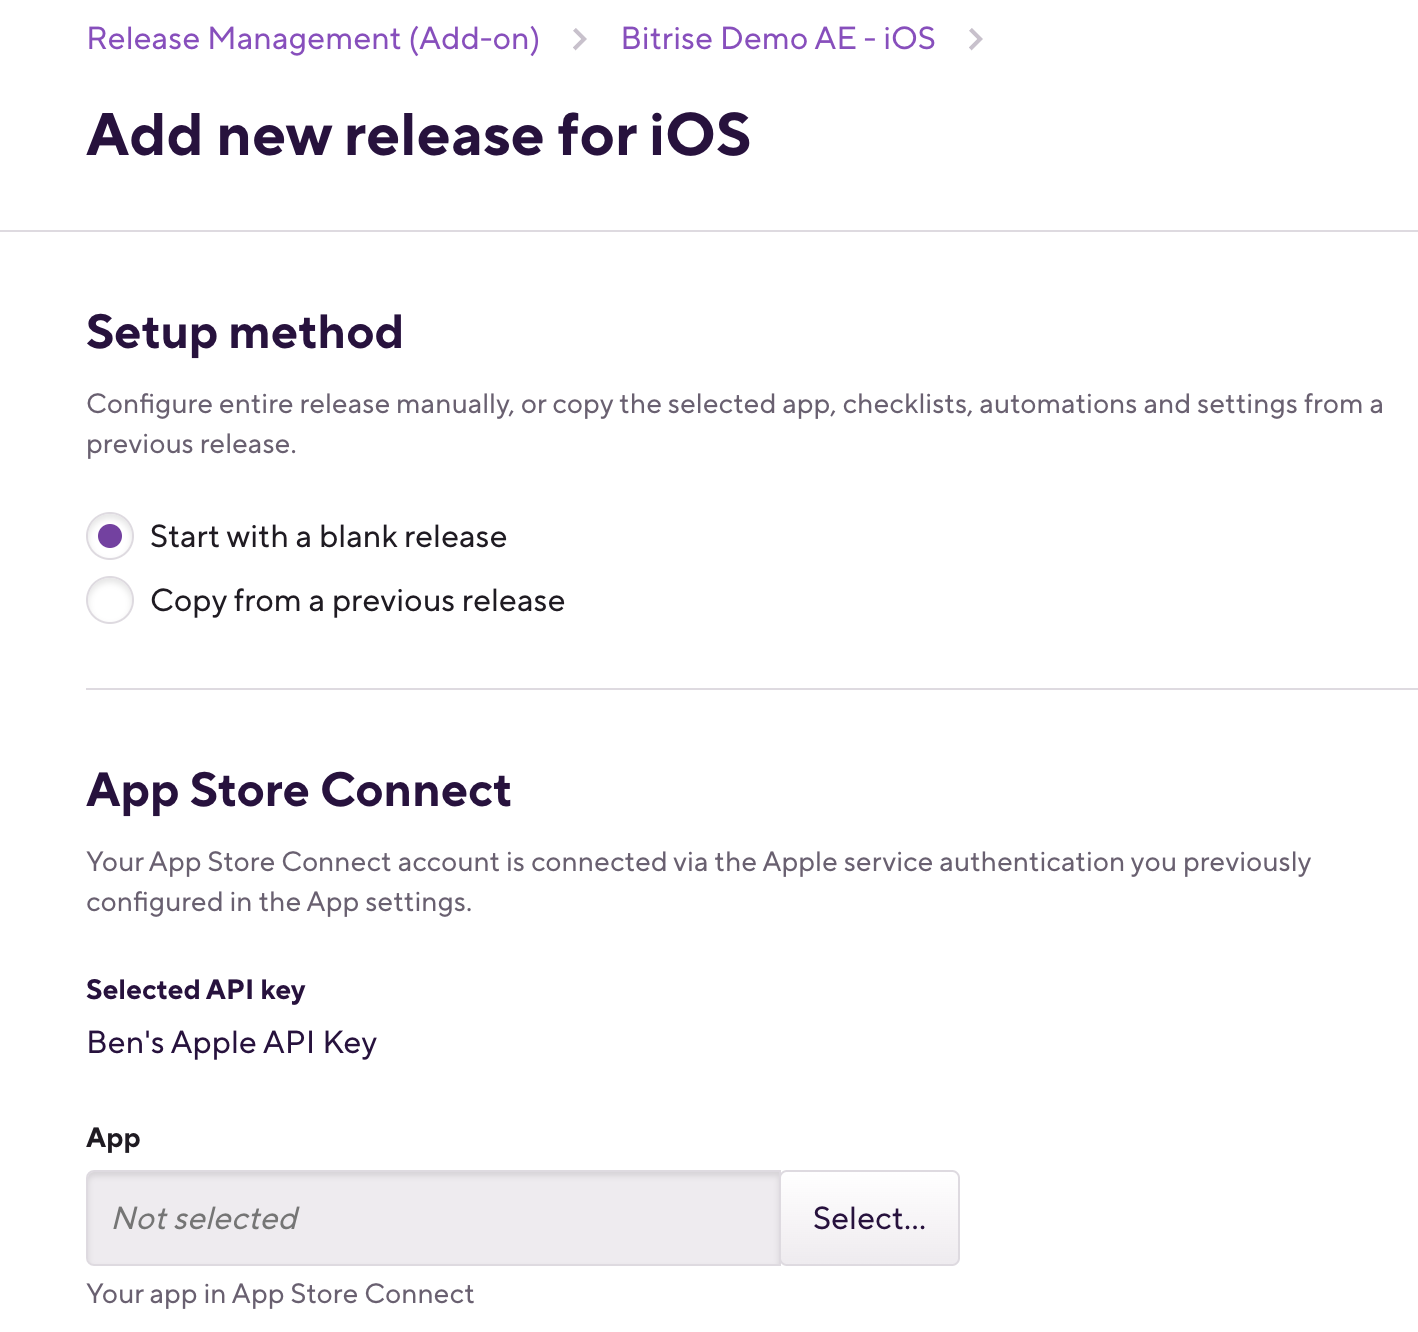
In the “Release” tab in your Bitrise Dashboard, which you’ll see if you have an iOS build in your Bitrise account, you can add a new release for your iOS app. You can either choose to start with a blank release or copy from an existing release in your Bitrise account.


Next, you can specify which App Store Connect app you want to release to the App Store, as well as the release version number. Then, click the “Add release” button.

In the left-hand navigation menu under “Release candidate”, you can select the release branch and the Bitrise workflow that is used to generate the .ipa file to upload to TestFlight. You can also choose to automatically upload the build to TestFlight and make it available to testers.
💡What is TestFlight? TestFlight is a free-to-use, Apple-owned beta testing solution that manages the beta testing of your app. You can invite up to 10,000 testers to help test your app.
In the next section, “TestFlight upload”, you can automatically upload your app to TestFlight and share it with testers. When you configure your release cadence, you can choose to upload all successful builds to TestFlight automatically. Alternatively, you can click the “Upload to TestFlight” button to trigger a workflow in the background, download the .ipa file, upload it to TestFlight, and stop the build — all in a single click.
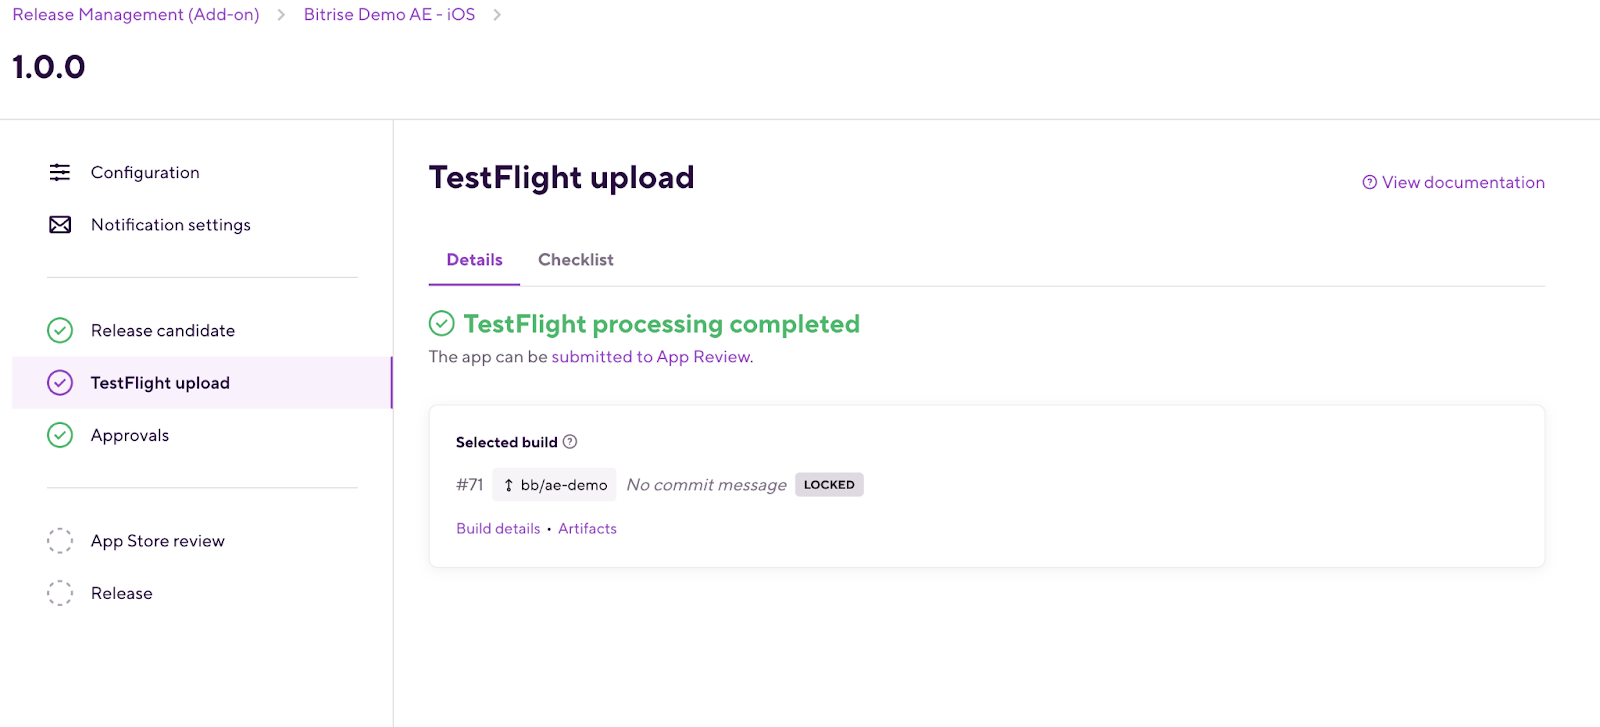
Then, you need to wait for Apple to finish the post-processing. Depending on your app size, this can take a few minutes, or it could take a few hours. With Bitrise’s Release Management, you’ll get updates on the status of your TestFlight upload and the post-processing changes — even without a running build.
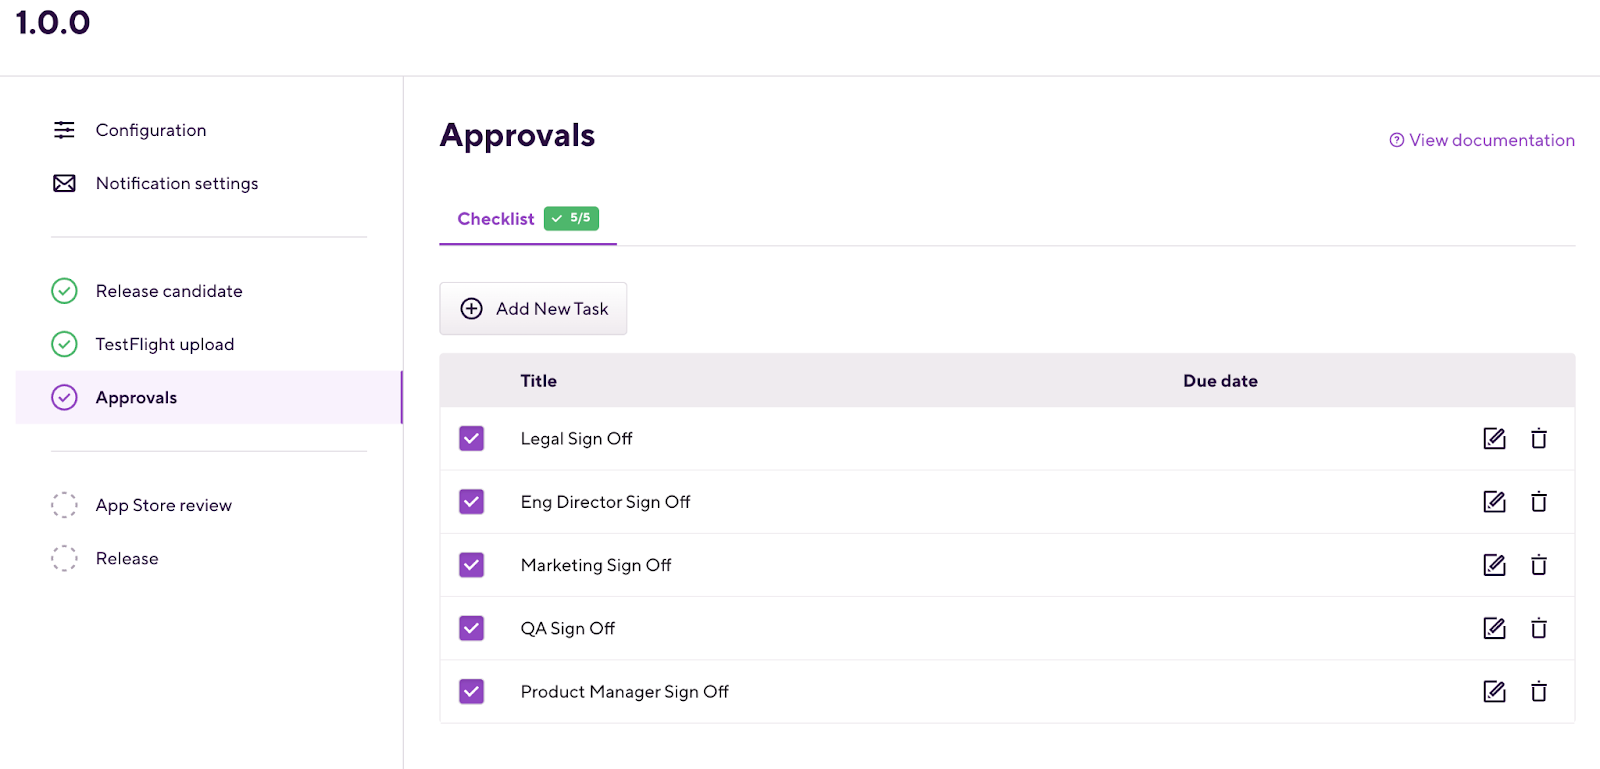
In the “Approvals” section of Bitrise Release Management, check the box beside the task to “review the release candidate” so it can be submitted for review. And that’s it for step 3, you’ve successfully uploaded and archived your app and it is ready to submit to the App Store for review.
Step 5: Submit your app for review
Once your app is uploaded and tested, you need to submit your app to Apple for review. This can be done in several ways:
- Use the Bitrise Release Management feature to automatically submit to the App Store and streamline your release processes.
- Manually submit your app for review to App Store Connect.
- Use the Bitrise fastlane Step, but again, it requires specialized fastlane knowledge, so we won’t discuss it in this article.
Manually submit your app for app review to App Store Connect
After you’ve archived your app, click on the “Distribute App” button in the right-side navigation bar. Choose “App Store Connect” as your distribution method (here you could also choose to distribute the app ad-hoc on designated devices, enterprise-wide for internal business apps, or development to distribute the app to certain team members).
Next, select a destination. This could be either the “Upload” option — where you are uploading and sending apps to App Store Connect, or the “Export” option — where you can sign and export your app without uploading it.

Afterward, you’ll select your App Store Connect distribution options. By default, “include bitcode for iOS content” and “upload your app’s symbols to receive symbolical reports from Apple” are checked off. Generally, you can leave them selected.
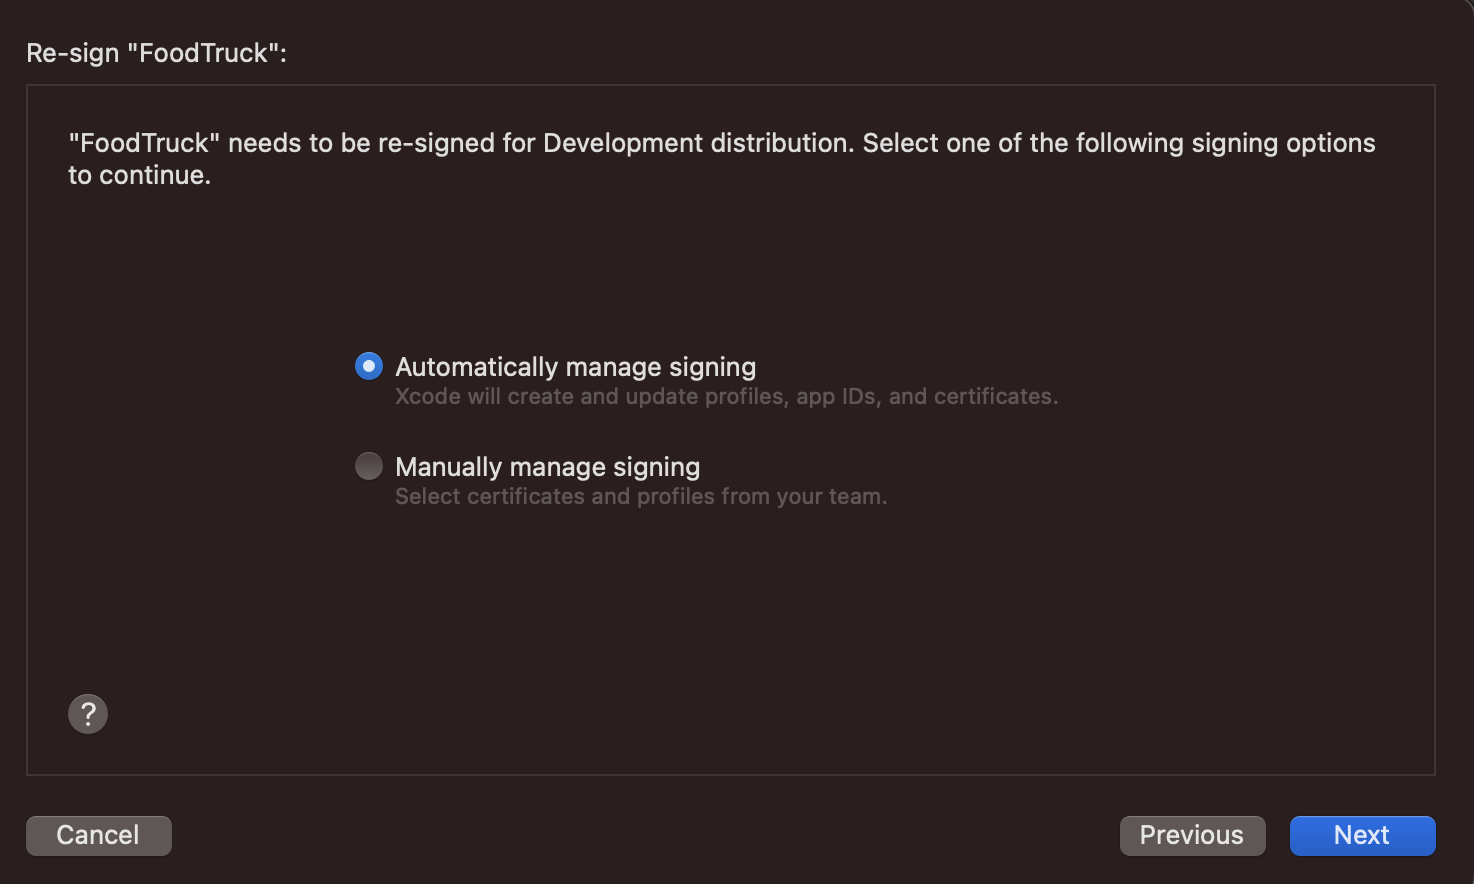
Next, your app needs to be “re-signed” before being distributed by App Store Connect. You can choose to automatically manage code signing or manually manage signing. When automatically code signing, Xcode creates and updates your app’s certificates and provisioning profiles, but you still need to trigger this process by selecting to automatically manage code signing with your upload.
Finally, you’ll see a summary screen of all the information you just entered into Xcode. If all looks good, you can click “Upload” to start the process of uploading your app to the App Store.
Automatically submit your app for review with Bitrise’s Release Management
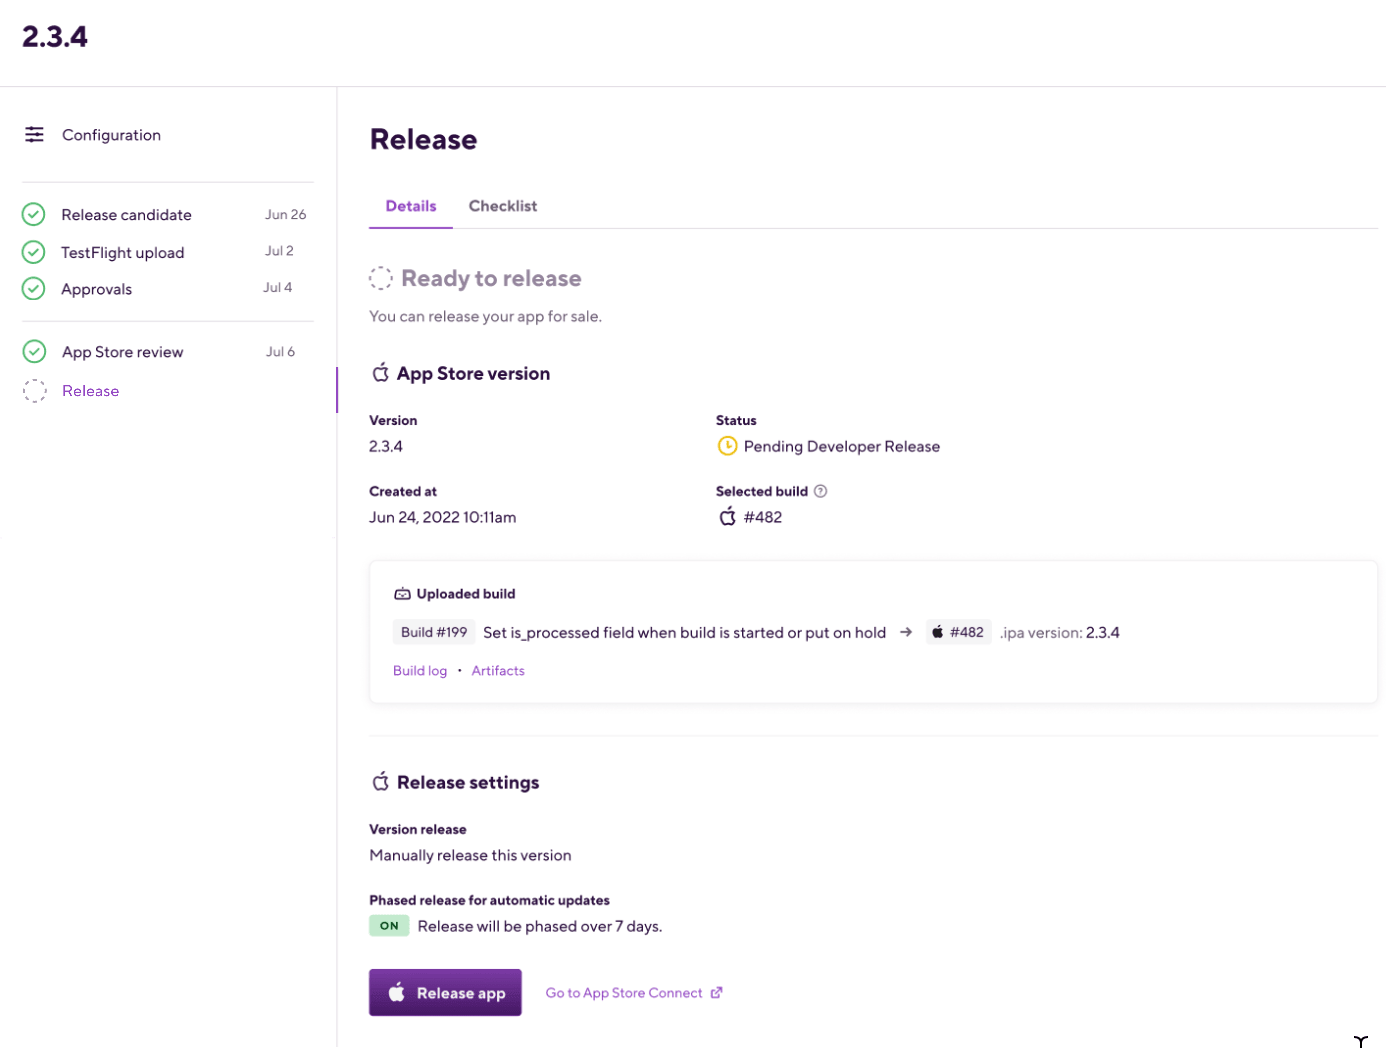
Through Bitrise Release Management, you can customize your release settings. Once the app is approved for release, you have three options:
- Set the version release settings to manually release
- Automatically release the approved version
- Automatically release the approved version after a set date
You also need to check the box to confirm you’ve checked the metadata in App Store Connect (currently, you can’t review the metadata in Release Management with Bitrise).
Click “Submit to App Review”.
Now, you need to wait for Apple to review your app. This process can take anywhere from a few hours to a few days. Once it’s approved, the status within Bitrise Release Management will say “Approved”.
If you’ve selected automatic release, after your app is approved, the approved app version will be automatically released to the App Store. Therefore, with the Release Management feature, you can submit your app for approval and release – all within a centralized platform to manage your app and Mobile DevOps.
And voila! You’ve successfully released your iOS app to the App Store. When pushing future app updates, this process creates simple, repeatable steps that save you time and effort. Next, you need to monitor the app analytics, and optimize your release process for better, faster app releases.
Step 6: Improve app performance, optimize releases, and more
Now that you’ve released your iOS app to App Store Connect and the App Store, you can think about optimizing your release processes. Ideally, you want to get your release cadence to ~2 weeks or less for optimal results. When you have a strong, bi-weekly release train and a Mobile DevOps-focused team, you improve app ratings, release faster, shift left on security, and more.
So, how can you optimize your mobile release management process? Bitrise offers several ways for mobile engineers to release faster, better apps and make more informed decisions. Two of those ways are the Bitrise Insights and Release Management features.
Use Bitrise Insights to improve your app performance
Bitrise Insights is our monitoring and analytics tool that tracks and reports mobile app build, test, and credit data.
Mobile teams use Bitrise Insights to:
- Pinpoint, investigate, and resolve flaky tests and failing builds to reduce how much time your engineers have to wait
- Understand bottlenecks so you can save the most developer wait time or credits, and as a result, optimize your overall developer experience and efficiency
- Deep dive into any negative trend in your app or Workflows with build and test filters to help you isolate the real issues and make informed decisions
Learn more about Bitrise Insights
Use Release Management to optimize your mobile release cadence
As previously mentioned, Release Management automates release management to bring mobile teams from various silos together, all in one place, to make shipping as seamless as possible.
Mobile teams use Bitrise Release Management to:
- Automate release-specific management tasks to minimize time spent on release preparation and increase time for more important tasks
- Automate deployment to TestFlight and get post-processing status updates from uploaded builds — all in a centralized Release Management solution
- Submit uploaded release candidates and monitor the App Store review status on Bitrise— without needing to open App Store Connect
Learn more about Release Management
Bitrise is a mobile CI/CD platform that helps mobile engineers release faster, better apps. With so many tools and processes for mobile developers, Bitrise helps teams centralize and automate their mobile efforts so they can focus on important development tasks. If you want to release better iOS apps, get started for free today.