XCUITest, short for Xcode UI Test, is Apple's UI testing framework for iOS apps. Tests run in the iOS Simulator or on real devices through Xcode and CI systems, enabling developers to automate user interactions such as tapping buttons, entering text, and verifying app state.
What is XCUITest?
XCUITest is a UI testing framework built into Xcode, part of Apple's XCTest umbrella that also covers unit and performance testing. Tests written with XCUITest drive the actual app, simulating real interactions like taps, swipes, and text entry, then assert on what's visible on screen. The goal with these tests is to catch user-facing bugs and errors before they reach production.
In 2015, XCUITest launched with Xcode 7, giving iOS teams a first-party way to write Swift or Objective-C UI tests, run them through the same Xcode test infrastructure as unit tests, and run them through continuous integration without the need for extra tooling.
Tests find UI elements by accessibility identifier, label, or type, then execute them. As they run against the real binary on a real platform (simulator or device), they catch issues unit tests miss, including layout problems, animation timing issues, accessibility regressions, and platform-specific behaviours.
XCUITest covers one layer of mobile app testing: the UI. While general end-to-end principles apply, XCUITest has its own conventions and constraints worth understanding before writing your first test.
How does XCUITest work?
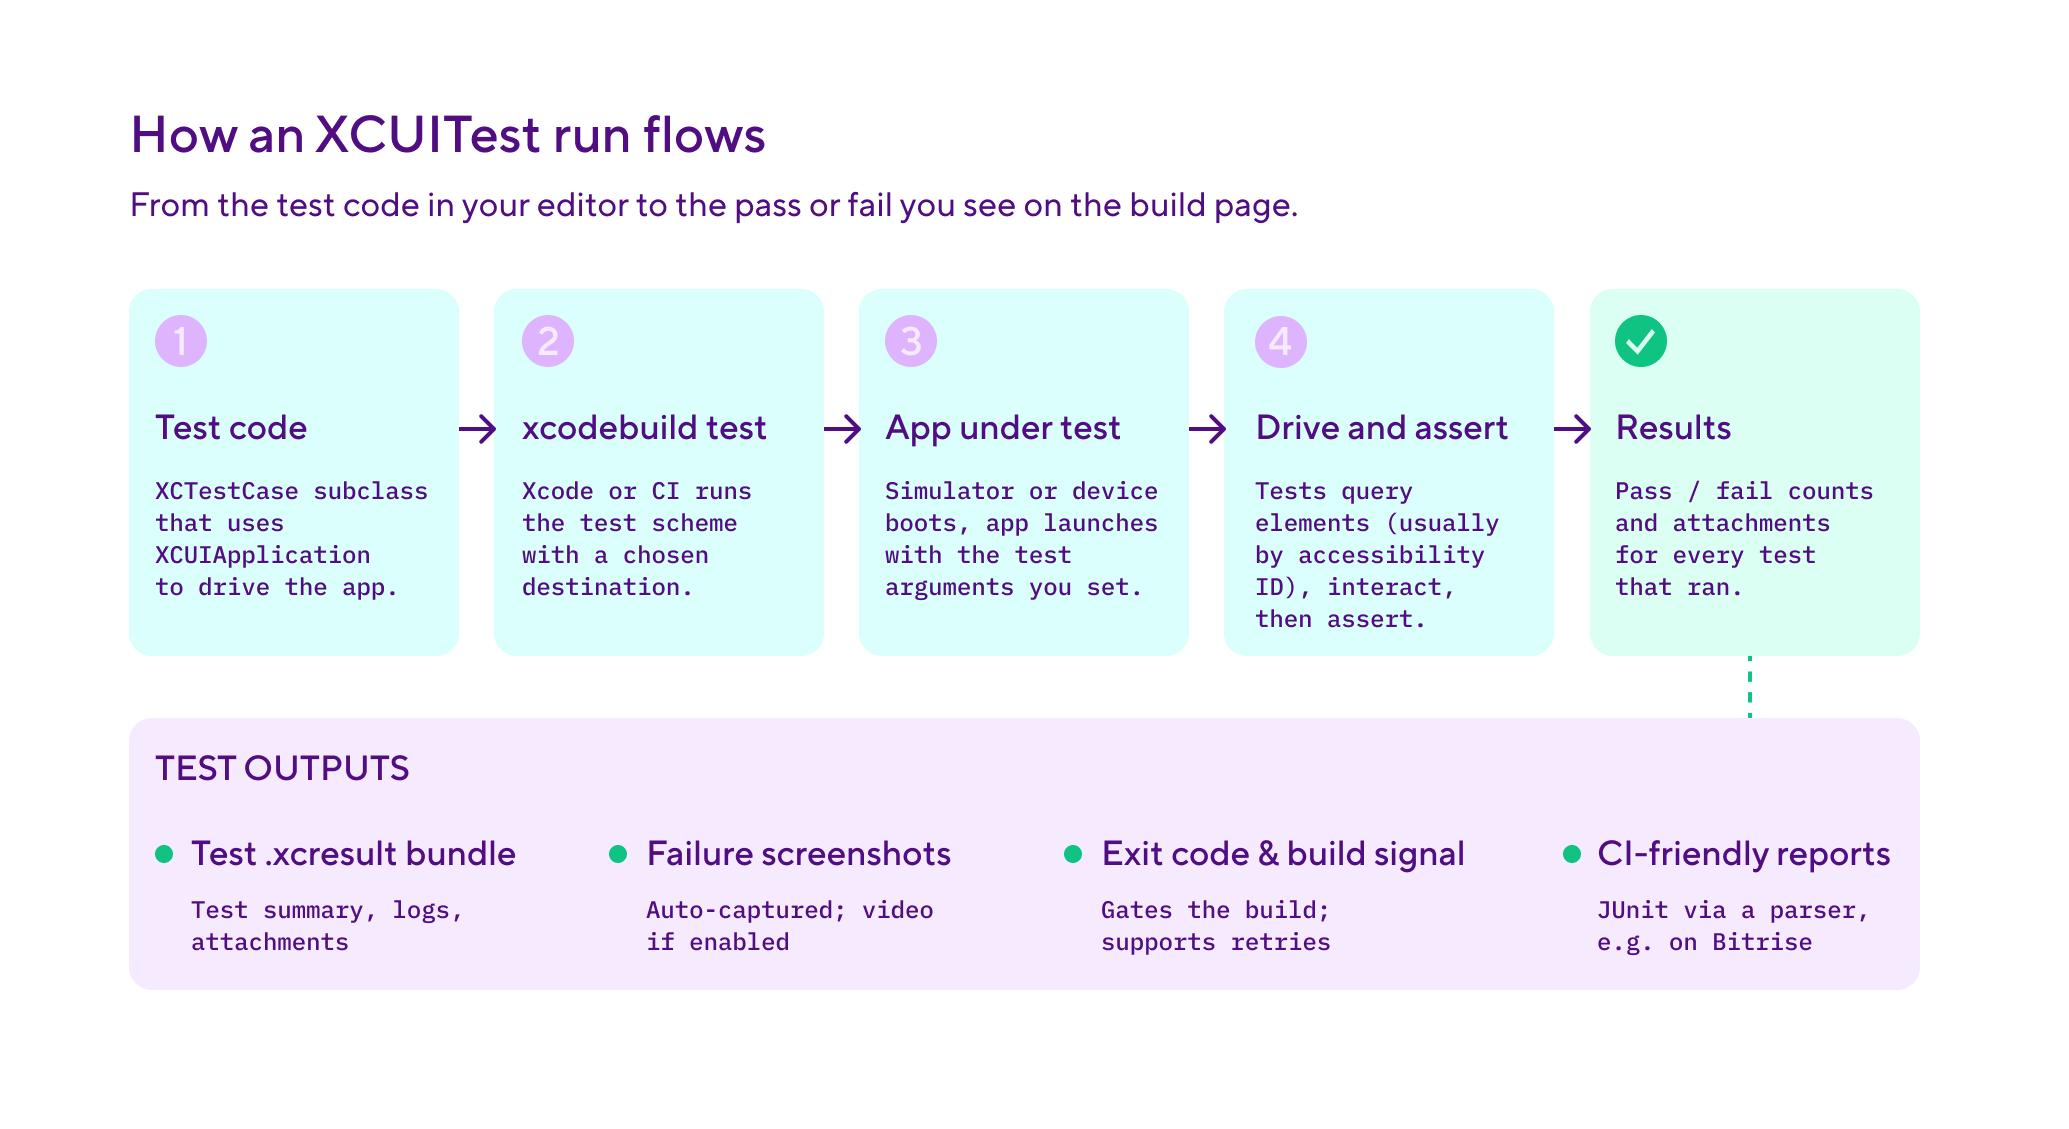
An XCUITest test extends Apple's standard test class (XCTestCase) and uses an XCUIApplication instance to drive the app. The pattern is consistent: launch the app, find the elements you want, perform actions, assert on the result.
A working test using the page object pattern looks like this:
import XCTest

// Page object: encapsulates the login screen so tests describe what
// the user does, not how the framework finds the elements.
class LoginScreen {
    let app: XCUIApplication

    init(app: XCUIApplication) {
        self.app = app
    }

    var emailField: XCUIElement { app.textFields["email"] }
    var passwordField: XCUIElement { app.secureTextFields["password"] }
    var signInButton: XCUIElement { app.buttons["sign_in"] }
    var errorMessage: XCUIElement { app.staticTexts["error_message"] }

    func signIn(email: String, password: String) {
        emailField.tap()
        emailField.typeText(email)
        passwordField.tap()
        passwordField.typeText(password)
        signInButton.tap()
    }
}

class LoginUITests: XCTestCase {
    var app: XCUIApplication!

    override func setUp() {
        super.setUp()
        continueAfterFailure = false
        app = XCUIApplication()
        // Launch arguments tell the app to use mocked network calls
        // so tests don't depend on real backend availability.
        app.launchArguments = ["-uiTestMode"]
        app.launch()
    }

    override func tearDown() {
        app = nil
        super.tearDown()
    }

    func testValidLoginShowsHomeScreen() {
        let login = LoginScreen(app: app)
        login.signIn(email: "[email protected]", password: "password123")

        let homeScreen = app.otherElements["home_screen"]
        XCTAssertTrue(homeScreen.waitForExistence(timeout: 5))
    }

    func testInvalidPasswordShowsError() {
        let login = LoginScreen(app: app)
        login.signIn(email: "[email protected]", password: "wrong")

        // XCTNSPredicateExpectation waits for a condition rather than a
        // fixed time. This is the right pattern when an element appears
        // asynchronously after a network response.
        let exists = NSPredicate(format: "exists == 1")
        let expectation = XCTNSPredicateExpectation(
            predicate: exists,
            object: login.errorMessage
        )
        let result = XCTWaiter().wait(for: [expectation], timeout: 5)
        XCTAssertEqual(result, .completed)
        XCTAssertEqual(login.errorMessage.label, "Incorrect email or password")
    }
}
A few things to note: the LoginScreen page object encapsulates UI details, so tests describe user actions rather than element lookups. setUp() launches a fresh app instance for each test, continueAfterFailure = false stops execution at the first failure, and launchArguments enables a test mode with mocked network calls.
Elements are queried by accessibility identifiers, which stay stable when labels change or get localised. Two patterns handle async UI: waitForExistence(timeout:) for the simple case and XCTNSPredicateExpectation with XCTWaiter for the general case. Both replace sleep(), the most common cause of flaky XCUITest tests.
XCUIElement instances support tap(), doubleTap(), swipeLeft(), swipeUp(), pinch(), rotate(), and typeText() for keyboard input. XCUIElementQuery composes predicates and filters for complex queries.
One critical detail: accessibility identifiers need to be set on the actual UIElements in your app code. In your view controller or SwiftUI code, set .accessibilityIdentifier("email") on your text fields so tests can find them reliably. Without this, tests fall back to querying by label or type, which breaks when UI text changes or is localised.
Xcode's test recorder is the fastest way to write your first XCUITest: click record, perform the actions, and Xcode generates the code. It usually needs cleaning up to use proper accessibility identifiers, but it's a reasonable starting point.
As a default, XCUITest runs on the iOS Simulator, which is fast and inexpensive.
It also runs on connected real devices, which catch hardware-specific issues. CI systems invoke xcodebuild test against the test scheme with the simulator or device as destination.
Why XCUITest matters for iOS development
XCUITest matters because it catches a class of bugs unit tests can't. Unit tests check that a function returns the right value whereas XCUITest checks that a user can actually use the app:
Layout regressions - A change to a constraint or a content size category can break a layout in subtle ways unit tests don't see. XCUITest asserts on what's actually visible on screen.
Accessibility regressions - XCUITest uses the same accessibility APIs as VoiceOver and other assistive technologies. If a UI element loses its accessibility label, an XCUITest written against it fails. Writing XCUITest tests is a useful side effect: it keeps accessibility healthy.
Critical user flows - Sign-in, sign-up, payment, the main feature loop. These flows must work, and they're where the cost of a regression is highest. XCUITest gives you automated coverage on flows that would otherwise rely on manual QA, or no testing at all.
Submission and refactoring confidence - App Store Review tests the binary you submit, and a broken critical flow can cost you several days of release delay. A strong XCUITest suite also lets you refactor view controllers and view models aggressively, because the tests verify the user-visible behaviour stays intact.
XCUITest best practices
Flaky XCUITest tests erode trust fast The practices below help to keep them reliable and useful:
Use accessibility identifiers, not labels - Querying elements by app.buttons["sign_in"] is reliable because the identifier doesn't change when the visible label is localised. Querying by app.buttons["Sign in"] breaks the moment the app is translated. Any element a test interacts with should have accessibility identifiers specified explicitly in the code or Interface Builder.
Wait on conditions, not on time - Replace sleep(2) with waitForExistence(timeout:) or XCTNSPredicateExpectation. Time-based waits are the leading cause of flaky XCUITest tests because simulator and CI timing varies. For modern codebases, XCTWaiter().fulfillment(of:timeout:) works with Swift async/await.
Adopt the page object pattern -Encapsulate each screen in a dedicated class that exposes named queries and actions. Tests describe what the user does (loginScreen.signIn(email: ..., password: ...)) rather than how the framework finds elements. When the UI changes, the page object updates, but the test code stays the same.
Control state and external dependencies -Use setUp() to launch a fresh app instance every test, and pass launch arguments to put the app into a deterministic test mode: logged in as a test user, with seeded data, with mocked network and payment clients. State leaks and real network calls are the second- and third-most-common causes of flakiness after timing.
Shard tests across simulators - A 30-minute XCUITest suite running serially can become an 8-10 minute suite running across four parallel simulators. Xcode supports test sharding natively through xcodebuild, and most CI platforms expose this as a configurable option.
Quarantine flakes aggressively - A flaky XCUITest erodes the team's trust in the suite faster than no test does. Detect flakes automatically, move them out of the main pipeline, and fix them as a priority. The full discipline is in our flaky tests guide.
XCUITest vs other iOS testing frameworks
XCUITest is the common standard, but it's not the only option. iOS teams often layer XCUITest with other frameworks for specific use cases.
For most teams, XCUITest plus XCTest covers everything. Swift Testing is becoming the modern default for new unit tests in iOS 18 / Xcode 16 codebases, but XCUITest remains the standard for UI testing because Apple hasn't released a Swift Testing equivalent for UI yet.
The choice between XCUITest and Appium often comes down to whether your team is iOS-only or cross-platform. iOS-only teams almost always pick XCUITest because the integration with Xcode and the simulator is tighter. Teams that need to run the same test logic on iOS and Android sometimes pick Appium for the consistency, accepting that the framework is less iOS-native than XCUITest.
One limitation: XCUITest only works for native iOS, iPadOS, and macOS apps. It can't drive React Native, Flutter, or other cross-platform UI frameworks directly. React Native apps can use XCUITest against the rendered iOS UI but lose visibility into the JavaScript side.
Flutter apps need Flutter's integration_test framework or a third-party tool like Patrol. If your codebase is cross-platform, you should factor this in early on.
How Bitrise handles XCUITest
Bitrise is a CI/CD platform built specifically for mobile teams. Running XCUITest at scale needs Apple Silicon machines for fast simulator launches, Xcode version management, simulator caching, parallel test execution, and pull request integration. Bitrise covers all of these out of the box.
The Xcode Test for iOS Step runs XCUITest suites against the iOS Simulator and posts results to pull requests as comments. The Step accepts inputs for the scheme, destination, and test plan, and outputs structured test results that the Tests tab surfaces alongside screenshots and videos. When a test fails, the engineer gets the failure message, the screen state at failure, and a video of the run, all without leaving the build page. The Running unit and UI tests for iOS apps docs page covers the full Step configuration, test plans, and the destination input.
For real-device testing, Bitrise offers the iOS Device Testing Step, which runs tests on real devices hosted by Google's Firebase Test Lab. Most teams use a tiered approach: most XCUITest tests run on simulators for speed, with a critical subset running against real devices on a less frequent cadence.
Test sharding through xcodebuild is supported natively, so a 30-minute XCUITest suite splits across four parallel simulators down to 8-10 minutes. Build environments run on managed Apple Silicon (M2 Pro and M4 Pro) with same-day Xcode updates, and SPM and CocoaPods caching cuts setup time before tests start.
Flaky test detection in Bitrise Insights highlights XCUITest cases that pass and fail inconsistently across runs of the same commit.
With the Bottlenecks view, you can see which tests are unreliable, inefficient, or flaky all in one place. This is particularly helpful for XCUITest, where flakiness is easy to miss.See our flaky tests guide for more.
If you're running mobile CI/CD, the mobile CI/CD guide covers the full pipeline context. For how XCUITest fits into the broader testing practice, see the continuous testing guide.
See what Bitrise can do for you
Confidently build, test, and ship high-quality mobile apps with Bitrise.
Frequently Asked Questions
What's the difference between XCUITest and XCTest?
XCTest is the umbrella testing framework that ships with Xcode. It covers unit testing, integration testing, performance testing, and UI testing. XCUITest is the UI testing portion specifically, accessed through the XCUIApplication and XCUIElement APIs. Both are part of the same framework, but XCUITest tests run in a separate test target from unit tests because they need to launch the app as a whole rather than testing functions in isolation.
Should I use XCUITest or Swift Testing?
They solve different problems. Swift Testing is Apple's modern unit testing framework, introduced with Xcode 16, focused on cleaner syntax with macros and better async support. XCUITest is for UI testing. Use Swift Testing for unit and integration tests in new code, use XCUITest for UI tests. They coexist in the same project. There's no equivalent of Swift Testing for UI testing yet, so XCUITest remains the standard for that.
How do I make XCUITest faster?
Three levers. First, use parallel testing through xcodebuild to run tests across multiple simulators at once. Second, use launch arguments to skip slow setup steps in the app (sign-in flows, animations, network calls) when running under test. Third, mock external dependencies so tests don't wait on real network round-trips. Combined, these three usually take a 30-minute suite down to 8-10 minutes.
Can I run XCUITest tests on real iOS devices?
Yes. XCUITest works against any iOS device that's connected to the build machine and provisioned for development or testing. Most CI platforms also support running XCUITest against hosted real-device farms (Bitrise, Firebase Test Lab via Bitrise integration, AWS Device Farm). Real-device testing catches hardware-specific issues simulators miss but is slower and more expensive, so most teams run a tiered approach: simulator for breadth, real devices for critical flows.
Can I run XCUITest tests in parallel?
Yes. xcodebuild supports parallel test execution natively, either by running tests across multiple iOS Simulator clones on the same machine or by sharding test bundles across machines. Combined, parallel execution and sharding take a 30-minute suite to 8-10 minutes on a four-way split. On Bitrise, the Xcode Test for iOS Step exposes parallelisation as configurable inputs, so you don't have to wire it up by hand.