Sometimes teams avoid introducing more tests (particularly UI tests) because they fear slowing down their CI pipeline. Should you have to sacrifice software quality for the sake of fast cycle times? Absolutely not.
So, how can you introduce more tests without slowing down your CI pipeline? The answer: employ test sharding.
In this post, we’ll dive into what test sharding is and why you should consider it. You’ll also get step-by-step instructions for how you can reduce your build times by up to 50% using Bitrise’s out of the box sharding features – and how you can enable this in just a few clicks.
What is test sharding?
Test sharding is the process of dividing a large suite of automated tests into smaller pieces (shards), which can be executed in parallel on different runners. This significantly reduces the time it takes to provide developers with feedback on their changes, allowing them to maintain focus and iterate fast.
When should I consider sharding my tests?
If developers are spending too much time waiting for pull request (PR) CI pipelines to complete – it’s time! PR pipelines are the most time-sensitive pipelines in a business so most teams start by optimizing these. You can of course introduce sharding into your other pipelines e.g. overnight checks, too – identifying issues ASAP is always good.
What kind of tests should I shard?
UI tests, especially end-to-end tests that simulate user interactions, can be time-consuming so many teams begin by sharding these. Unit tests usually run fairly quickly and it’s less common to shard these, but teams working with very large projects often end up sharding their unit tests as well.
How much time will test sharding save?
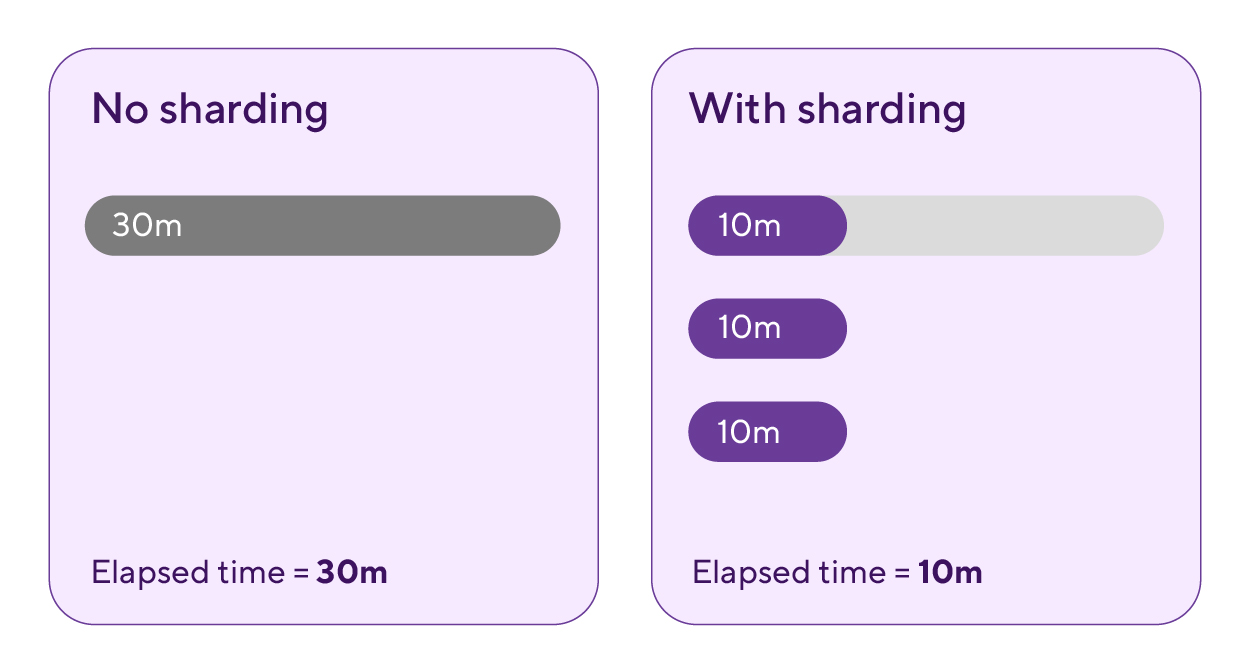
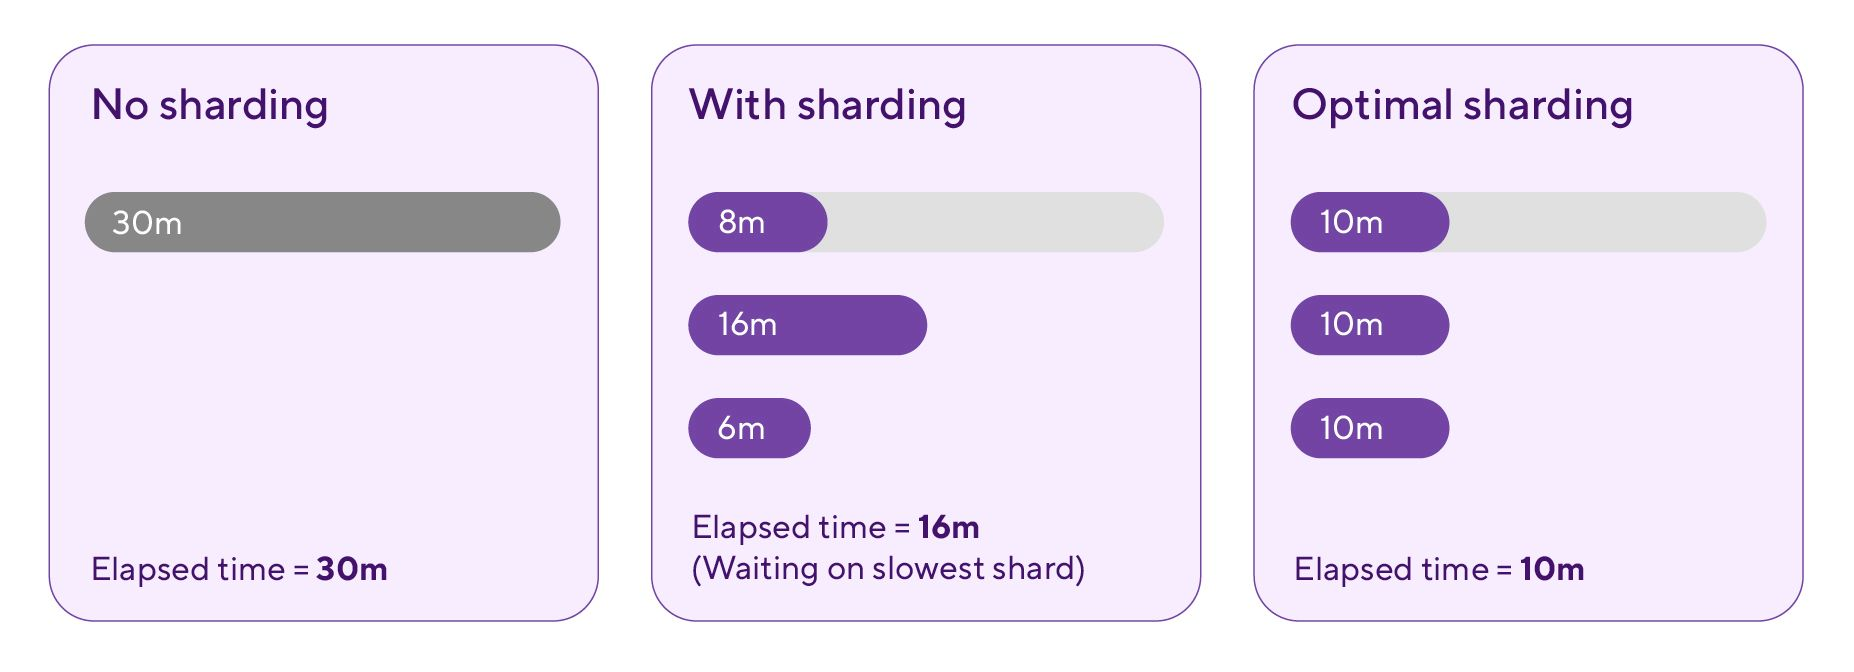
The answer to this depends on how well you are able to optimize the split. Let’s go back to our 30 minute long un-sharded test suite (first diagram). Imagine it contains 300 tests and you choose to split them randomly into 3 shards of 100 tests each. As each test has a different execution time you might end up with what you see in the second diagram: 3 shards of differing length. The wall clock time is less than the original 30 minutes but it’s somewhat more than the optimal split, shown in the final diagram (below).
The trick is to arrange your tests in a way which means each shard has the same duration, which might mean having different numbers of tests in each shard.
How can I get the optimal split?
This is the $64,000 question! Many of our customers at Bitrise have developed their own logic for calculating this by monitoring the execution time of their tests over time and calculating the best split every time tests are run. However, this requires a lot of effort to set up and maintain. What if you don’t have the bandwidth for this?
No problem, we’ve got you covered. Bitrise provides easy to use test sharding optimization features out of the box.
How does Bitrise help with sharding?
Bitrise can help you in a variety of ways depending on your project type and whether you want Bitrise to provide the the sharding optimization calculation.
Let’s walk through how to set up test sharding on Bitrise in three different scenarios:
Scenario 1: You already have your own test shard calculation (works for any project type)
Many customers already have a means to calculate the optimal test split, usually achieved by processing historic data from the test framework they use for executing tests e.g. Jest. If you’re in this camp, you can set up test sharding in just a couple of clicks using Bitrise’s Parallelism feature.
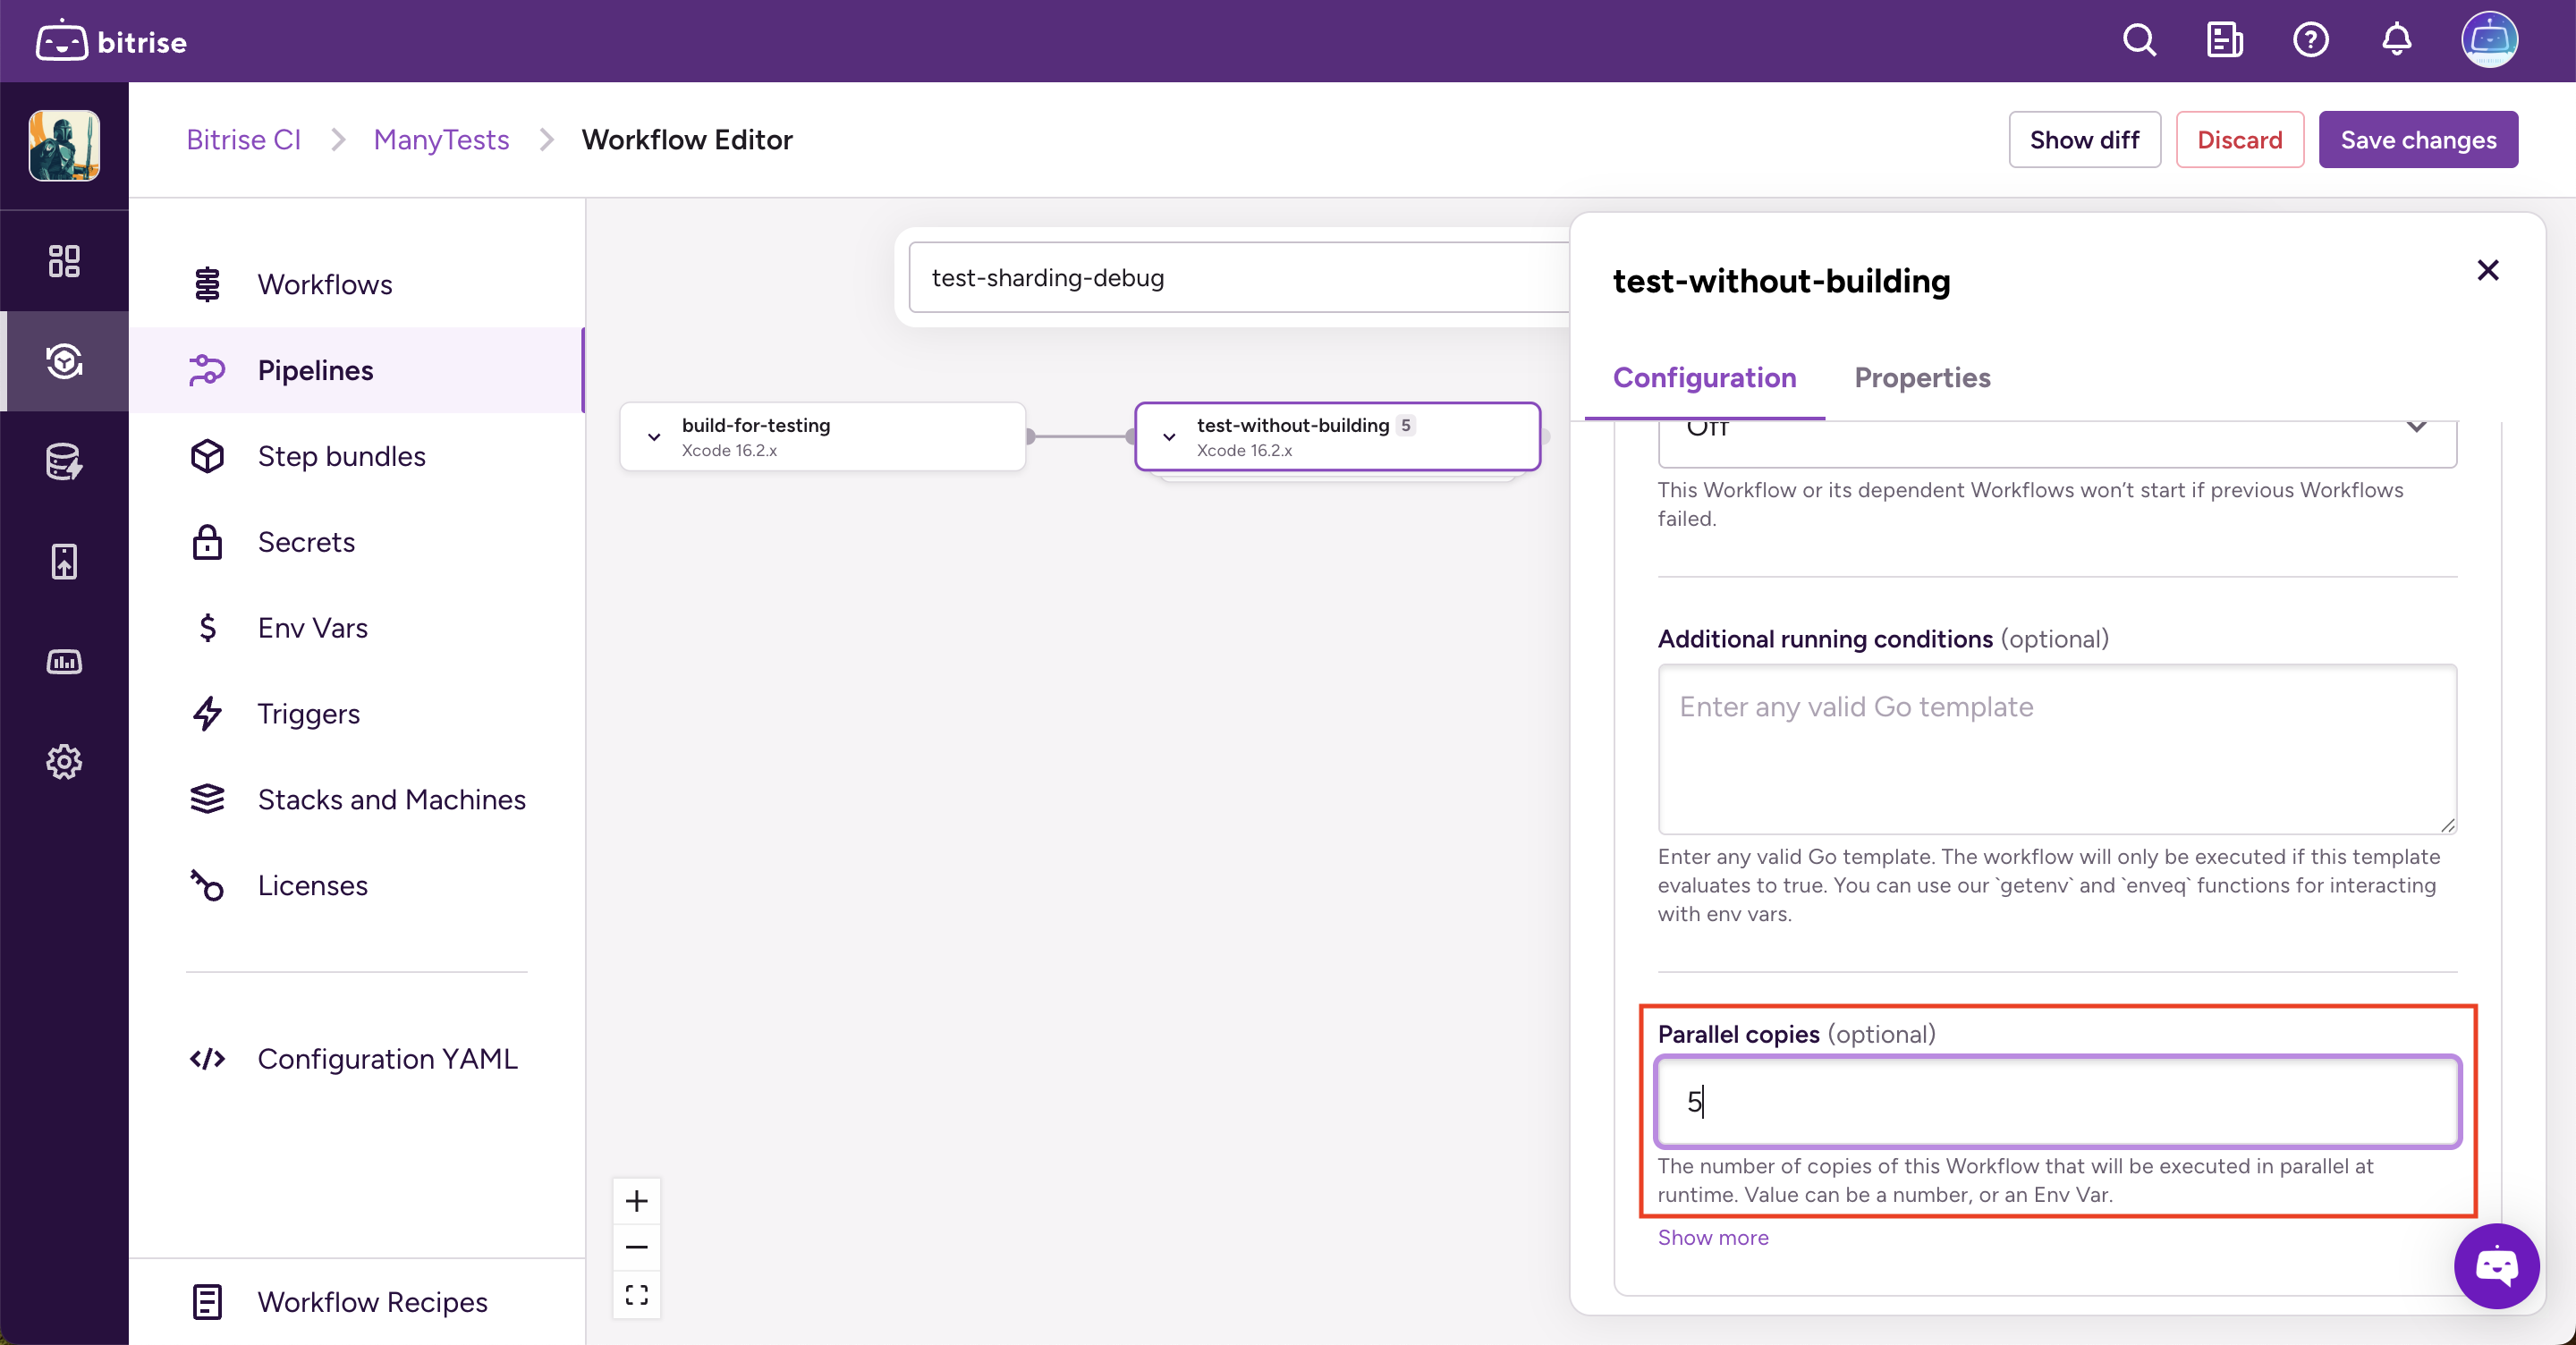
Simply find the workflow which executes your tests in the Pipelines section of the Workflow Editor (in the screenshot below it’s called test-without-building), click on the gear icon in the little box and open up the Pipeline Conditions. There’s a field in there called Parallel Copies. Putting a number in here will cause n copies (n=5 in this case) of the test-without-building workflow to spawn at runtime, each one running in parallel on its own VM.
If you prefer to define your pipeline in YAML, use the parallel configuration:
1...
2workflows:
3  test-without-building:
4    depends_on: [build-for-testing]
5    parallel: 5
6...
When this pipeline is triggered, 5 copies of run-tests will execute in parallel on separate VMs (named run-tests_0, run-tests_1 and so on). This is how it appears in the build page:
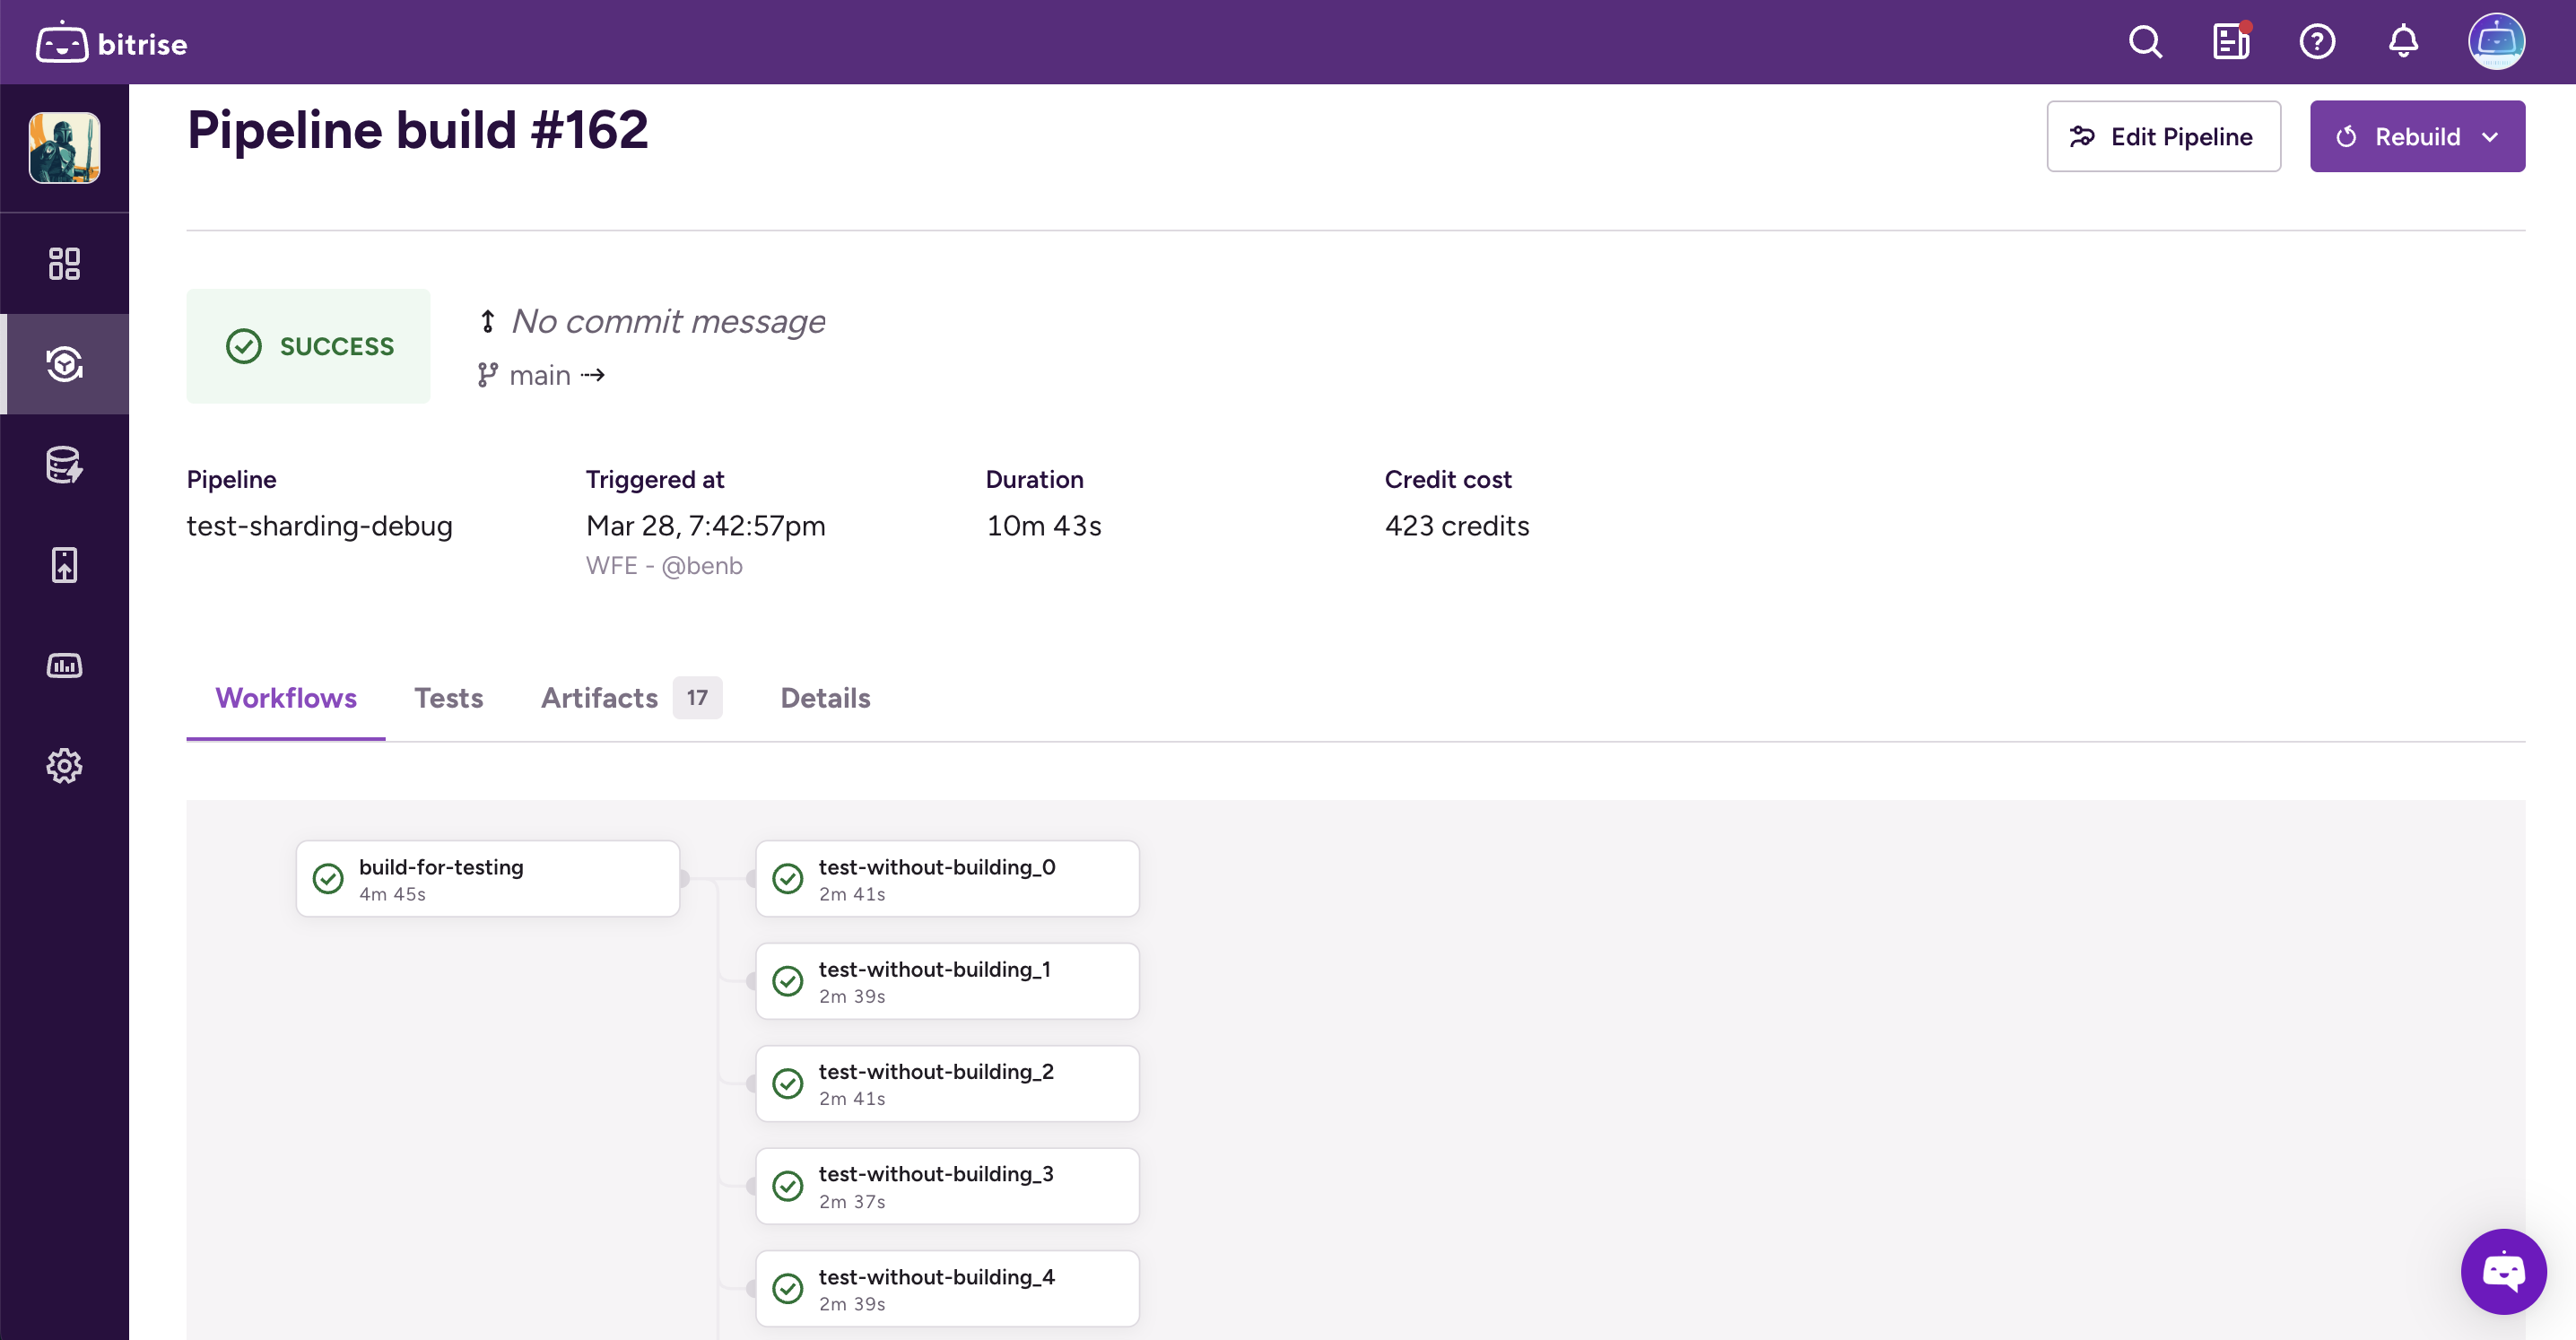
Each copy will receive two new environment variables:
$BITRISE_IO_PARALLEL_INDEX: a zero based index for each workflow (in this example it will run from 0 to 4)$BITRISE_IO_PARALLEL_TOTAL: for this pipeline it will be 5 for every copy
How does this make use of your awesome test sharding calculation? Well, you can leverage these environment variables to run test sharding using the appropriate syntax for your test framework. For example, with Jest:
1jest --shard=$((BITRISE_IO_PARALLEL_INDEX + 1))/$BITRISE_IO_PARALLEL_TOTALOr with yarn it might look like this:
1yarn test --ci --silent --shard=$((BITRISE_IO_PARALLEL_INDEX + 1))/$BITRISE_IO_PARALLEL_TOTALScenario 2: Xcode project: Bitrise calculates the split
If you don’t have the time and resources to maintain your own test sharding optimization for your Xcode project, don’t worry! You can simply use the Parallelism feature with our new Xcode Test Shard Calculation step.
If you follow the steps below, within a few clicks you’ll have a pipeline which automatically shards your Xcode tests based on an optimization algorithm provided by Bitrise, without you needing to do anything at all to your Xcode project.
Note: this example assumes that you already have a setup where you build your app once and use the shared test bundle for test execution. If you want to know how to achieve this, check out this workflow recipe.
Here’s how to set up your Xcode project pipeline to include test sharding based on Bitrise’s algorithm:
- Go to the Env Vars menu option in the Workflow Editor and create a new environment variable called something like
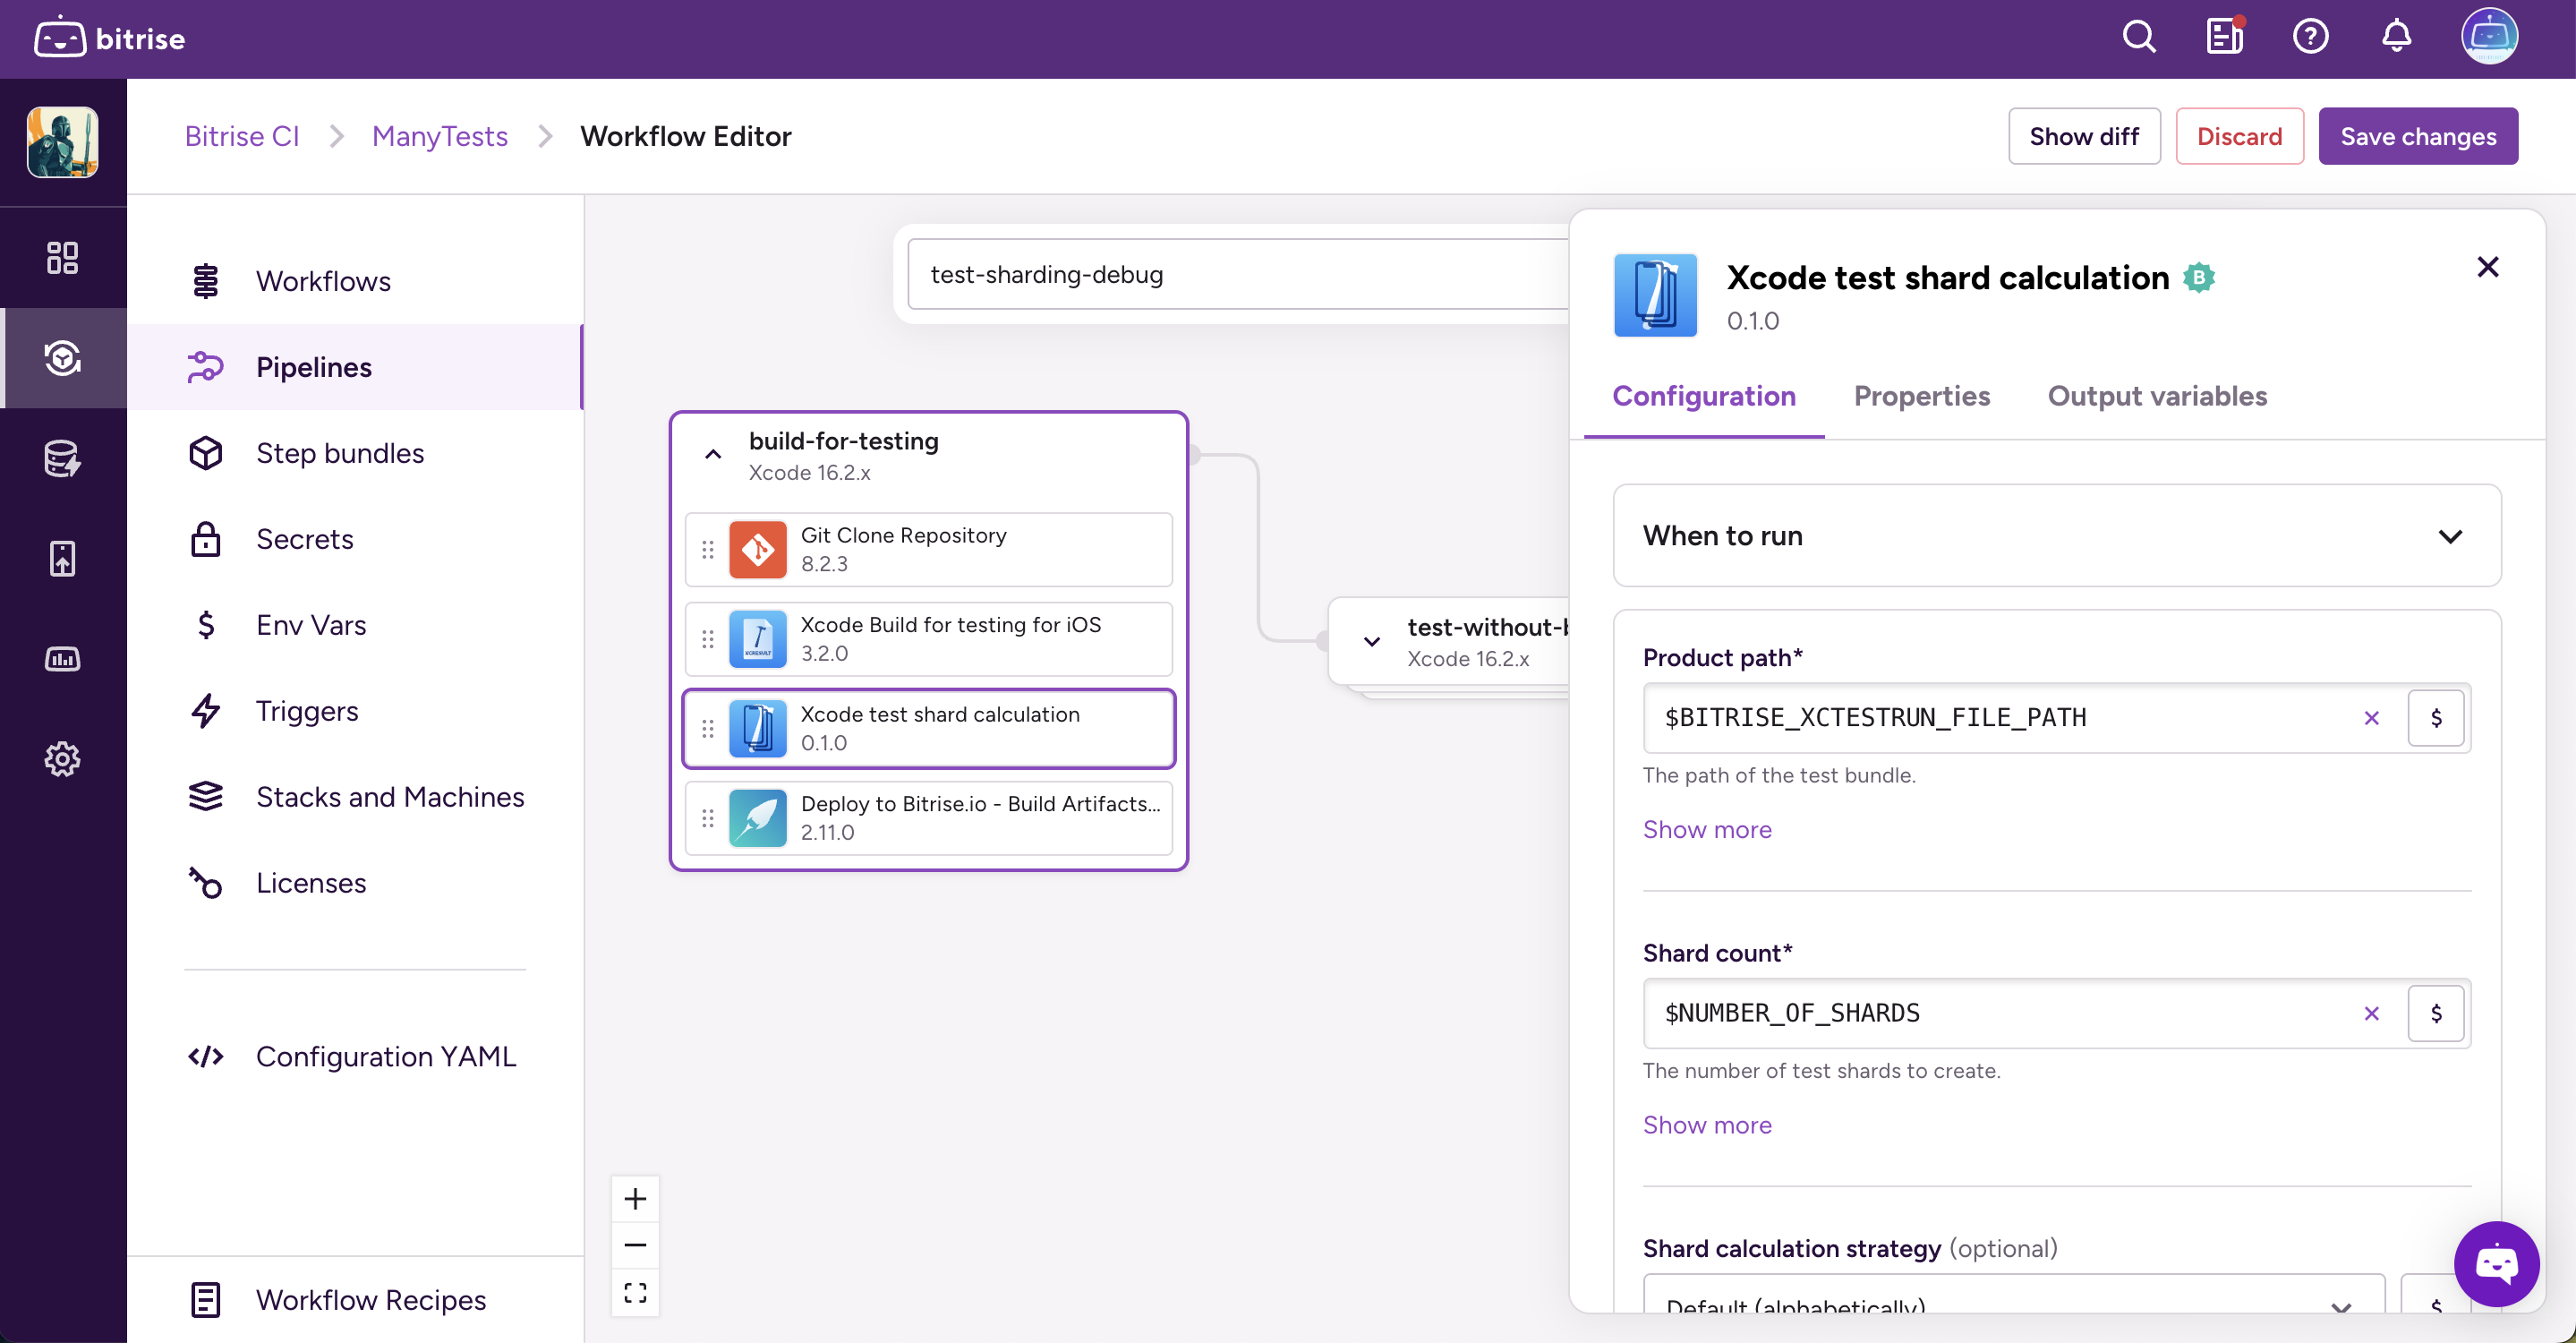
$NUMBER_OF_SHARDS. Assign a value to this env var - Switch to the Pipeline menu option in the Workflow Editor left nav and add the Xcode Test Shard Calculation step to the workflow that builds your Xcode app
- Click on the step to open up its configuration options
- Fill in the Product Path parameter with the path to your xctestrun file, then add your new environment variable to the Shard Count field, like so:
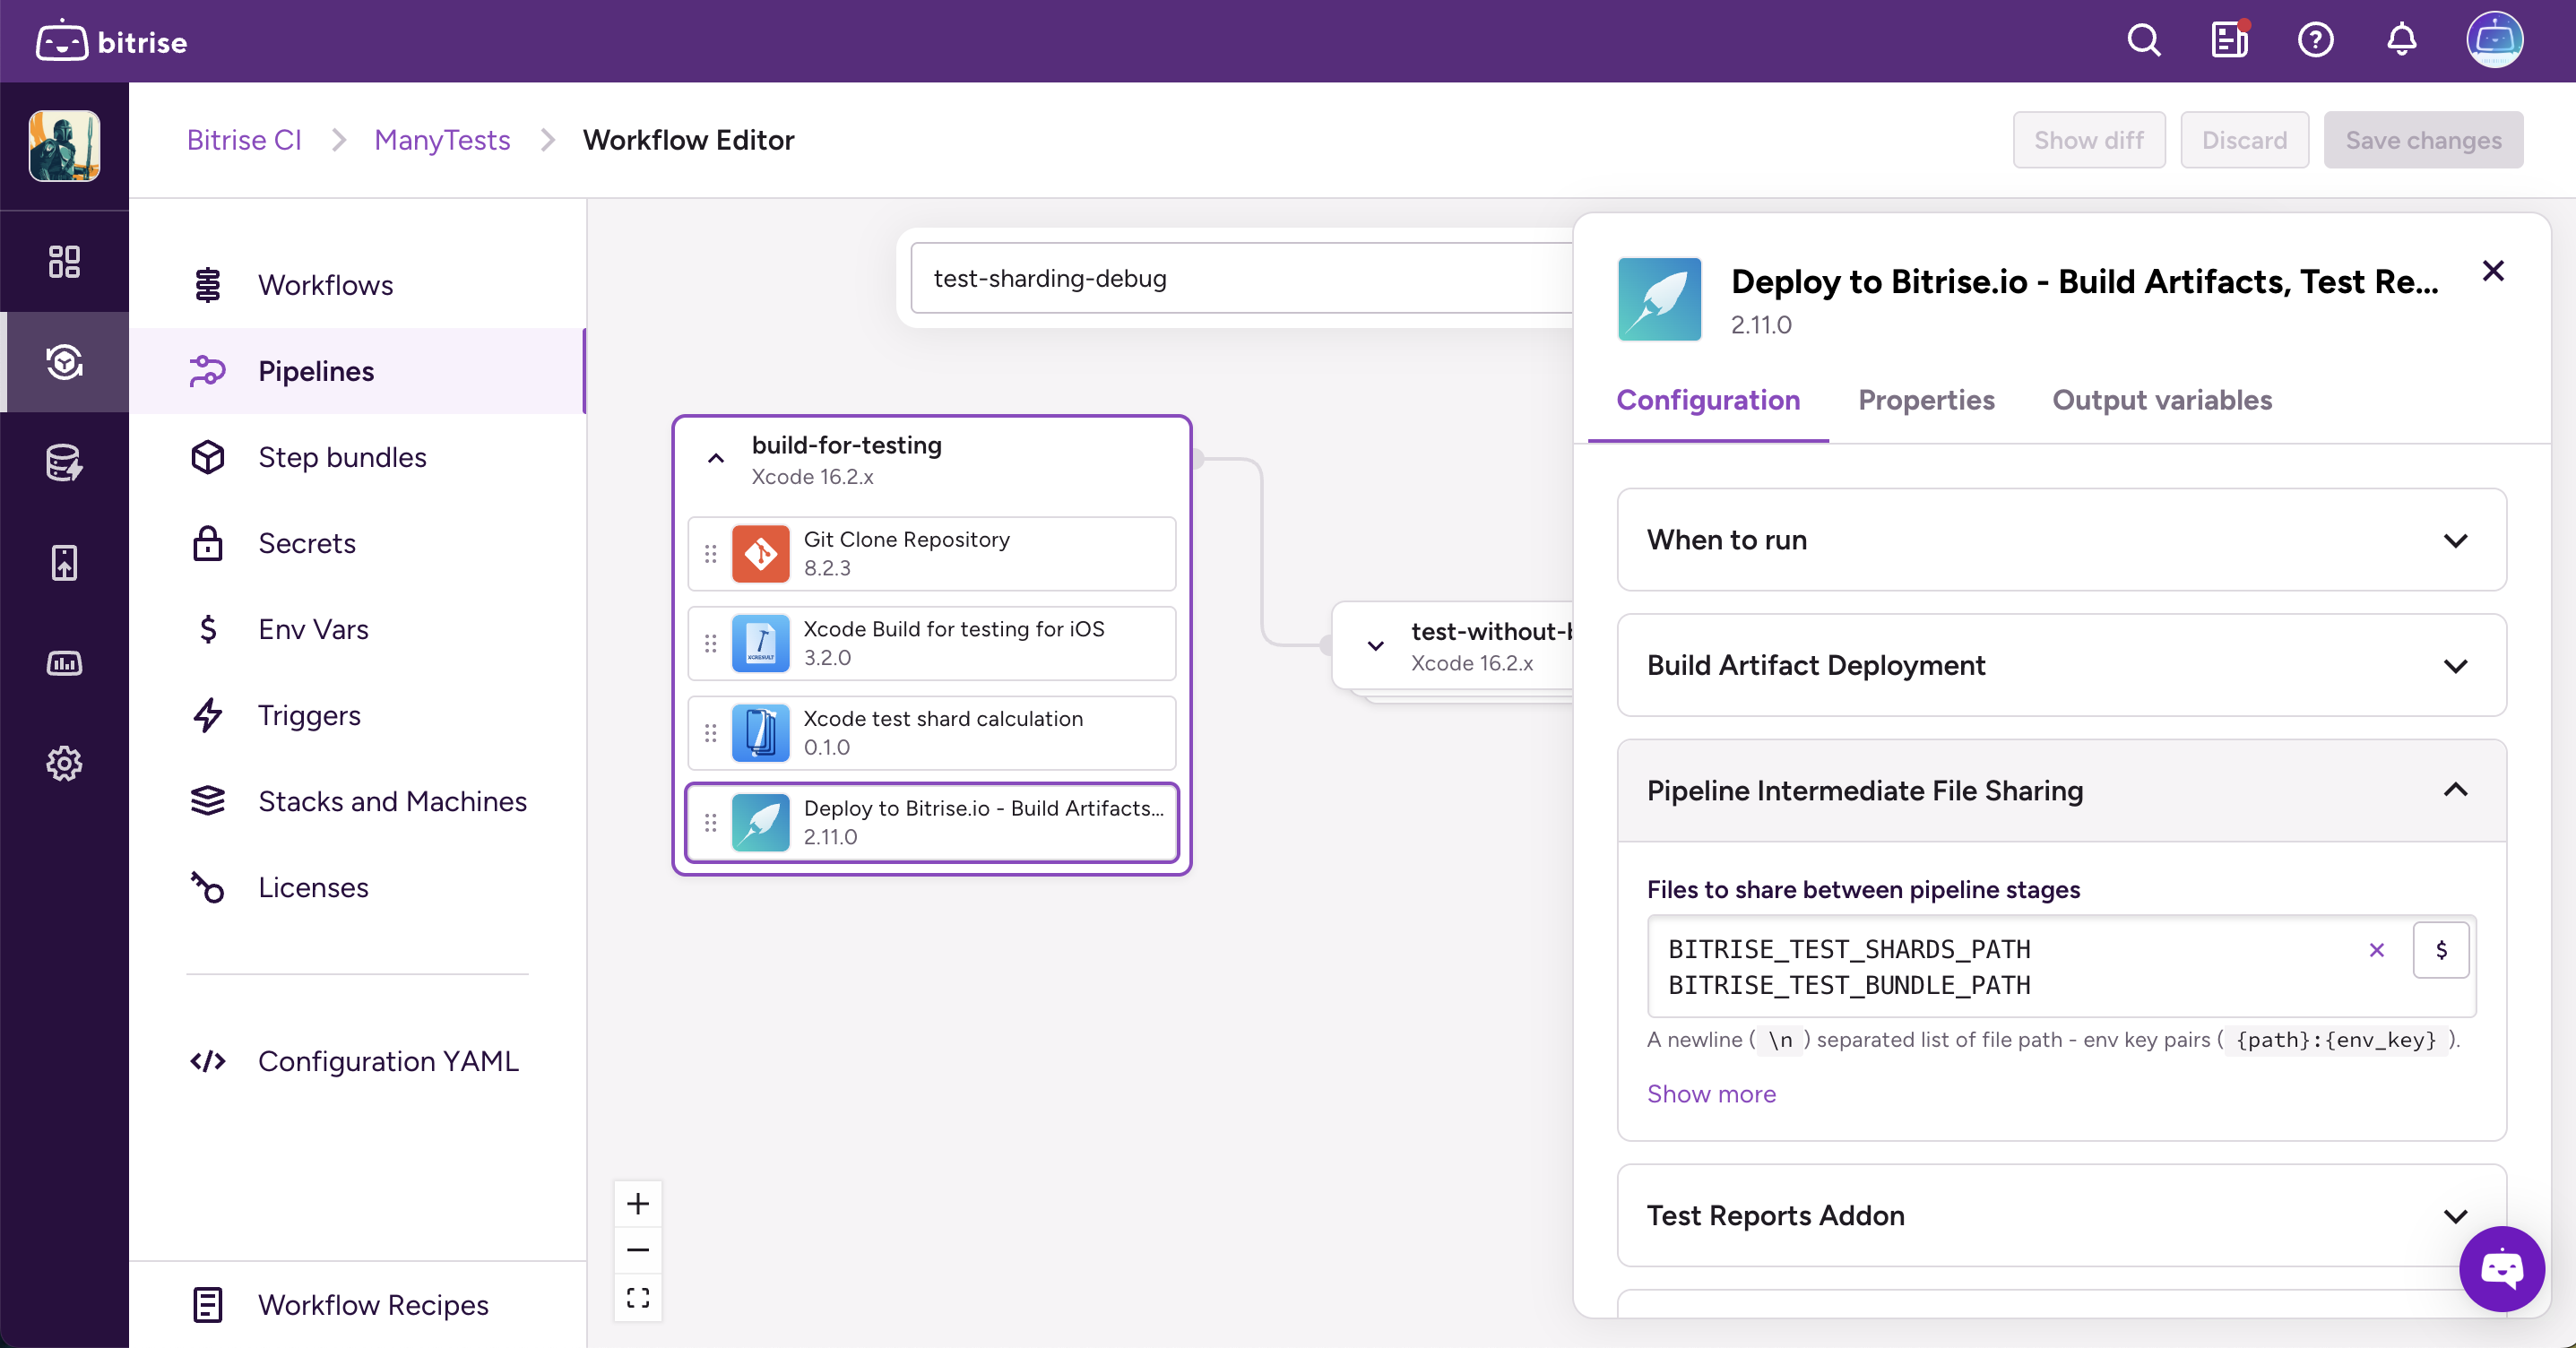
- Once the shards are calculated the rest of the pipeline workflows also need to know about it. This is achieved by sharing the shard calculation step via the Deploy To Bitrise.io step. Click on the Deploy workflow and enter the system env vars
BITRISE_TEST_SHARDS_PATHandBITRISE_TEST_BUNDLE_PATHin the Files to Share Between Pipeline Stages field as shown:
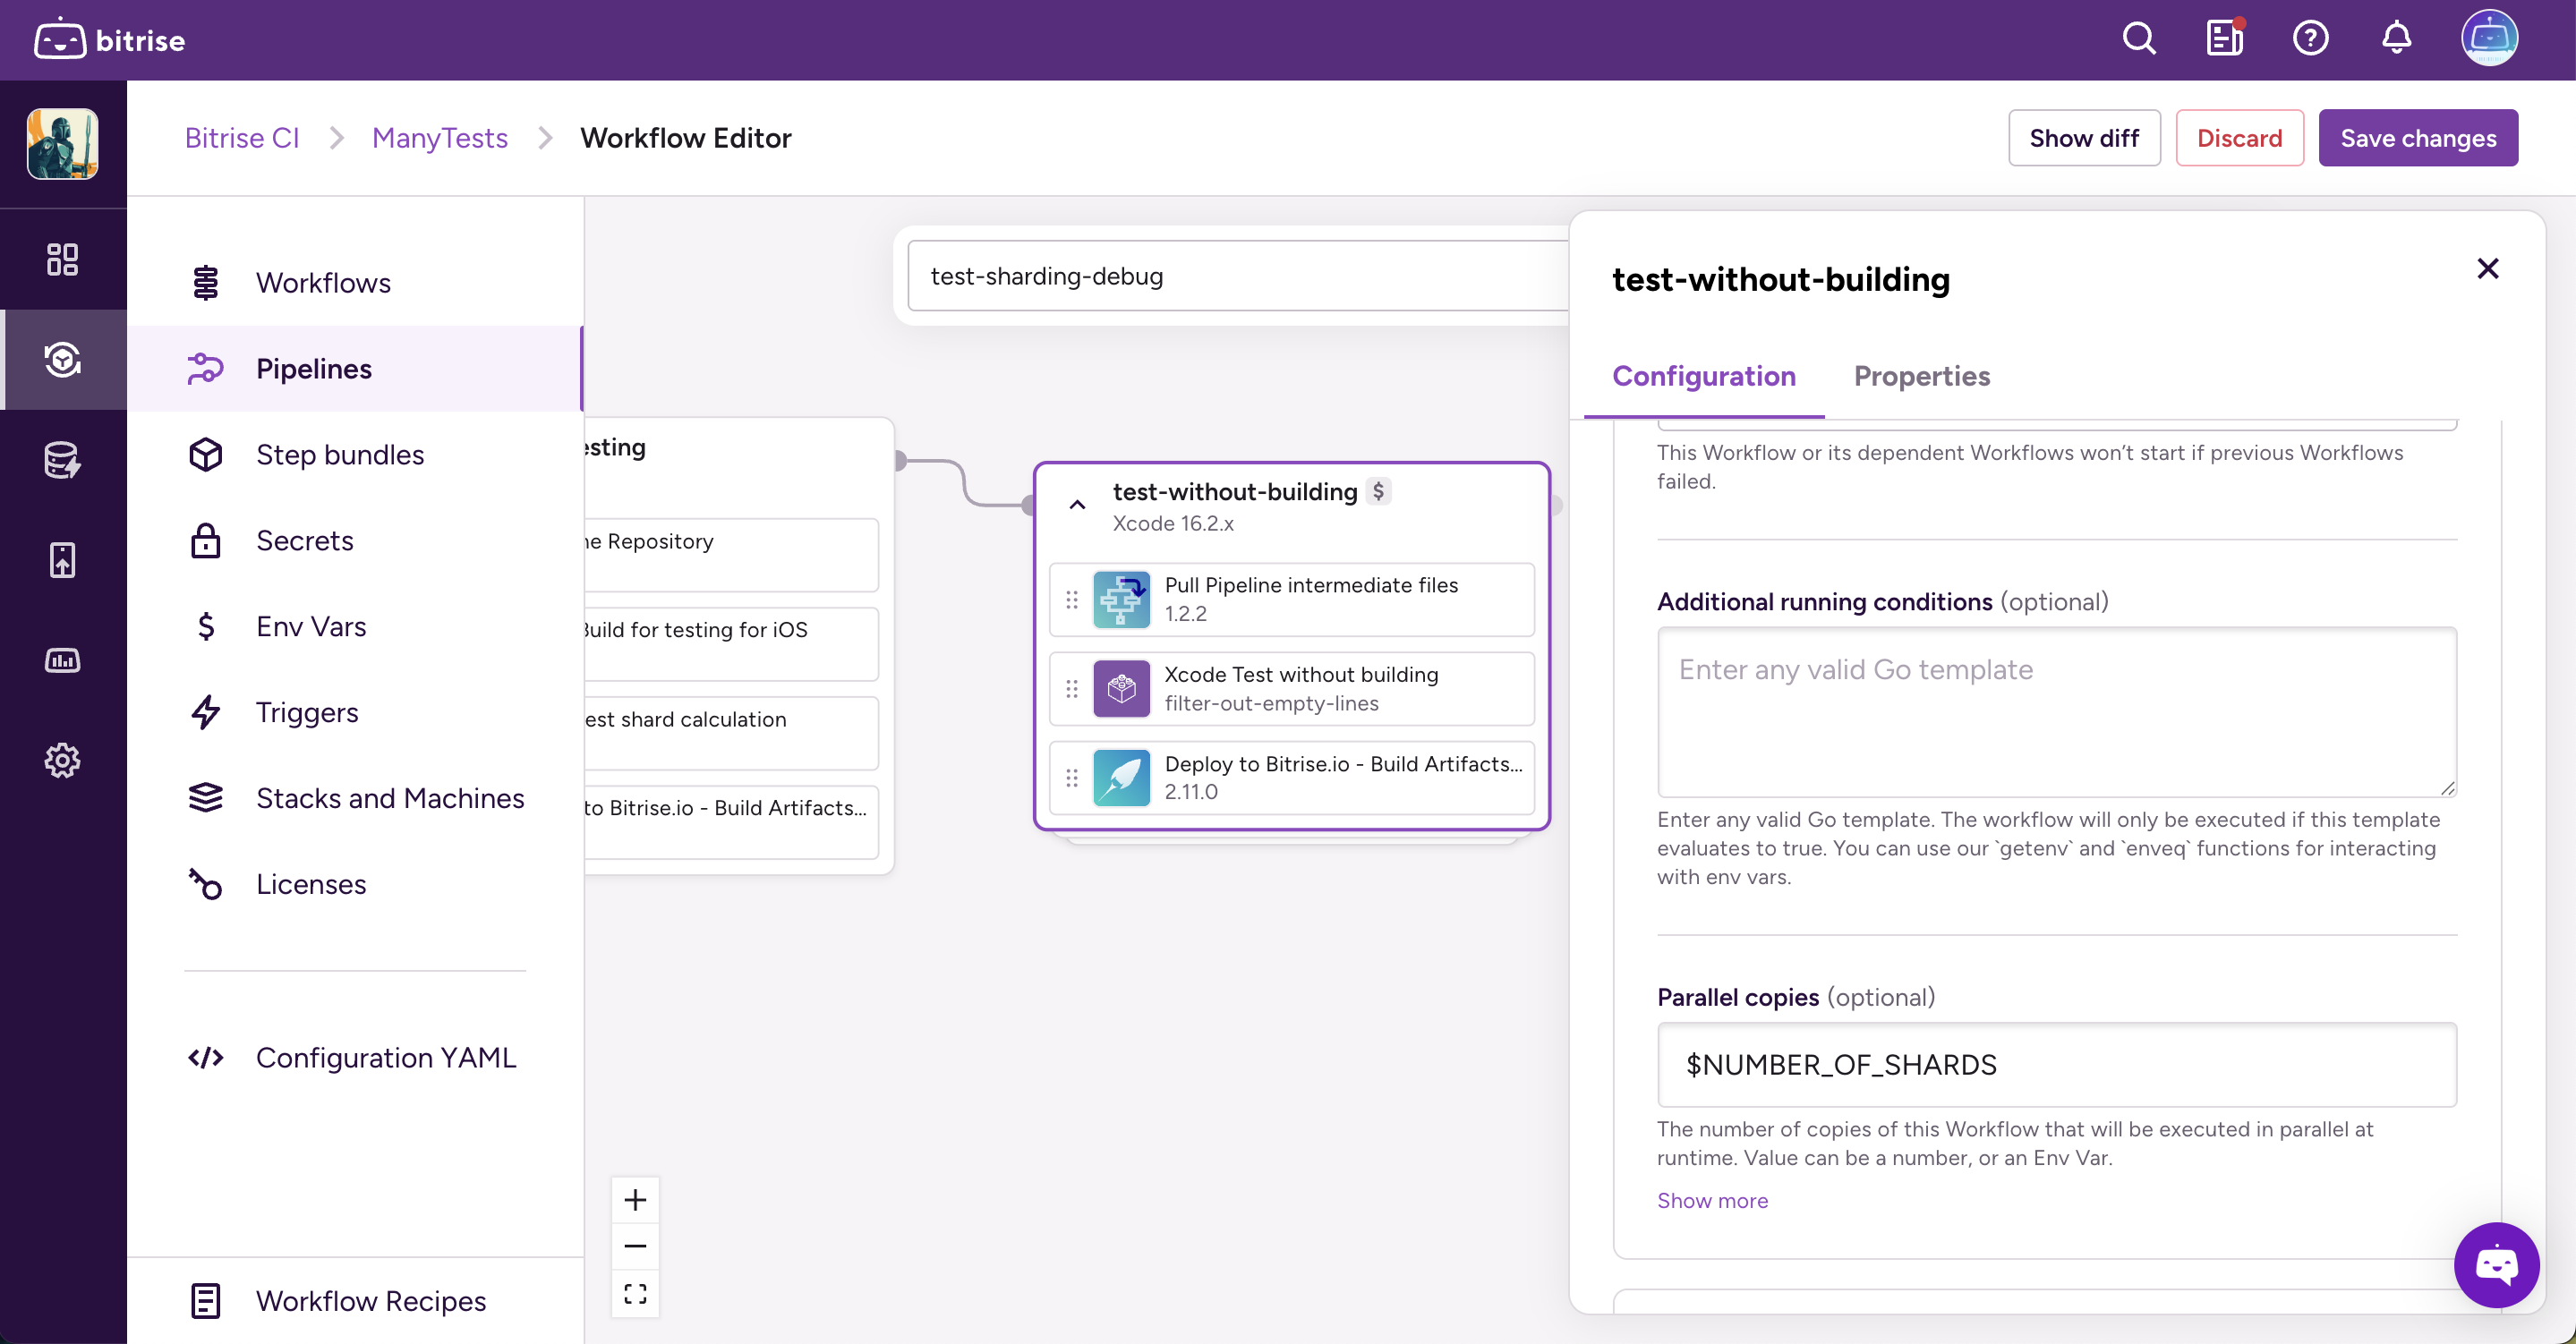
- On the pipeline canvas, click the gear icon the workflow that does the testing (in this example it’s called
test-without-building), open the Pipeline Conditions section and add your new environment variable to the Parallel Copies field (see below)
That’s it! You just set up test sharding for your project without building and maintaining your own shard optimization calculation.
If you prefer, the full CI config is available at the bottom of this post.
What else do I need to know?
There are a couple of important parts which make test sharding work.
Xcode bonus: Built-in protection from flaky tests
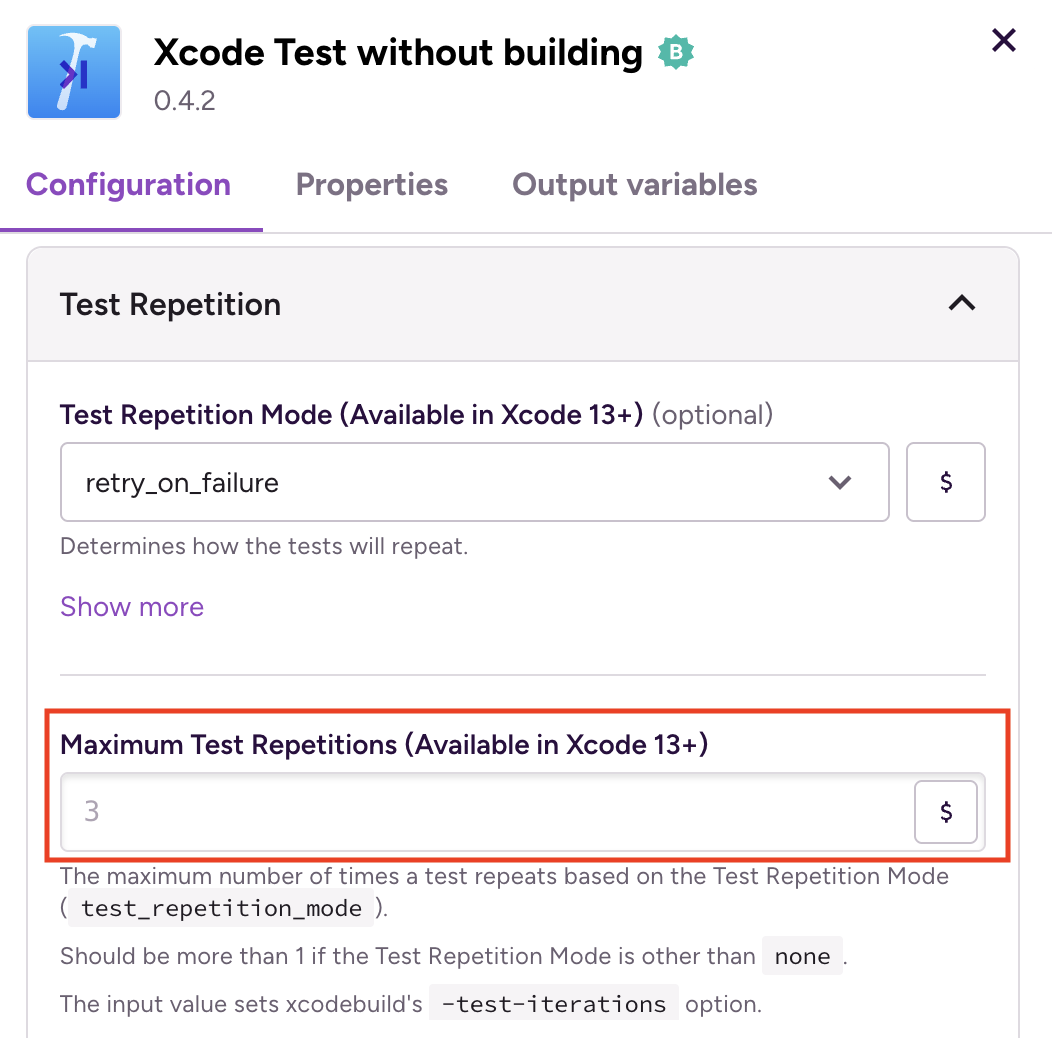
The Xcode Test without building step minimises the impact of flaky tests as it contains a built-in retry parameter, which retries failed tests a specified number of times. Just set the Test Repetition Mode to something other than none and set a maximum test repetitions number:
Xcode bonus: If you already calculate the optimal split for your Xcode project
If you have an existing way of calculating the test shards you can now use our iOS Xcode Test Without Building step to run your test shard, like so:
1- xcode-test-without-building@0:
2    inputs:
3    - only_testing: |-
4        TestTarget/TestClass/testFunction1
5        TestTarget/TestClass/testFunction2
6        TestTarget/TestClass/testFunction3
7        TestTarget/TestClass/testFunction4
The step’s only_testing input accepts a newline separated test identifier list. In this case it will only execute the tests which appear in this list.
If your list is long then you can write this list into a file and just put the file path into the input field:
1- xcode-test-without-building@0:
2    inputs:
3    - only_testing: /path/to/shard/file
Scenario 3: Android project with UI tests: Gradle calculates the split
The good news here is that Gradle provides a test sharding calculation out of the box. If you want to set up test sharding for your Android project and don’t have the bandwidth to build your own calculation, you can get up and running in minutes:
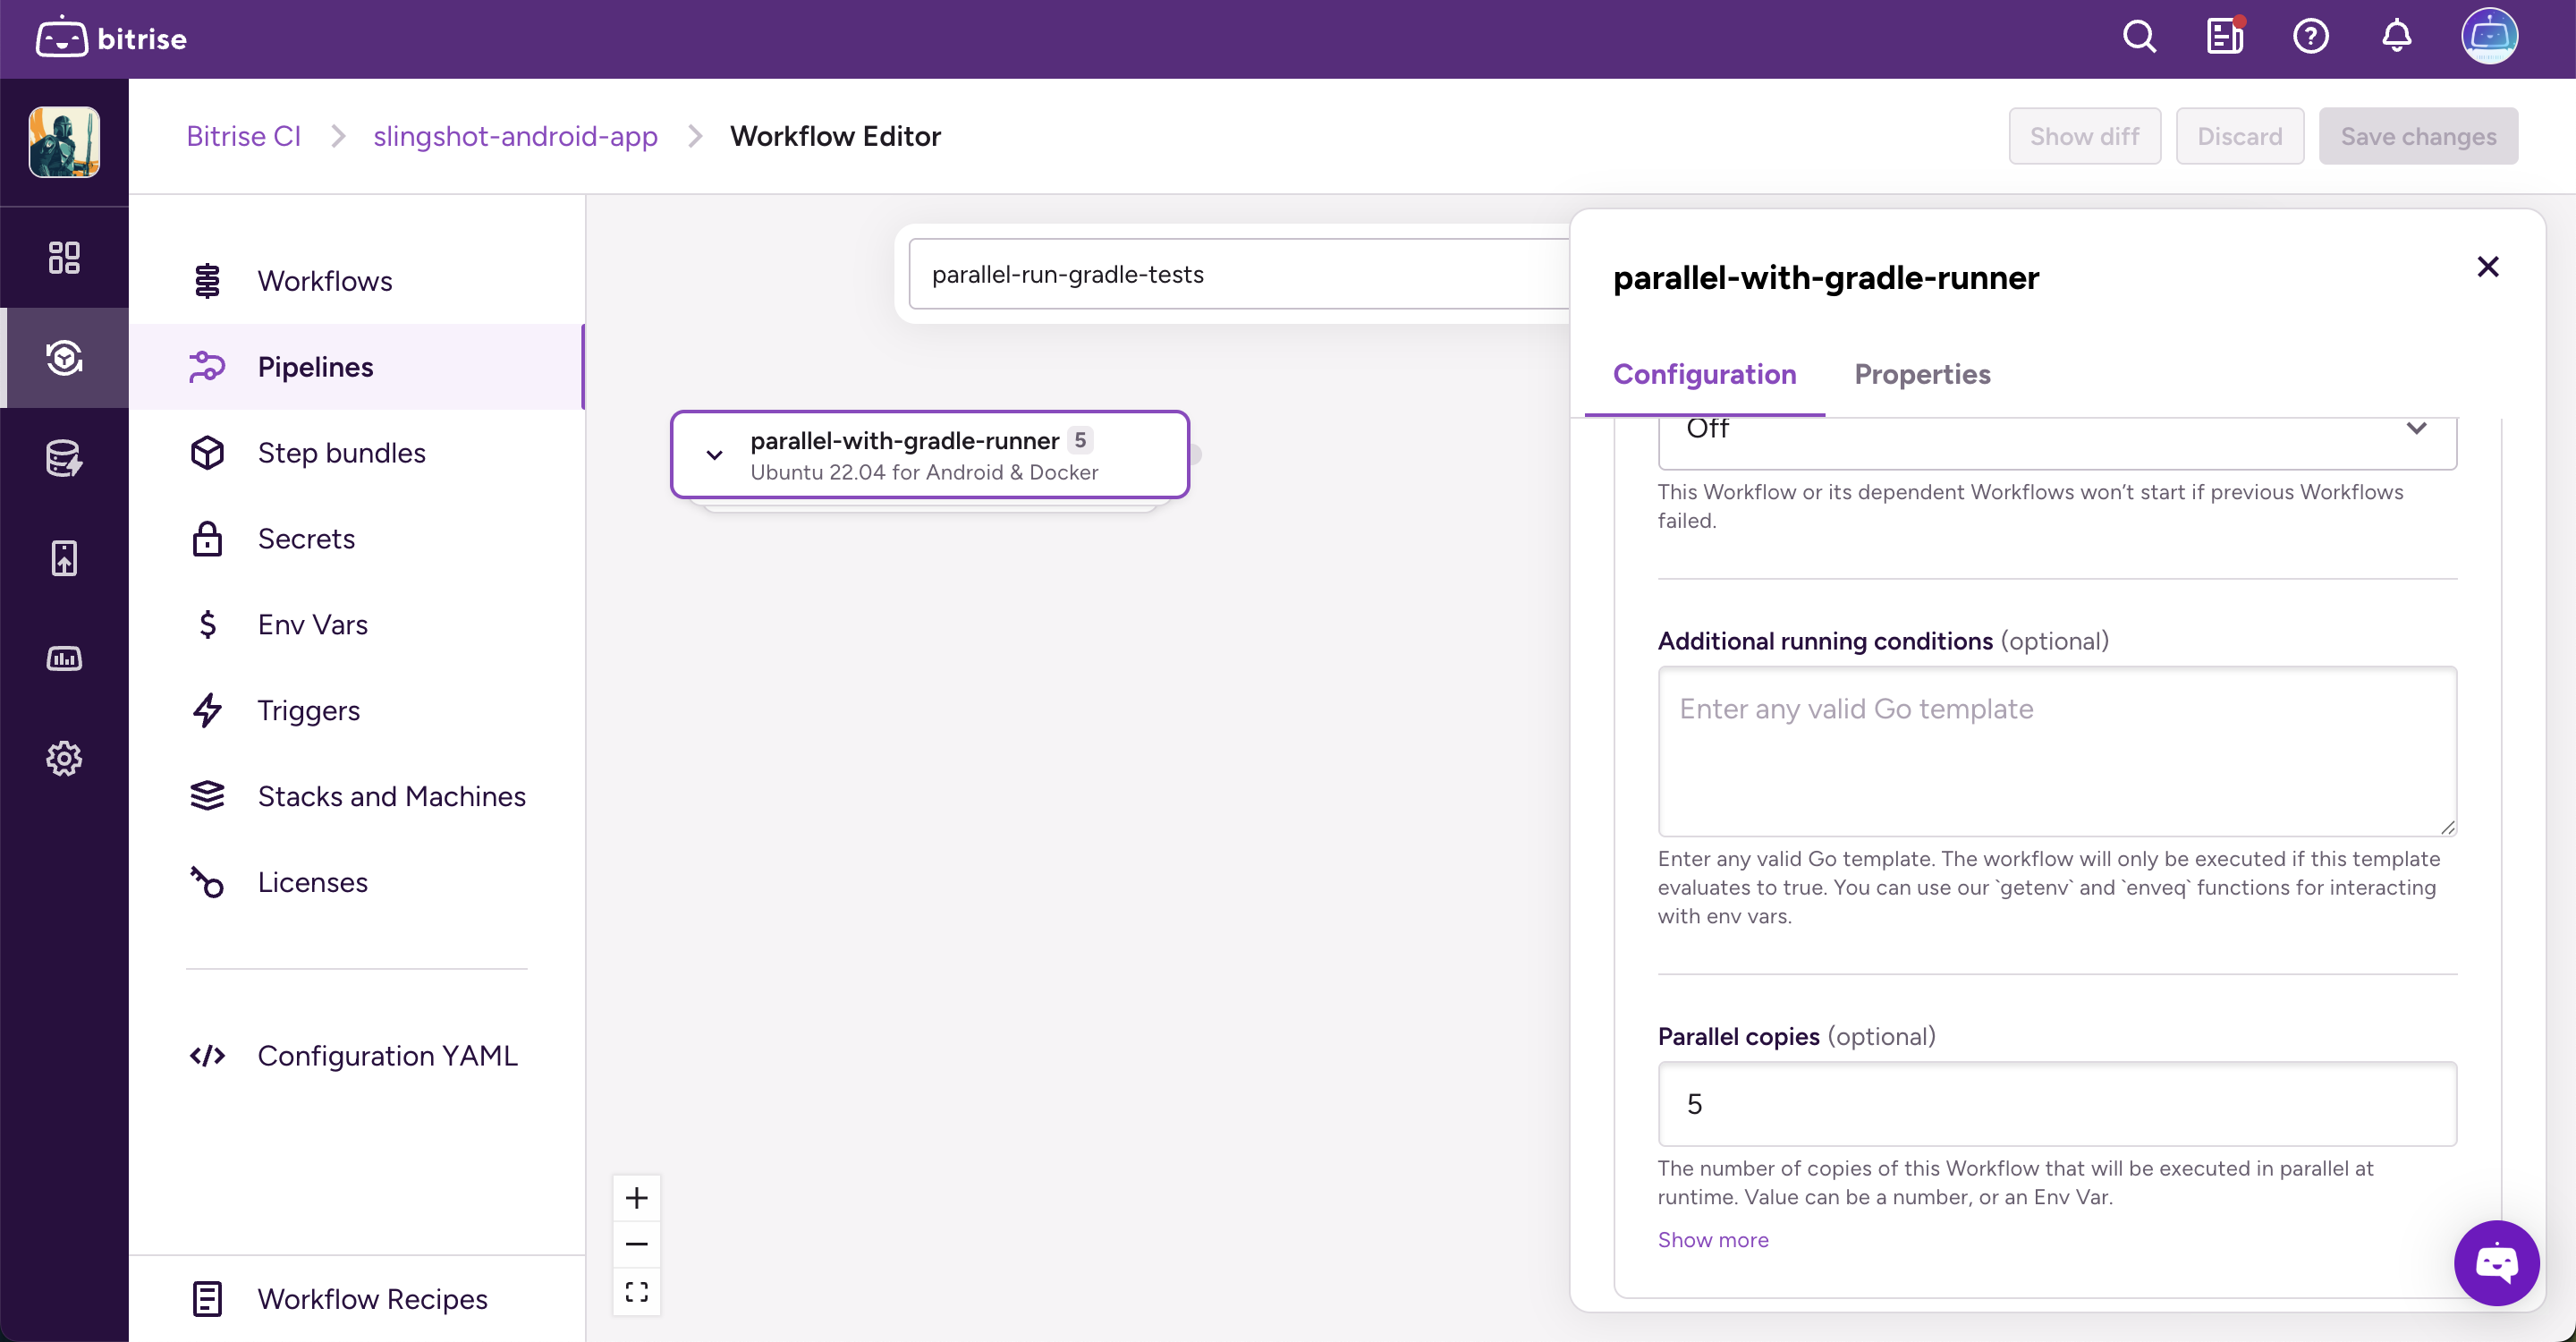
- Click on the gear icon for the workflow which performs your tests (in this example the workflow is called
parallel-with-gradle-runner) to access the workflow settings - Within the Pipeline Conditions section, set Parallel Copies to be the number of shards you want:
- Include the Gradle Runner step in this workflow
- Select the Gradle Runner step and in the Config section, include the following in the Gradle Task To Run field. The
$BITRISE_IO_PARALLEL_TOTALand$BITRISE_IO_PARALLEL_INDEXenvironment variables will tell Gradle which tests to apply to each shard
1connectedAndroidTest \
2  -Pandroid.testInstrumentationRunnerArguments.numShards=$BITRISE_IO_PARALLEL_TOTAL \
3  -Pandroid.testInstrumentationRunnerArguments.shardIndex=$BITRISE_IO_PARALLEL_INDEX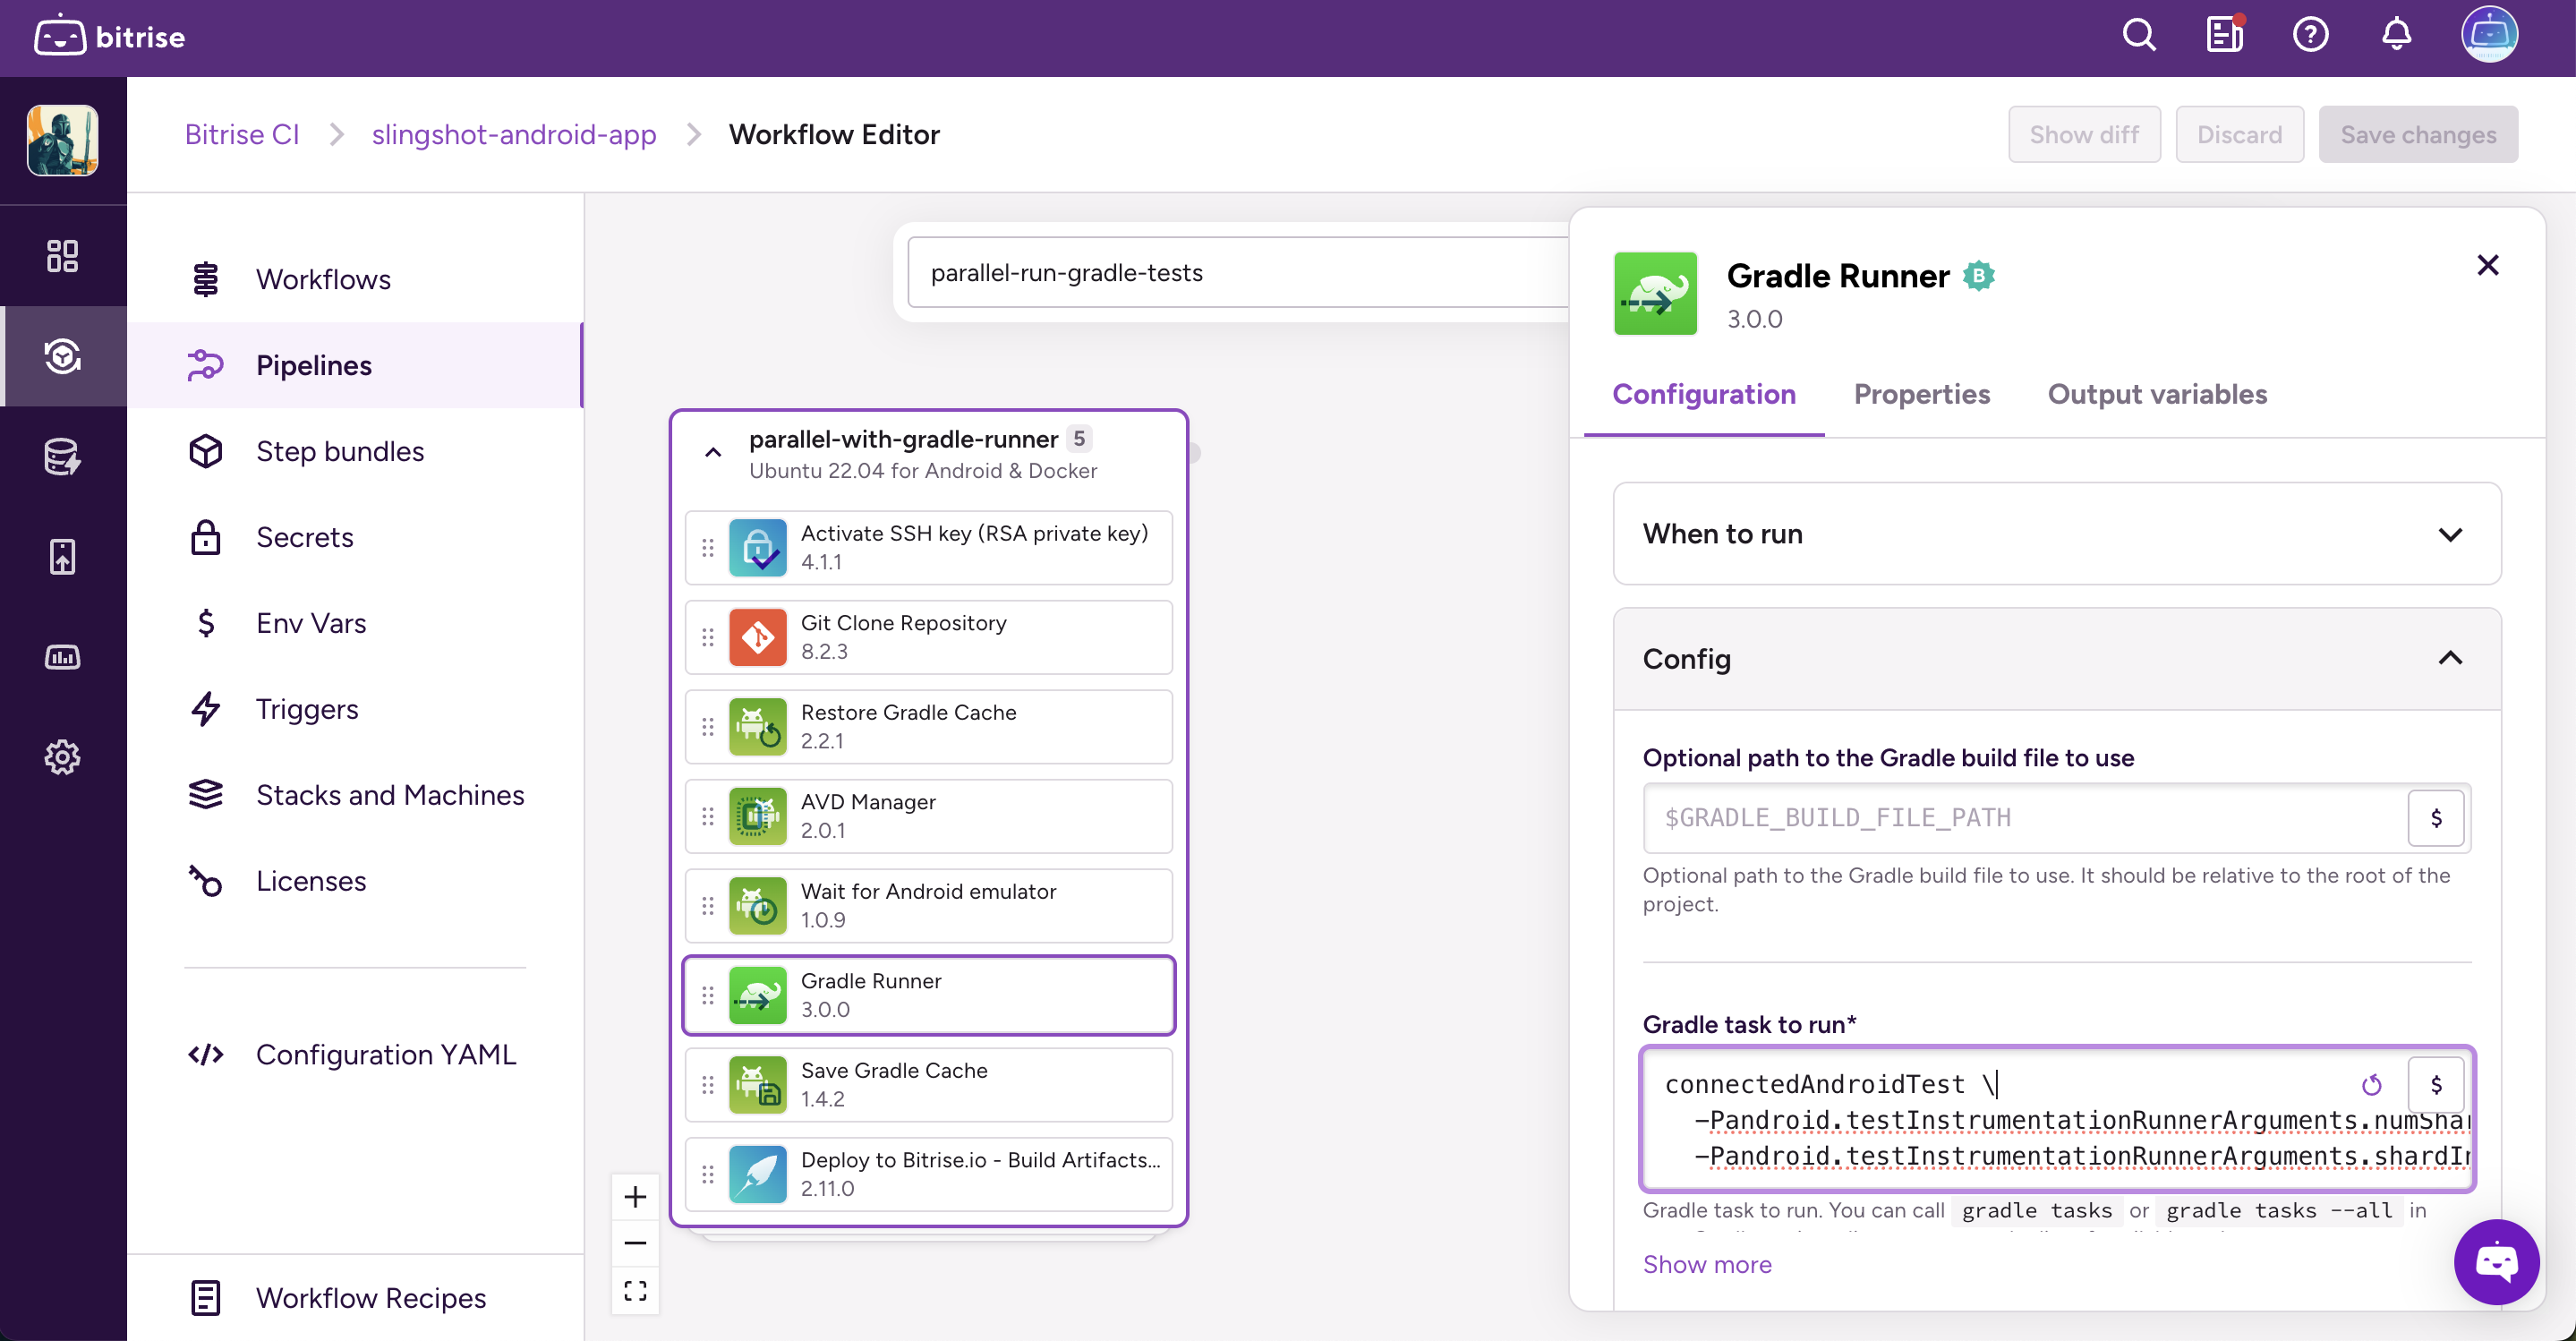
Why use test sharding?
By parallelising your tests via sharding you can have your cake and eat it: fast CI builds coupled with a high quality bar, backed by a large suite of unit and UI tests. Our customers report up to a 50% reduction in testing time when employing test sharding for the first time. Even customers who have their own proprietary test sharding calculation have seen 10-20% improvement using our Xcode Test Sharding Calculation step.
All this comes without you managing the overhead of building and maintaining your own test sharding calculation. But if you prefer to do this yourself, that’s fine: the Parallelization feature will help bring the most out of it.
Ready to try it out? Follow the steps above if you’d like to implement sharding using your own optimization calculation, or if you want Bitrise to provide that calculation for your Xcode or Android project.
Happy building!
--
Full YAML from Scenario 2:
1---
2format_version: '17'
3default_step_lib_source: https://github.com/bitrise-io/bitrise-steplib.git
4project_type: ios
5
6pipelines:
7  test:
8    workflows:
9      build-for-testing: {}
10      test-without-building:
11        depends_on:
12        - build-for-testing
13        parallel: $NUMBER_OF_SHARDS
14
15workflows:
16  build-for-testing:
17    steps:
18    - git-clone@8: {}
19    - xcode-build-for-test@3:
20        inputs:
21        - destination: generic/platform=iOS Simulator
22    - xcode-test-shard-calculation@0:
23        inputs:
24        - product_path: $BITRISE_XCTESTRUN_FILE_PATH
25        - shard_count: $NUMBER_OF_SHARDS
26        - destination: $BITRISE_DESTINATION
27    - deploy-to-bitrise-io@2:
28        inputs:
29        - pipeline_intermediate_files: |-
30            BITRISE_TEST_SHARDS_PATH
31            BITRISE_TEST_BUNDLE_PATH
32
33  test-without-building:
34    steps:
35    - pull-intermediate-files@1: {}
36    - xcode-test-without-building@0:
37        inputs:
38        - only_testing: $BITRISE_TEST_SHARDS_PATH/$BITRISE_IO_PARALLEL_INDEX
39        - xctestrun: $BITRISE_TEST_BUNDLE_PATH/ManyTests_ManyTests_iphonesimulator18.2-arm64-x86_64.xctestrun
40        - destination: $BITRISE_DESTINATION
41
42app:
43  envs:
44  - BITRISE_PROJECT_PATH: "./ManyTests.xcodeproj"
45  - BITRISE_SCHEME: ManyTests
46    opts:
47      is_expand: false
48  - BITRISE_DESTINATION: platform=iOS Simulator,name=Bitrise iOS default,OS=18.2
49    opts:
50      is_expand: false
51
52meta:
53  bitrise.io:
54    stack: osx-xcode-16.2.x
55    machine_type_id: g2-m1.4core