
Learn how to use Swift Package Manager in Xcode. SPM now supports iOS and more, so it's time to ditch CocoaPods for good.
Now with Xcode 11 and Swift Package Manager, you can take the next step forward by replacing a non-native solution (Carthage, CocoaPods) with a deeply integrated one. I really love that finally this is happening and I definitely recommend to do the migration process as soon as possible.
Completely removing CocoaPods
Taking the first step is always the hardest, but this time it's quite a relief to get rid of CocoaPods (you might have noticed that I'm not a big fan). In order to start the whole procedure, you just have to run pod deintegrate in your project folder.
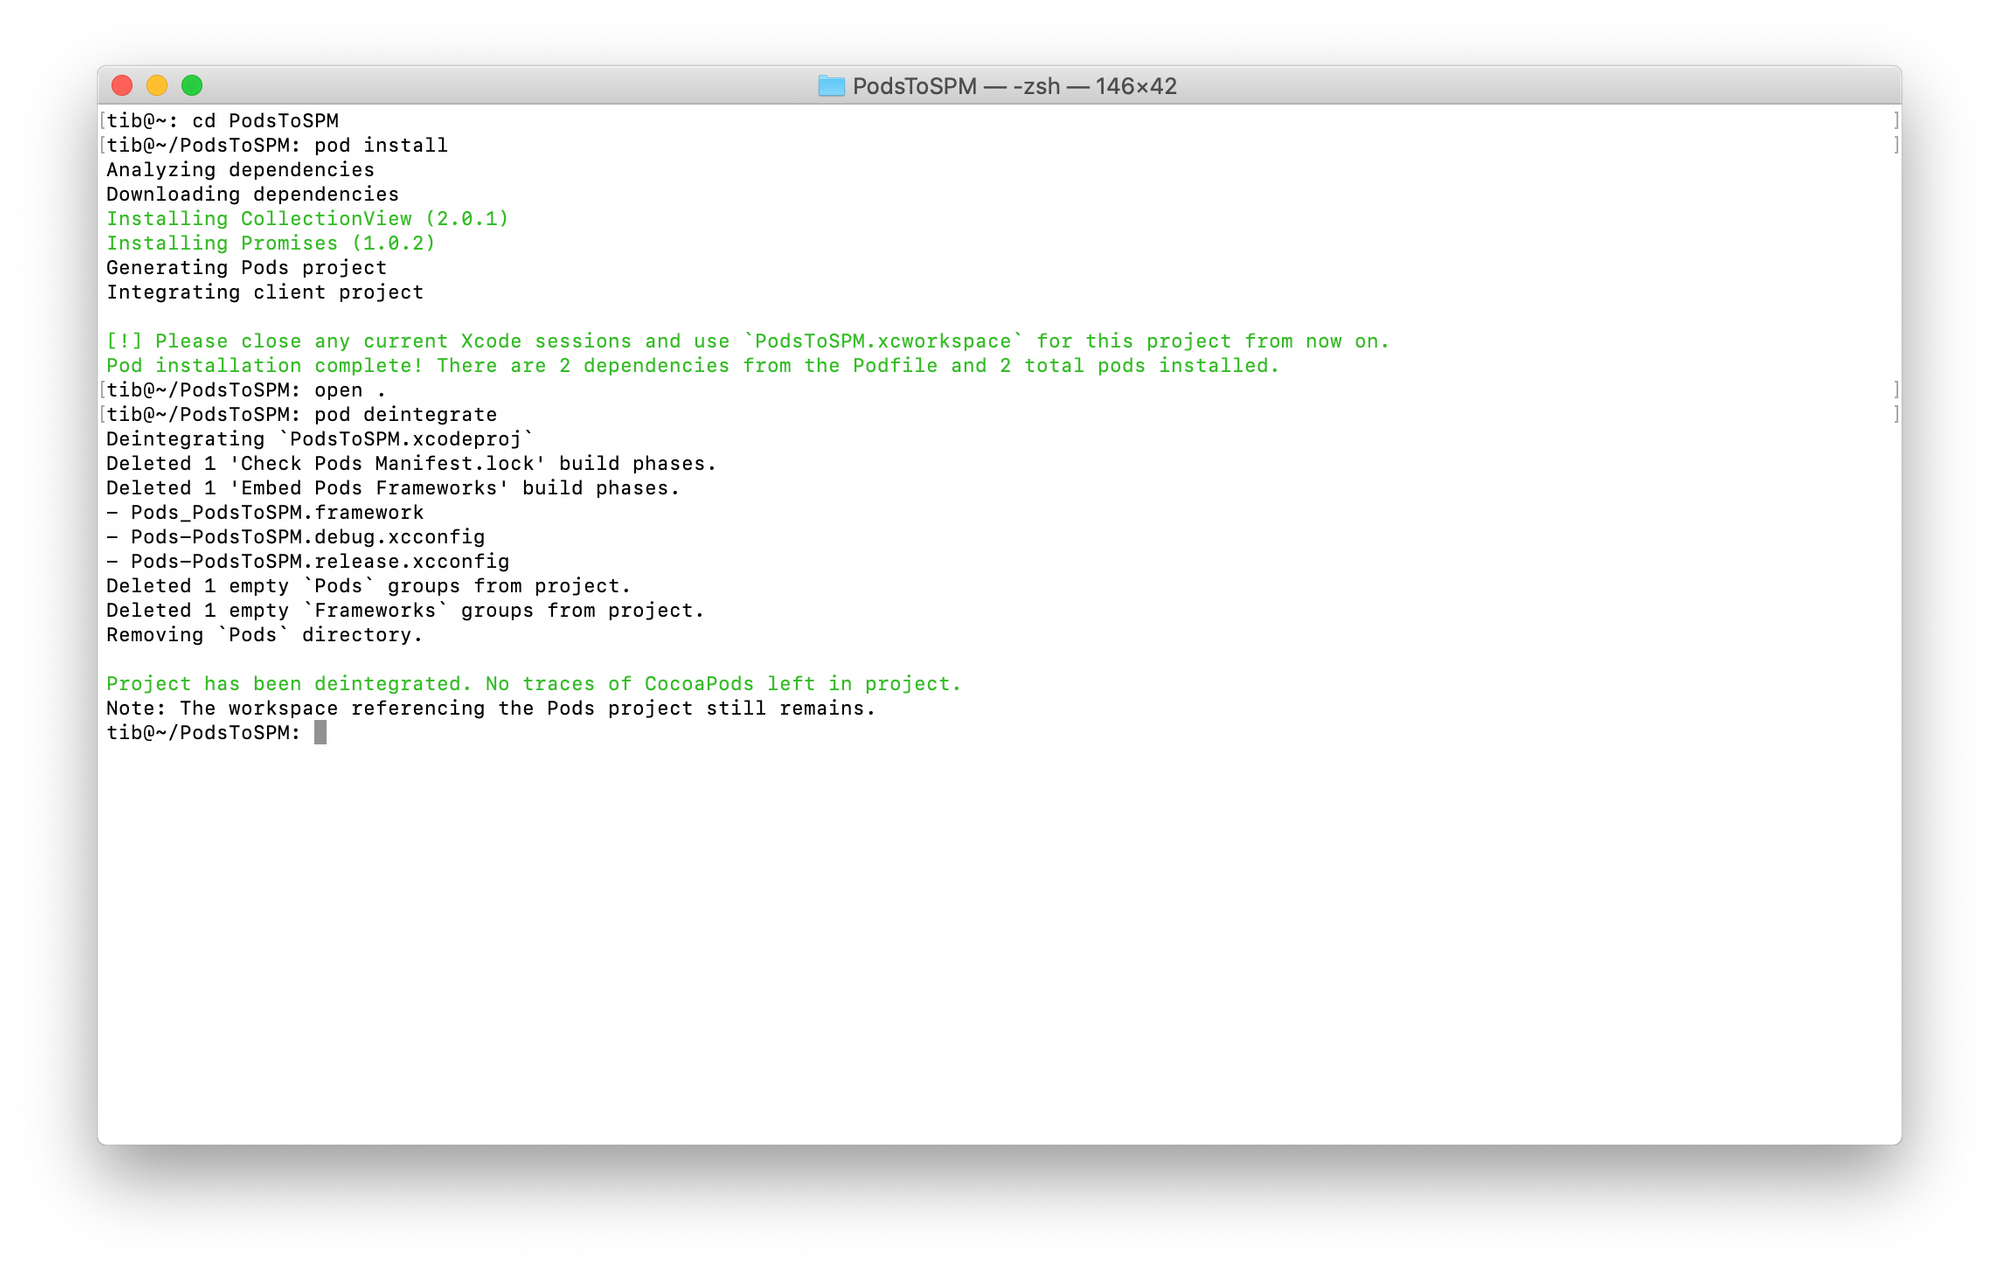
Yep, no traces left, but still, if you go to the folder you'll find some remaining trash like the .xcworkspace file, the Podfile and the Podfile.lock. Simply delete those, because you won't need them anymore. Maybe if you need a list of your third-party libraries, you can keep your Podfile around for a while, so you can be sure that you’ve migrated everything. Apart from these files, CocoaPods is now gone. Enjoy! 👍
Using Swift Packages in Xcode 11
Many popular frameworks already support SPM. For example, Alamofire is ready to use on iOS, macOS, tvOS, watchOS via the built-in Swift Package Manager. Let me show you how to integrate an existing package first, then I'll guide you through making your own Swift package that will work on appleOS targets.
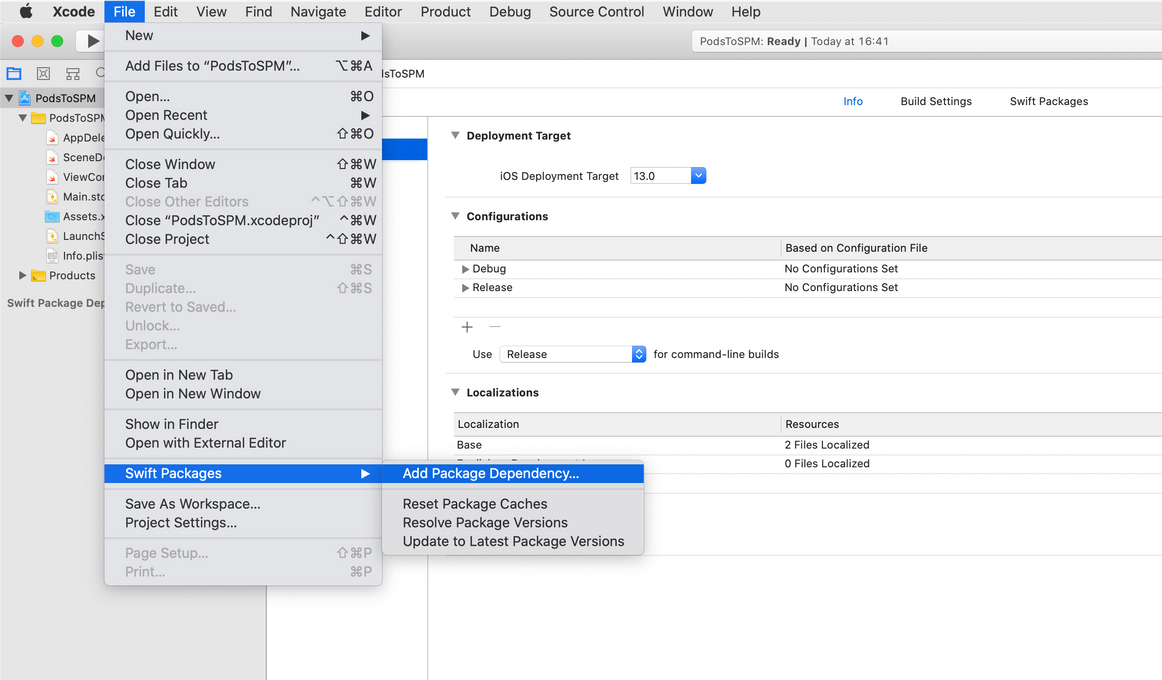
Triggering the flow is a piece of cake. Just go to the File menu and select Swift Packages, finally click on the Add Package Dependency... menu item.
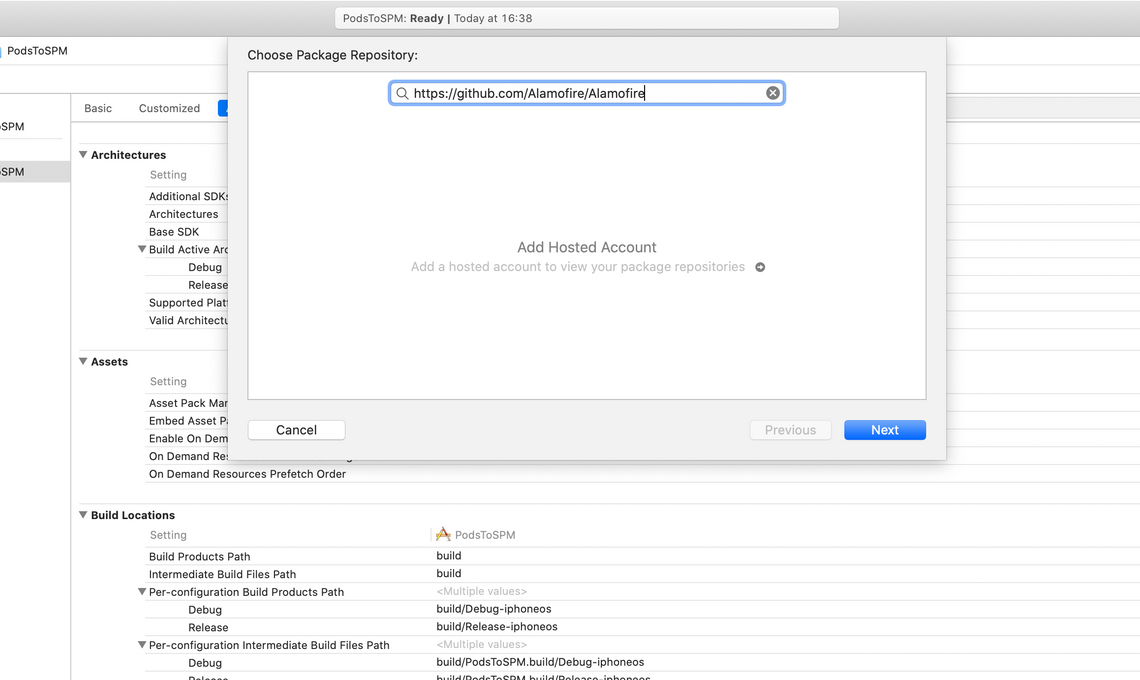
The only thing you need to do now is to enter a valid Swift Package repository URL that you'd like to use: usually you can copy & paste the github URL from your browser. Valid means that the git repo has to contain a Package.swift file.
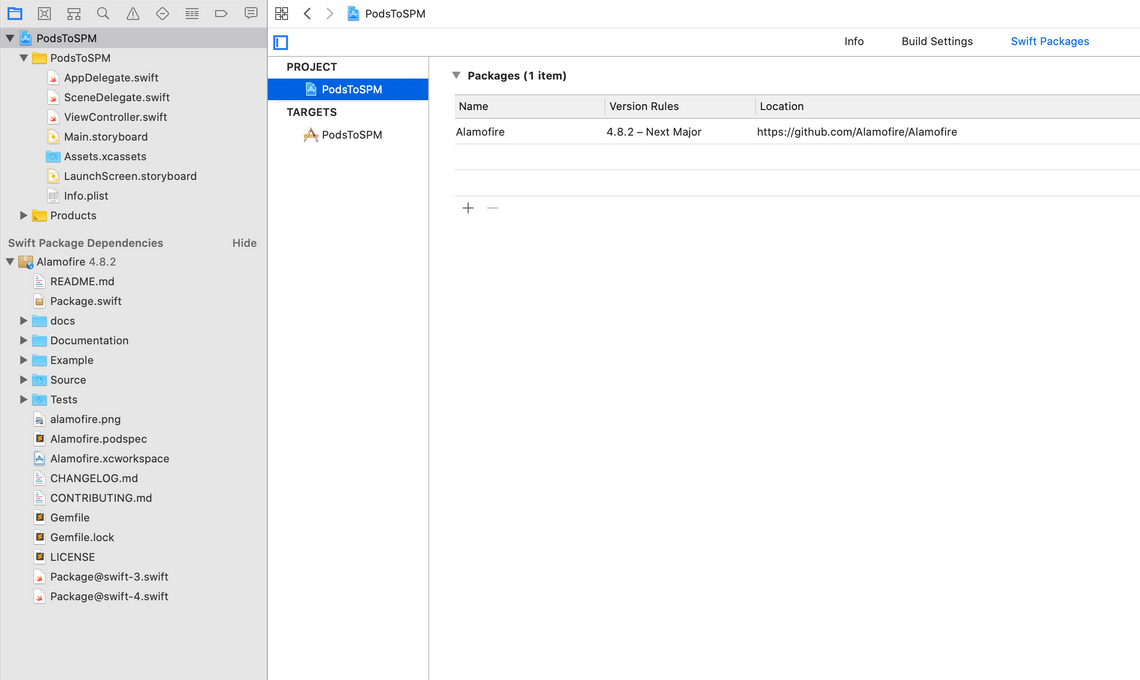
Quick note: You can also reset, resolve or update your packages under the Swift Packages menu item. It's really good to have everything in one place.
If you are not sure where to find the git repository URL, you can go to cocoapods.org, enter your pod name and click on the See Podspec menu item on the right side. The thing that you need is under the source key. 😉
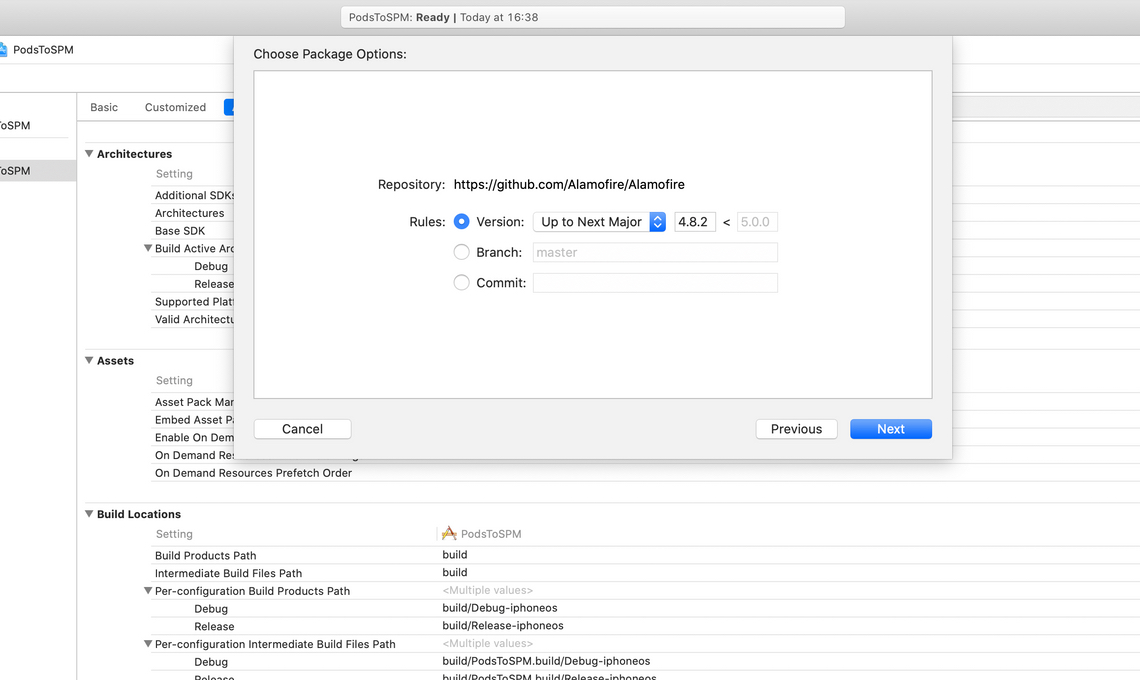
You can select the required version number, branch or even commit message that you'd like to use during the checkout process. This comes in extremely handy if you are using some older version of a specific framework or library.
A Swift package can contain multiple products (a product is a framework or an executable), you can select and integrate them individually in Xcode.
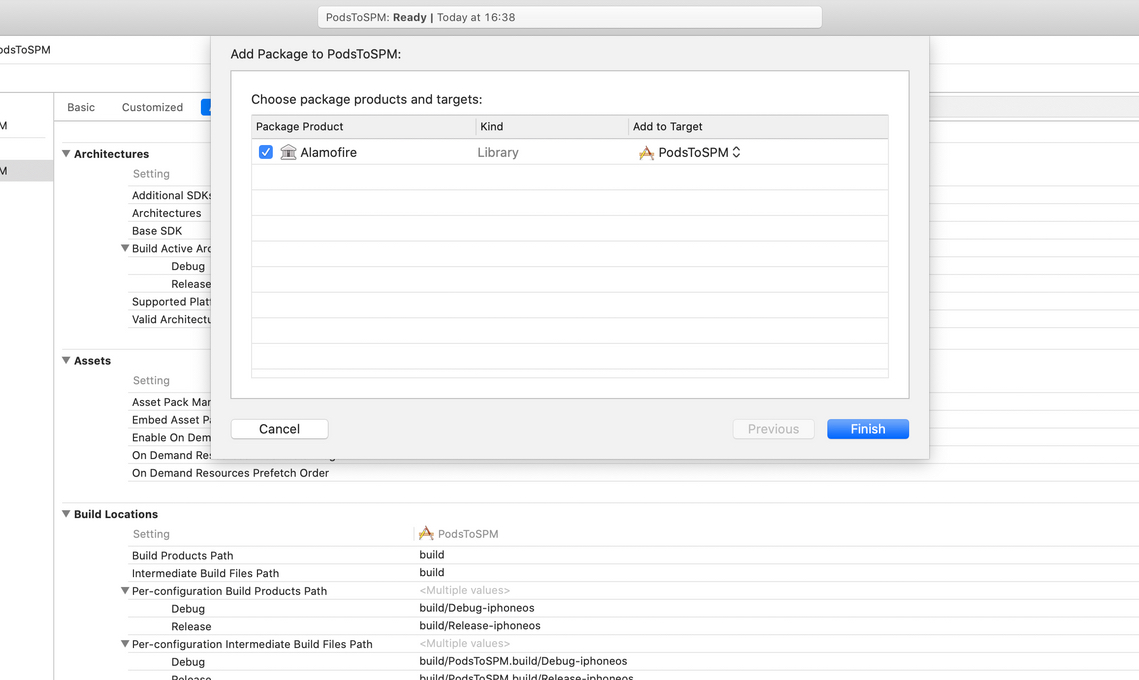
Finally, Xcode will do the required integration process, like embedding the library into the project and some other build configuration changes…
Now you are ready to import your framework in your target. Well done. 👏
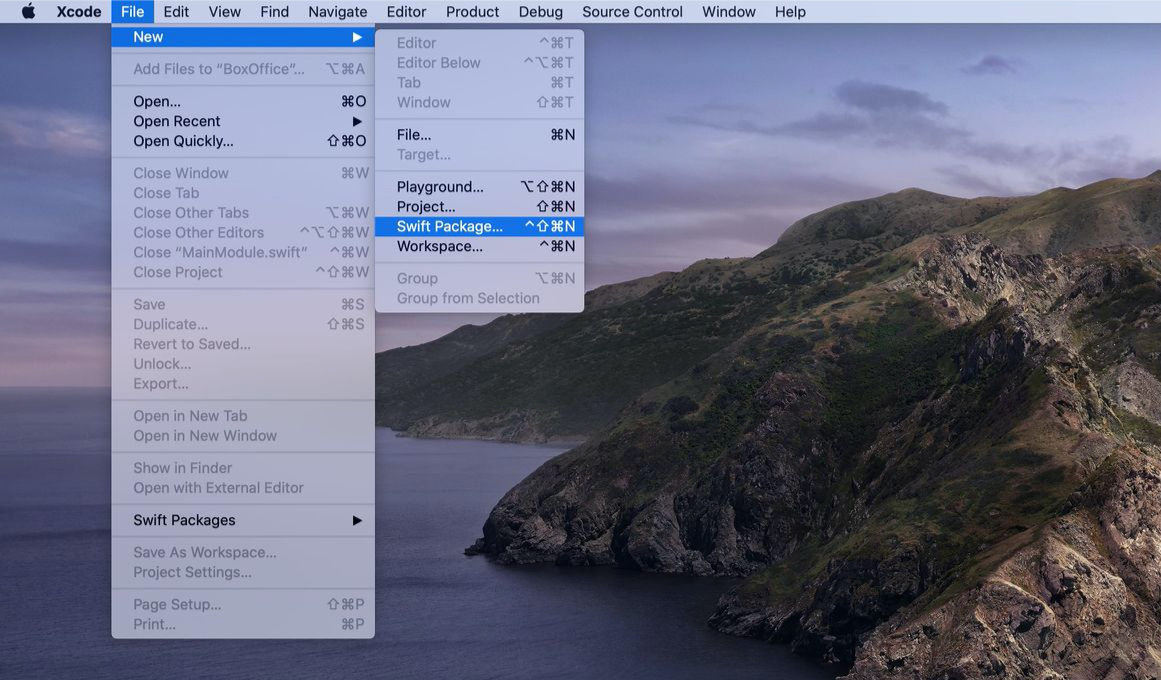
How to create a Swift Package for iOS?
The answer is quite simple. Just use Xcode’s File menu and select: New > Swift Package...
Name your library first, then save it somewhere on your disk. Xcode will create almost everything for you that is required to use a Swift package on Apple platforms.
Still, you have to add a few things to the Package.swift file, because by default these Swift packages won't work if you are planning to integrate them with an iOS project.
The most important thing is that you have to configure your package to run on specific platforms. You can do this by adding a new platforms section inside the Package description object, right after the name parameter. You can learn more about the manifest format change from this Swift evolution proposal.
// swift-tools-version:5.1
import PackageDescription

let package = Package(
    name: "MyLibrary",
    platforms: [
        .iOS(.v12),
    ],
    products: [
        .library(
            name: "MyLibrary",
            targets: ["MyLibrary"]),
    ],
    dependencies: [
        // no dependencies
    ],
    targets: [
        .target(
            name: "MyLibrary",
            dependencies: []),
        .testTarget(
            name: "MyLibraryTests",
            dependencies: ["MyLibrary"]),
    ]
)
Oh, by the way, SPM now supports target specific build settings if you need to configure build settings or link a specific dependency. I'm not going into details, because this could be a standalone tutorial, but if you want to learn more about the anatomy of Swift Package Manager you can check all the package related evolution proposals here. These proposals are usually really well documented. 📖
As a last step you only need a git repository populated with the source files.
git init
git add .
git commit -m "initial"
git remote add origin [email protected]:<your-user>/MyLibrary.git
git push -u origin master
git tag 1.0.0
git push --tags
Now you can add your library as I described it before (don't forget to use git tags).
SPM support to an existing library?
Sometimes you'll need to add an existing package to your project, but wait... the author of the package haven't made the Package.swift file yet. Now what?
Don't worry too much! There are just a few steps that you need to follow:
- Fork the repository (if it's on GitHub, it's just a few clicks)
- Add the package description file (see example above)
- Commit & push your changes (using git)
- Use your own forked repository URL in Xcode
- +1 create a Pull Request! 🎉
As you can see bringing support to an existing library is not rocket science. There are some edge cases, for example, if a library is closed source or it contains some kind of pre-compiled binary, but in 90% of the cases you'll be just fine with these steps. 🚀
Where to look for Swift packages?
The quick answer is: swiftpm.co
Dave Verwer has a really nice explanation about what this site does:
Once you have chosen a package, Xcode 11 makes it easy to integrate it into your project. But with so many third party libraries available for Swift, how do you pick the right one? You need to consider which ones are well supported, whether they are compatible with your version of Swift, what platforms they support? It’s hard. That’s the question this site aims to answer.
I also had my own list of top 20 libraries for iOS developers, basically the criteria were almost the same as Dave mentioned. Also I love the fact that the webpage displays platform and Swift version support right next to the search results. ❤️
Pro tip: this is a perfect time to check all the dependencies that you're using. Maybe there is a better alternative for the given problem or you don't even need a 3rd-party solution anymore. By doing this your build time can be reduced dramatically also this is going to have a nice effect on your automated CI or test builds. Bitrise already supports Xcode 11, so you can already beta test your apps for free by signing up. ✅


.jpg)
