
In this one, we’re going to get you started with fastlane.
What’s fastlane?
Fastlane is an automation tool that makes building, testing, and uploading your apps effortless. It works for iOS and Android, but we’re going to focus on iOS here.
Portability is a huge advantage of fastlane. Once it works, you can run it on other developers' machines, and more importantly, the cloud.
It can do far more than just build test & upload, but that's something you can look at later. Once you have the basics set up, the possibilities are endless.
Pre-Requisites
App Store Connect
There are a couple of prerequisites before we can get your Fastlane setup going. You’ll need an App Store Connect API key, and a couple id’s that we’ll get when we make the key.
To create the key, open App Store Connect, Users and Access, then Keys. **Note down the issuer ID.** Hit the plus button and make a key. We’re going to make use of this key both for Bitrise and Fastlane, so be sure to give it a name you can identify later. As for the access level, you have to make sure it can do everything you want, so I recommend giving it the highest level of access youre comfortable with. For me, I’m the only person who uses my Fastlane, so I’ll make it an admin key. Hit generate and **Note down the KeyId.**. Download this key.
Github
You’re going to need an empty git repo to point your fastlane match at (don’t worry, we’re almost getting started). Once you’ve made a repo, be sure to note down the ssh url for it.
Whilst we’re here, we’re going to make an SSH key that will let Bitrise connect to our repos later. To make this key, open the terminal and run the following command: “ssh-keygen -t rsa -b 4096 -C "[email protected]". Follow the prompts on the screen, but know that if you change the location of the key the next steps will be a little different.
Back on GitHub, open your personal settings ( or if you’d like, a bot user that has access to the match repo and the code repo ) and go to SSH keys. Tap add, set the name to CI and then copy in the key. To get the key to your clipboard, type in “pbcopy < ~/.ssh/id_rsa.pub” ( change the last location if you moved it somewhere else ).
We’re ready to go! The rest of this tutorial will just be doing cool stuff I promise.
Getting started
Let's get going.
Head to the root of your iOS project, and make sure you have all the stuff we just created - that's your key to making this all work.
Type `fastlane init` and it will walk you through creating a basic setup. We’re going to modify the Fastfile it generates, but it's good to have this starting point. When asked what you'd like to use fastlane for, select option two, "Automate beta distribution to TestFlight".
Don’t worry about fastlane asking you for your credentials. It’s about as trusted as it gets. If you’re concerned, consider using an account with the bare minimum credentials to upload apps. Enter your credentials and then select the correct team for your app. This is the team for the app you're setting up. You'll then be asked for your dev portal team, this should be the corresponding team with the previous step. So long as your Xcode projects' bundle identifier is available, the rest of the process is all automatic.
Fastlane has generated an Appfile and Fastfile for you, be sure to check these into git. Hit enter to close out the fastlane process, you'll have to do this a couple of times, but you'll be given some useful information about what you can do with fastlane.
The file you just generated will actually do quite a lot for you already - we just need to sort your signing out and you'll be good to go on beta uploads.
Reading the Fastfile and AppFile
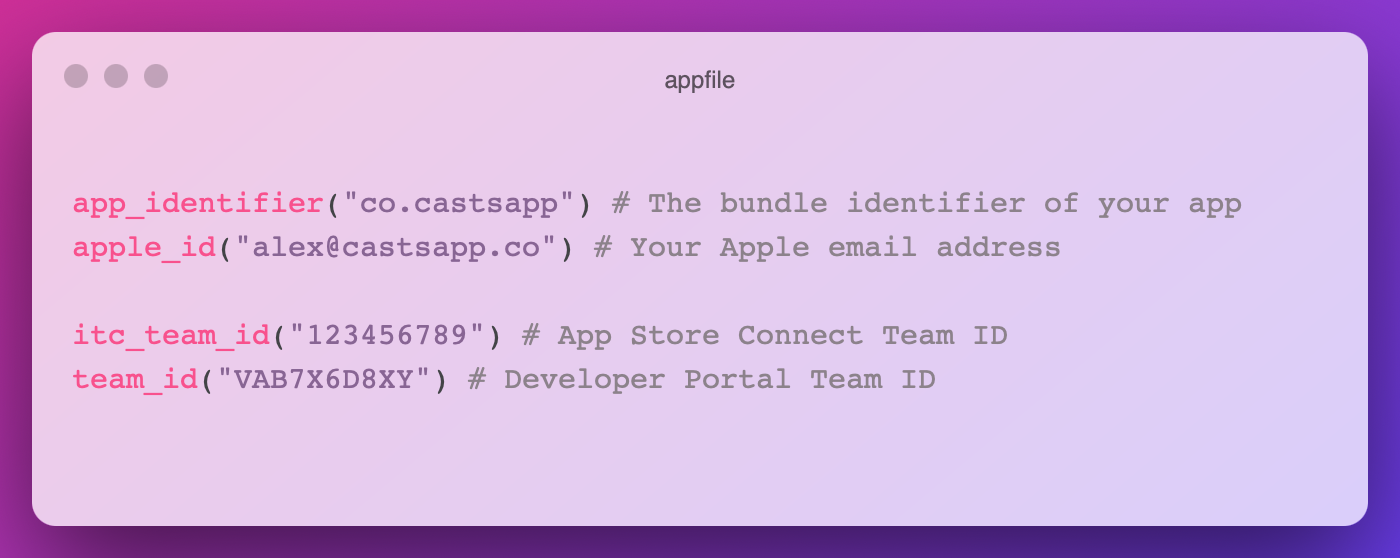
It’s cool that fastlane generated this file for us, but it's good to understand what’s going on. Open up the Appfile first. It will look a little something like this, and even has handy comments. Once you've finished with this tutorial, you could even take this setup and move it to another project, just change the identifiers to match the other project.
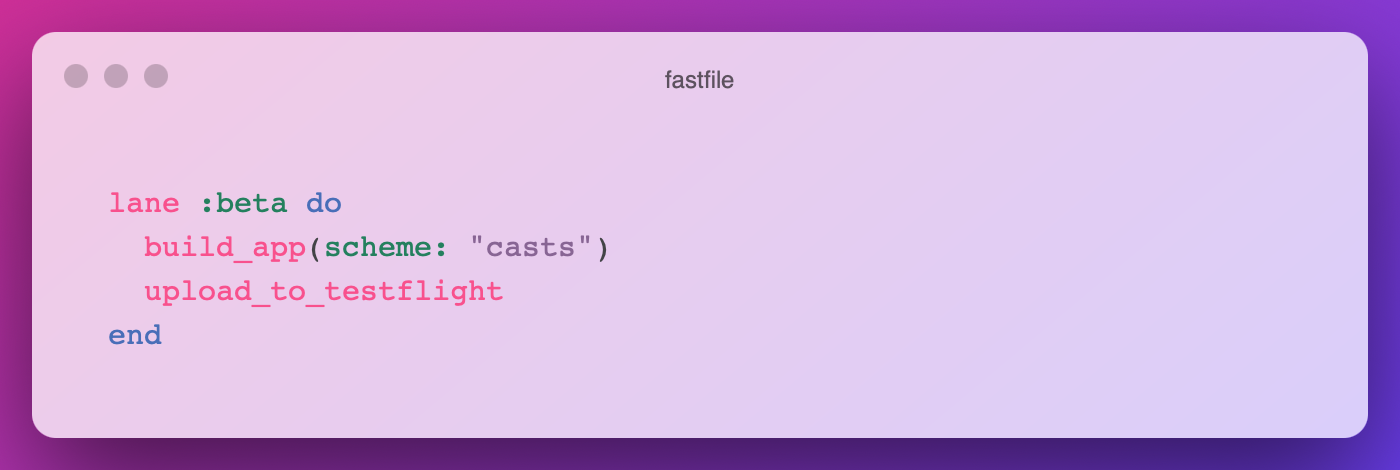
The Fastfile is a little more complex, but it's also filled with lovely comments that explain everything.
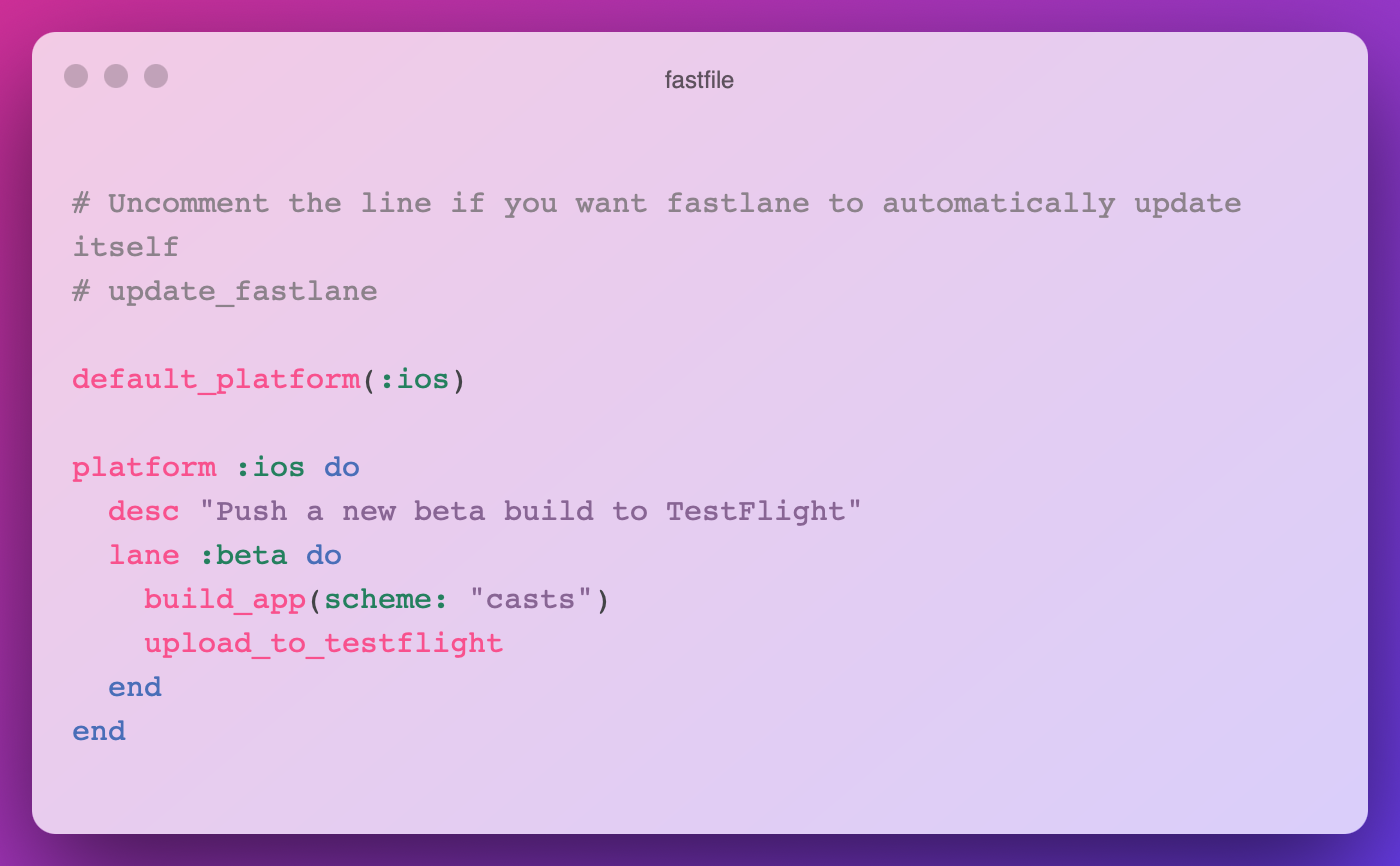
The format of this is nice and easy to read, and you might be surprised at how compact it is. You can clearly see that we have a platform specifier and description, followed by our actual lane code. If you don't like the name beta, you can change the `:beta` to something else, like `:testflight`.
The `build_app(scheme: "casts")` and `upload_to_testflight` lines act as steps in our lane, and they're nice and self-explanatory. If you have a specific scheme for your app that you want to run instead of the default one, change the scheme name now. You can always make this a little smarter later and pass in a scheme name based on the environment, but that’s for later.
Code Signing
Trust me - you’re about to be shocked at how easy code signing can be. We’re going to use Match, which will help with the portability of this fastlane setup.
Match is a tool provided by fastlane that makes code signing effortless. It maintains the certificates and profiles for your app, allowing you to have one consistent signing setup across all machines.
Match is just as easy to set up as fastlane itself. Open your terminal and type `fastlane match init`. As we just had with fastlane itself, Match has a nice guided tutorial to help you out. Remember that git repo we created earlier? We'll need that now. Select 1 when asked where you want to store the certs.
*Remember - this repository has to be one that can be accessed by the SSH key that was created earlier in this tutorial.*
After the program finishes, you'll have a MatchFile in your repository right next to the Fastfile. Don't worry about this just yet, we'll take a look later.
Now we have this repo initialised, we can set up the certificates. Run `fastlane match appstore` followed by `fastlane match development`.
You'll need to set a password for the match. This password is used to unlock the storage and if you forget this, you'll have to nuke the storage to reset it. Make this something secure, and consider using a keychain assistant to help you generate a good password.
Match will then log in to the developer portal and get a certificate created for you. If you've already hit the maximum amount of distribution or development certificates you may have an error here, if so, you'll have to go onto the developer portal and delete one of the existing ones.
Provided nothing went wrong, match will do its thing and push some changes to the git repo.
Let's quickly look at that Matchfile to get a feel for it. It's a little simpler than our Fastfile as it's another configuration file. Mine looks like this:
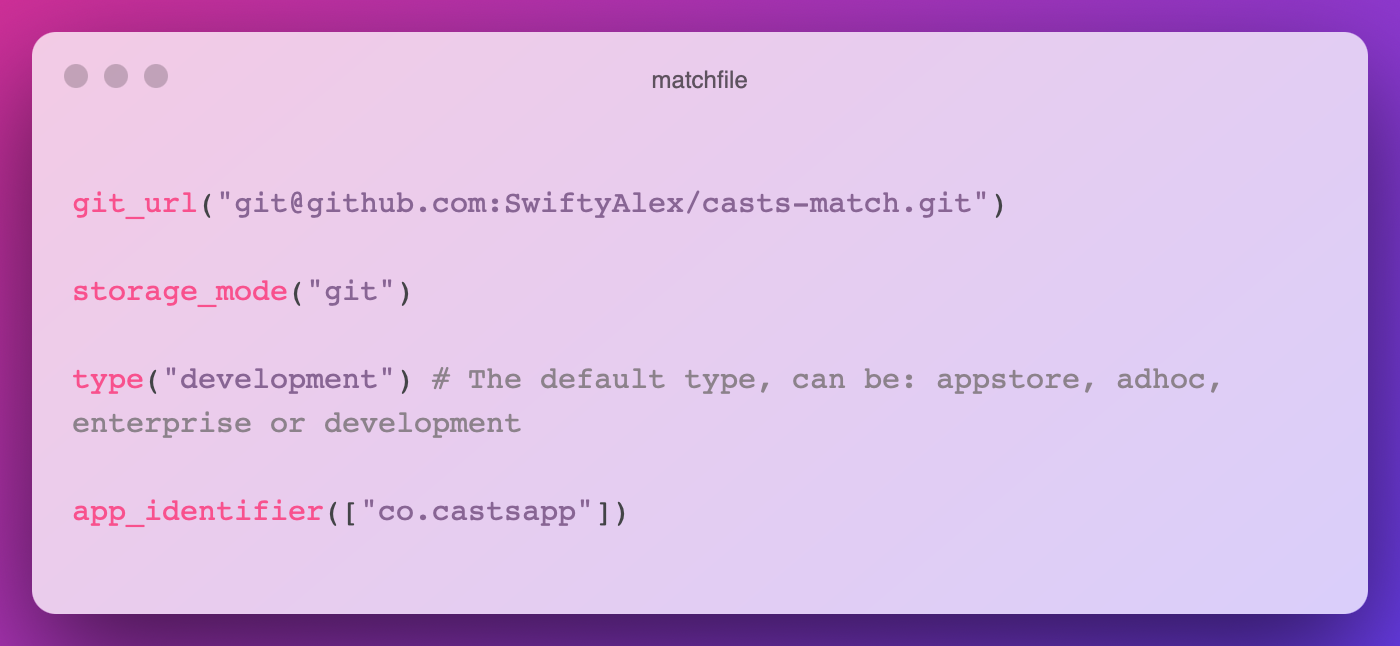
If you have multiple bundle identifiers under this project, you can add them here and re-run matches to get certificates and profiles for those too. This is very useful in advanced setups where you may have multiple variants such as an internal beta with separate features and its own TestFlight listing. You'll also have to do this if you add extensions, like the one you'll add if you put widgets in your app. If you've already got widgets in your app, add the identifier here to make sure the match can do its thing. If you do have to add these, re-run match appstore & development.
For our actual setup to work, we need to tell Xcode to use these profiles, and not just create new ones all the time.
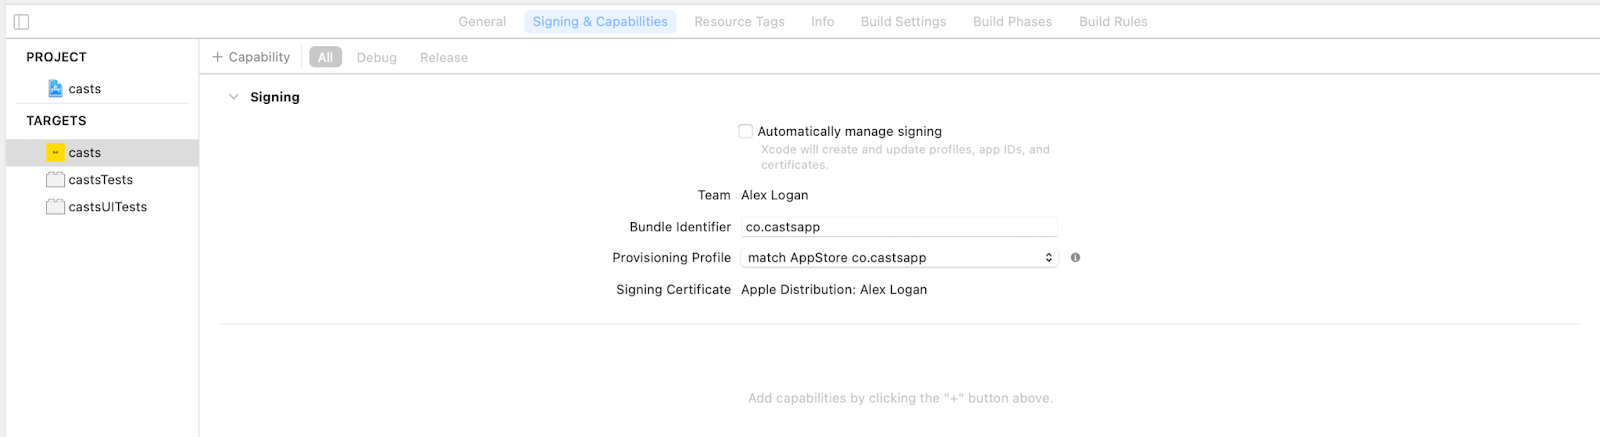
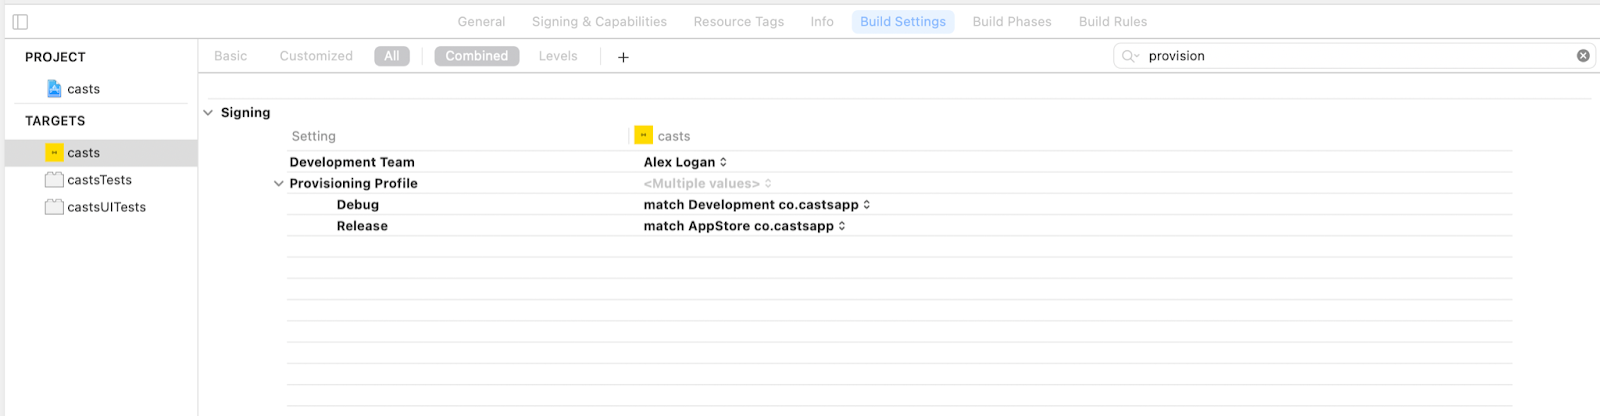
To update Xcode to use these profiles, open your project and go to the signing tab. You'll need to untick automatically manage signing and select the provisioning profile from the drop-down, it should look something like this:
It takes Xcode a little while to catch up when you make signing changes, so you might see an "ineligible" message that isn't actually correct. We'll need another quick change to make sure your development builds are signed correctly too.
Head to the build settings tab and search for "Provisioning Profile". At the moment, it will show "Match AppStore co.castsapp" ( but with your identifier). Tap the little chevron to expand and select debug, from the dropdown you'll need to select "Match Development co.castsapp".
Ok, back to the Fastfile.
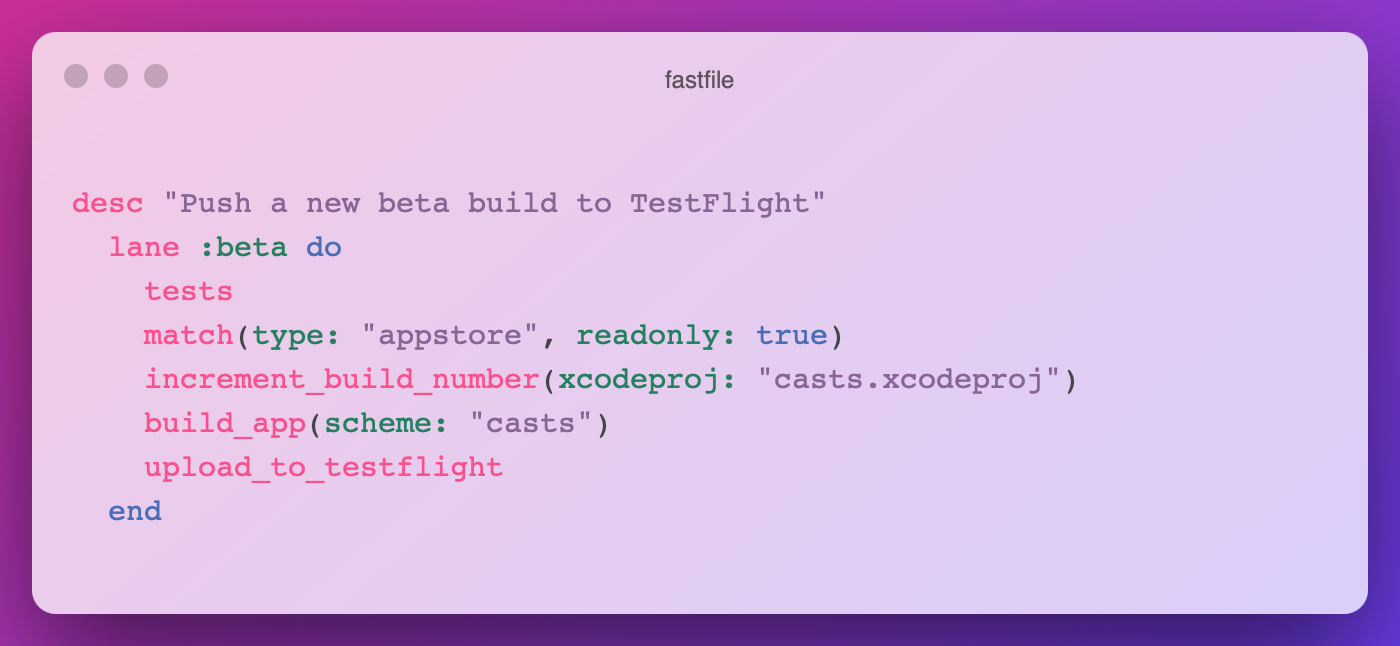
Currently, we have one lane called beta that looks like the following:
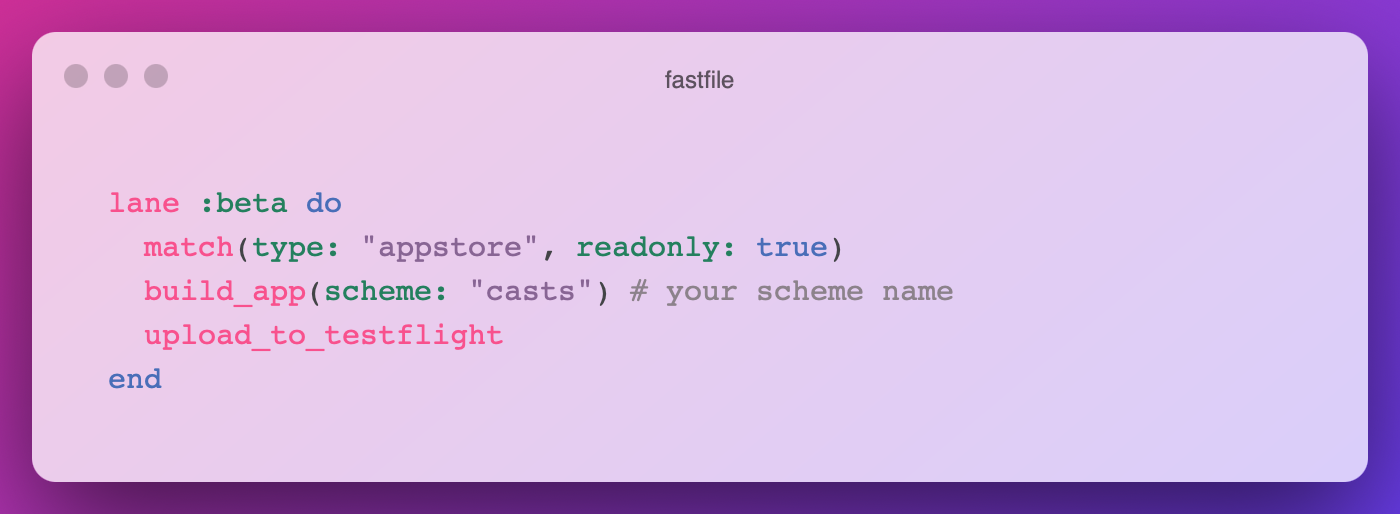
We're going to add a new line above `build_app` that will do all the hard work for us:
`match(type: "appstore", readonly: true)`
Your lane should now look like this:
Next up, let's look at testing!
Testing
Whilst this pipeline is great, it misses what I think is a pretty crucial step - it doesn't check the build is any good by running the tests. We can fix that easily and make sure that the builds are a-ok for the store.
Let's open up that Fastfile again.
Above the beta lane, add the following new lane.
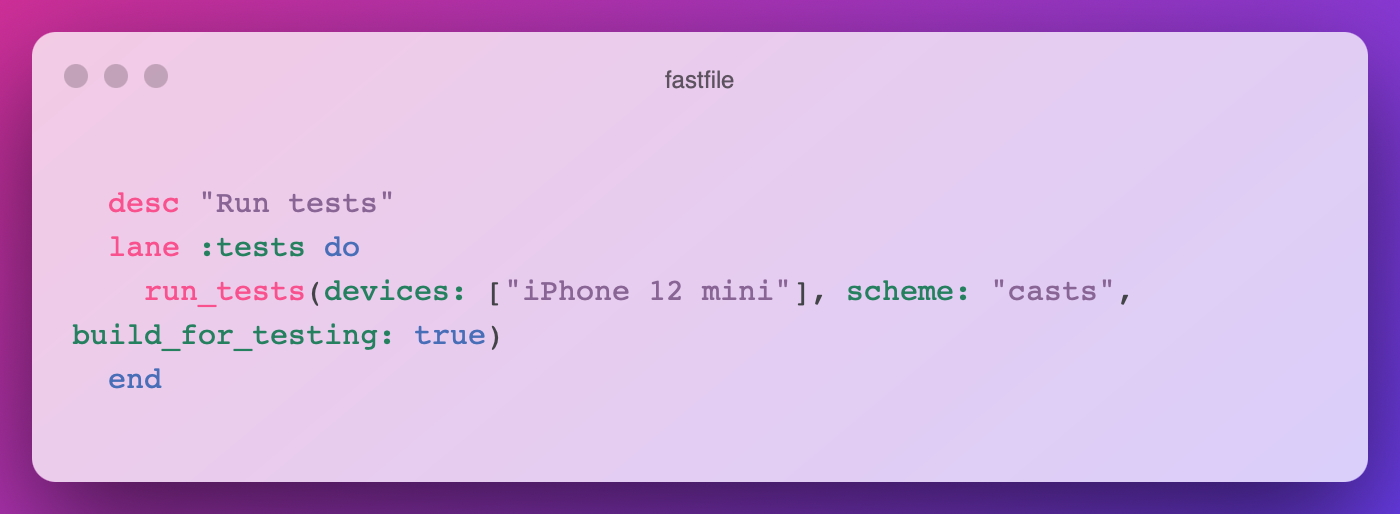
You can now run your tests with "fastlane test". This will build your app, run the tests in the simulator, and fail the build if any of the tests fail.
To make our beta lane run these tests, all we have to do is adding one more line that changes lanes. To change lanes, you simply type the name of the lane, in this case, `tests`. Add it first in the beta lane, so that if the tests fail we don't bother running matches or incrementing the build number. It should like this:
Right now we have a lane that will sign our app, build it, test it, and attempt to upload it to TestFlight. The only thing we have to do now is make sure that upload to TestFlight works smoothly.
Uploading to Testflight
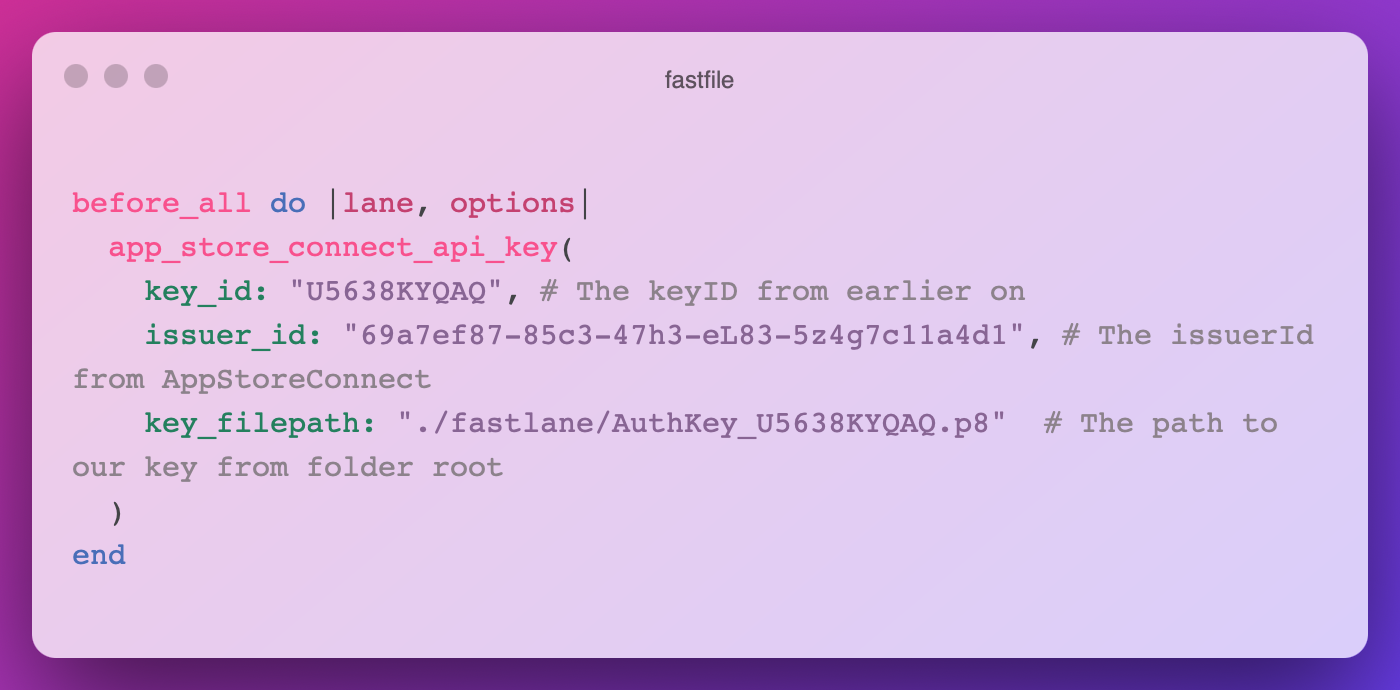
Whilst your lane might currently work fine, it's because you're already authenticated with AppStoreConnect. We're going to make use of that key from earlier to authenticate with the API. First, put the key somewhere that the script can access. For me, I put the key in the fastlane folder. You can always revoke this key in the event of a repo breach, so I think this is perfectly safe, but if you're not comfortable, put it somewhere else, just make sure that you have a way for the script to get to it.
With the key in the folder, we're going to have to make another few changes to our Fastfile. At the top, below the `platform :ios do` line add the following:
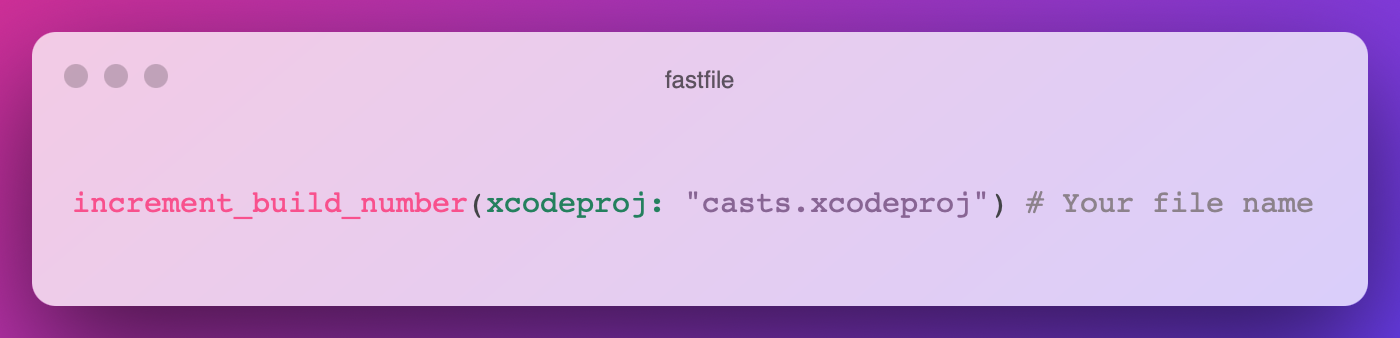
There's another small change we need to make. You'll know by now that AppStoreConnect only accepts one build of each version and number, so we'll have to make sure that each build we upload has a new number. To do this, fastlane has an increment build number step.
Below our match step, add the following line which will push the number up by one each time it runs. Remember that unless you check in this version number change, your next build on another machine may fail as it will have the old number. I tend to commit and tag as soon as my lane finishes.
That's it! You've now got a setup that can upload to Testflight, and pretty quickly too. Fancy giving it a spin?
Type `fastlane beta` and let the script run. The length of this process can depend on the size of your app and your general build times. When it's finished and ready to upload, you'll see it begin to repeat the following message.
"Waiting for the build to show up in the build list - this may take a few minutes (check your email for processing issues if this continues)"
This message will eventually change to "Waiting for App Store Connect to finish processing the new build (0.0.1 - 1) for IOS" ( but with the correct numbers).
This processing time can depend on how busy the processing servers are, your app's size again, and a whole bunch of other things. The best part is that you don't actually have to wait anymore!
Go make a coffee, and come back when it's finished. Grab a biscuit whilst you're there, you deserve it. One of the ones with chocolate on.
If you're set up as a tester for the app, you may have had a mid-bite interruption when your phone dinged with the TestFlight notification. Your build is ready for testing!
If you did add the increment version number step, make sure to commit these changes. It's also great to tag your builds with the corresponding numbers.
Checklist
Before I let you go, make sure you've done all the steps below. If you miss any, your setup might not quite work.
- You have a Fastfile, Appfile and Matchfile.
- The match repository contains certificates and profiles
- Your Xcode project uses these certificates and profiles
- When you run `fastlane` it shows the beta lane as an option
- You've checked in your Fastfile, Appfile, Matchfile, and optionally your app store key. If you haven't checked this in, you'll have to make sure that you've put it somewhere that future developers can get to.
Thanks for reading!
If you’d like to learn a little more about fastlane, keep your eyes on the site for a follow-up on making fastlane work on Bitrise. If you have any questions, please feel free to get in touch with me, @swiftyalex on twitter.


.jpg)
