TLDR; Bitrise’s caching solution is the most efficient way to increase your build speed. Optimize your workflow. Talk to us today.
In our blog post, CI/CD Caching with Bitrise: Dependency caching - then vs now, we spoke about some of the most incremental changes to our cache offering. In this post, we deep dive into those changes, look at what the caching methods are, talk about steps you can take to implement caching methods, as well as provide an overview on troubleshooting cache issues.
CI/CD caching with Bitrise is a series of articles that takes you through all there is to know about caching. Other caching articles in the series currently include Dependency caching — then vs now, and What is a cache, and why should you care about caching?
Caching methods
Bitrise has two main methods of caching namely branch-based caching and dependency caching. As branch-based caching will be sunsetted* in 2023, we’re covering dependency caching only in this post.
*View our documentation to start with dependency caching.
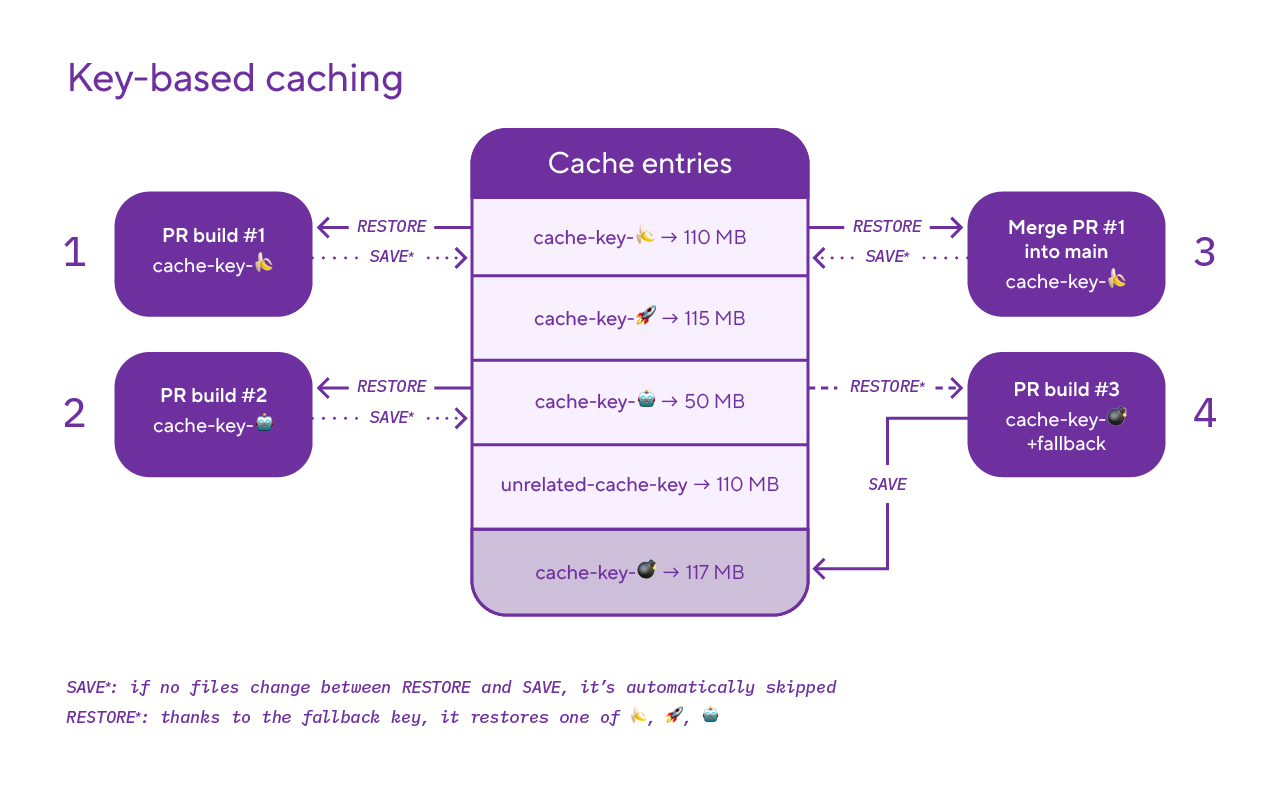
Key-based caching
Key-based caching works by associating cache archives with a key. During a workflow, you can restore a cached archive by referring to the associated key and save a new cache entry with an arbitrary key, including dynamic elements in the key (templating). At the end of the Workflow, the build files can be saved into the cache archive that the key indicates — overwriting the cache archive.
Adding key-based caching to your workflows
Developers can use key-based caching in their workflows by adding Restore Cache and Save Cache to their workflows:
- Restore Cache: Used at the beginning of a workflow, this step restores build files from a cache entry, identified by a key, and adds them to the build.
- Save Cache: Used at the end of a workflow, this step saves the build files at the end of the build into a cache entry, identified by a key.

Keys need to be specified as the values of the cache keys Step input; each key identifies a separate cache archive.
Both key-based caching Steps support using template elements in their Step inputs. The Steps evaluate the key template at runtime and the final cache key to be used can change depending on the build environment or on certain files in the repository.
Available caching templates can be found in our dev center and in the table below.
The key-based caching templates support the use of two different functions:
- checksum: This function computes the SHA-256 checksum of the contents of one or more files. This is useful for creating unique cache keys based on files that describe content to cache. Example 1: “Using the checksum function”.
- getenv: This function returns the value of an Environment Variable (Env Var) or an empty string if the variable is not defined. Example 2: “Using the getenv function”.
Example 1: Using the checksum function
Use the checksum function to create a key that computes the checksum of the package-lock.json file:
- save-cache@1:
    inputs:
    - key: npm-cache-{{ checksum "package-lock.json" }}
    - paths: node_modules
Use the checksum function to create a key that computes a checksum for any .gradle file and the gradle.properties file:
- save-cache@1:
    inputs:
    - key: gradle-cache-{{ checksum "**/*.gradle*" "gradle.properties" }}
    - paths: AndroidApp
Example 2: Using the getenv function
Use the getenv function to create a key that contains the value of the BITRISE_BUILD_NUMBER Env Var.
- save-cache@1:
    inputs:
    - key: npm-cache-{{ getenv "BITRISE_BUILD_NUMBER" }}
    - paths: node_modules
Key matching for cache archives
It's possible to define more than one key in the Cache keys input of the key-based caching Steps. You can specify additional keys by listing one key per line. The list is in priority order, so the Step will first try to find a match for the first key you provided, and if there is no cache stored for the key, it will move on to find a match for the second key (and so on).
In addition to listing multiple keys, each key can be a prefix of a saved cache key and still get a matching cache archive. For example, the key my-cache- can match an existing archive saved with the key my-cache-a6a102ff. We recommend configuring the keys in a way that the first key is an exact match to a checksum key, and to use a more generic prefix key as a fallback:
inputs:
  key: |
    npm-cache-{{ checksum "package-lock.json" }}
    npm-cache-
Switch to key-based caching today.
What should you cache?
Caching the resolved and downloaded dependencies of the project is the first obvious thing to cache. Setting up dependency caching varies across platforms and dependency managers, but we have dedicated caching steps for the most popular dependency managers that require no setup. Read more on workflow recipes for more sophisticated use cases.
Other than dependencies, build artifacts should also be cached. At Bitrise, we have several out-of-the-box automation Steps that can help optimize your workflows and cache your build artifacts. These, currently in Beta, include Step support for Gradle, Bazel, and Tuist - all fully maintained by Bitrise.
How to cache with various build tools
We’ve made it really easy to cache with various build tools, and it takes practically no time to set them up. You can view the step-by-step instructions in our dev center, or check out the videos below.
Inspecting the cache: Troubleshooting and debugging caching issues
There are some places where caching can go wrong. We’ll take a look at some of the most common mistakes made, and how to fix them.
The best way to start troubleshooting is to look at the build logs. It’s full of useful information about what happened during the build and why.
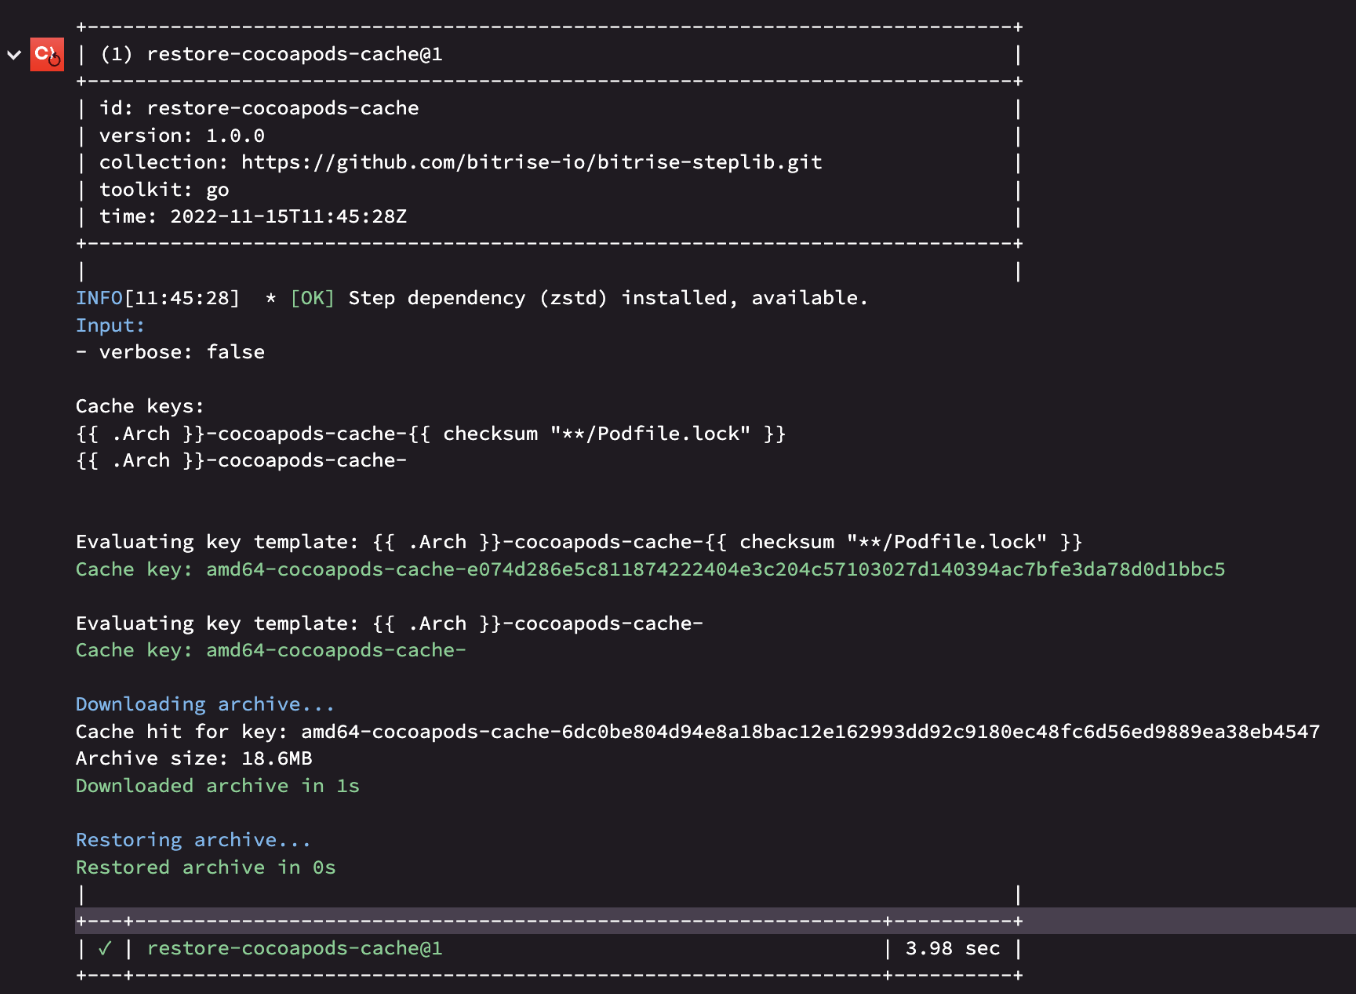
Below, Image 4 shows a screen grab for logs in a restore step. Here you can see:
- There are two cache keys defined, the second key can possibly match a key with a different checksum value
- The final cache keys after the templates are evaluated.
- There is a cache hit, and a cache archive is restored.
- The exact key for the match; notice that the last part (the checksum) is different from the first requested cache key, so this match happened for the second requested key.
- The cache archive size (before decompression) - 18.6MB.
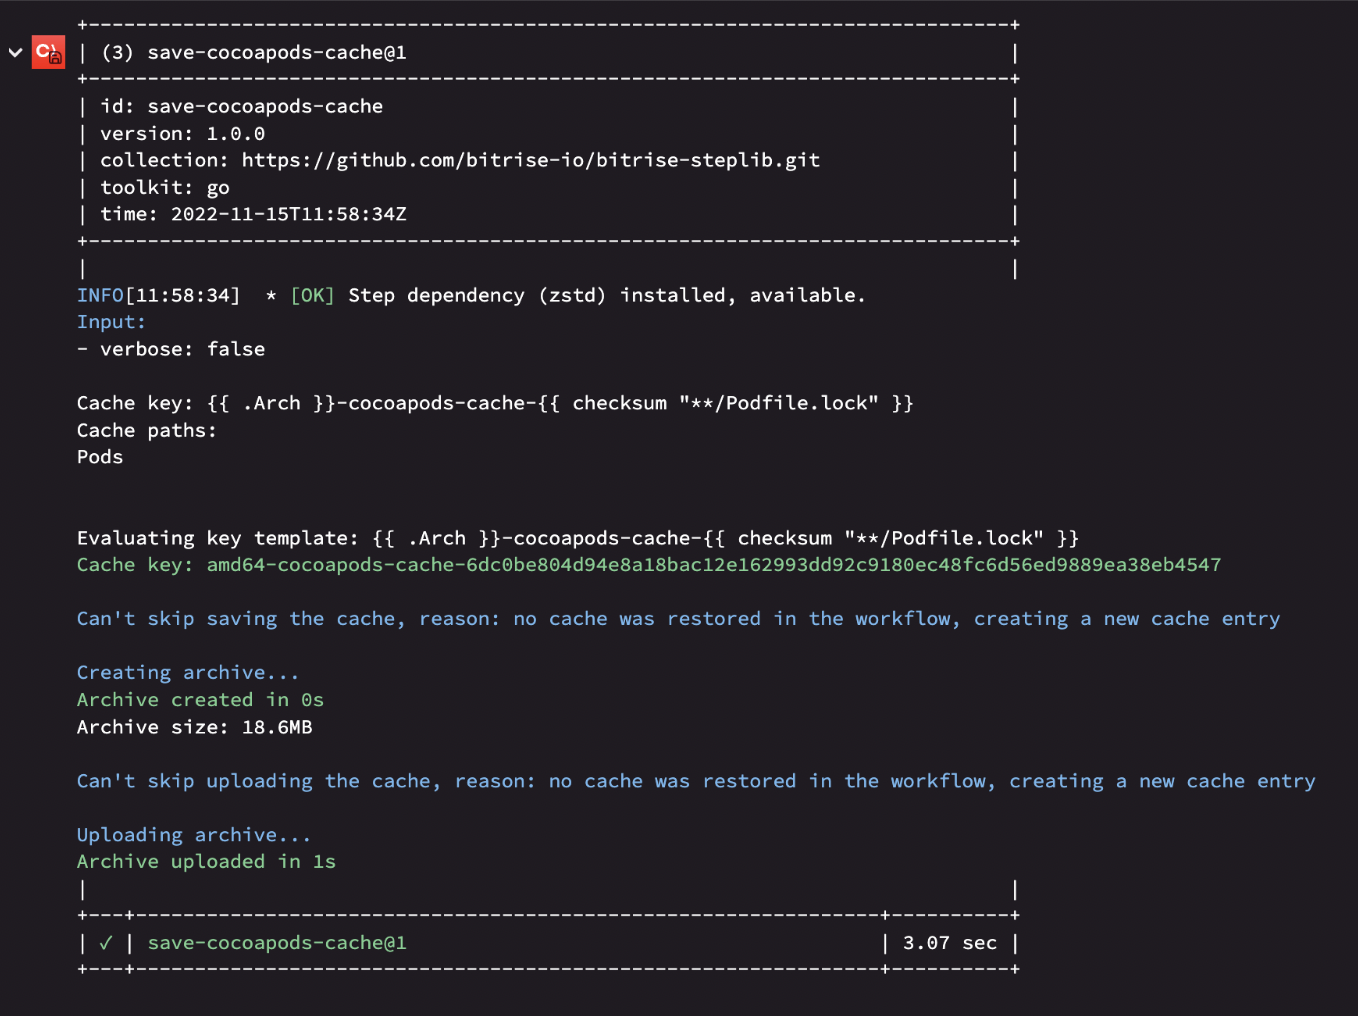
A restore step logs similar information. Below, Image 5 shows a screen grab for a restore step. Here you can see:
- The final cache key after evaluating any template elements.
- The size of the compressed archive - 18.6MB
- Whether skipping the cache save was possible. The step tries to avoid uploading the same cache archive again, and can detect if the to-be-saved cache is the same as what was restored in the same workflow.
- There was no cache restored in the workflow, so the step did not skip creating a new cache entry.
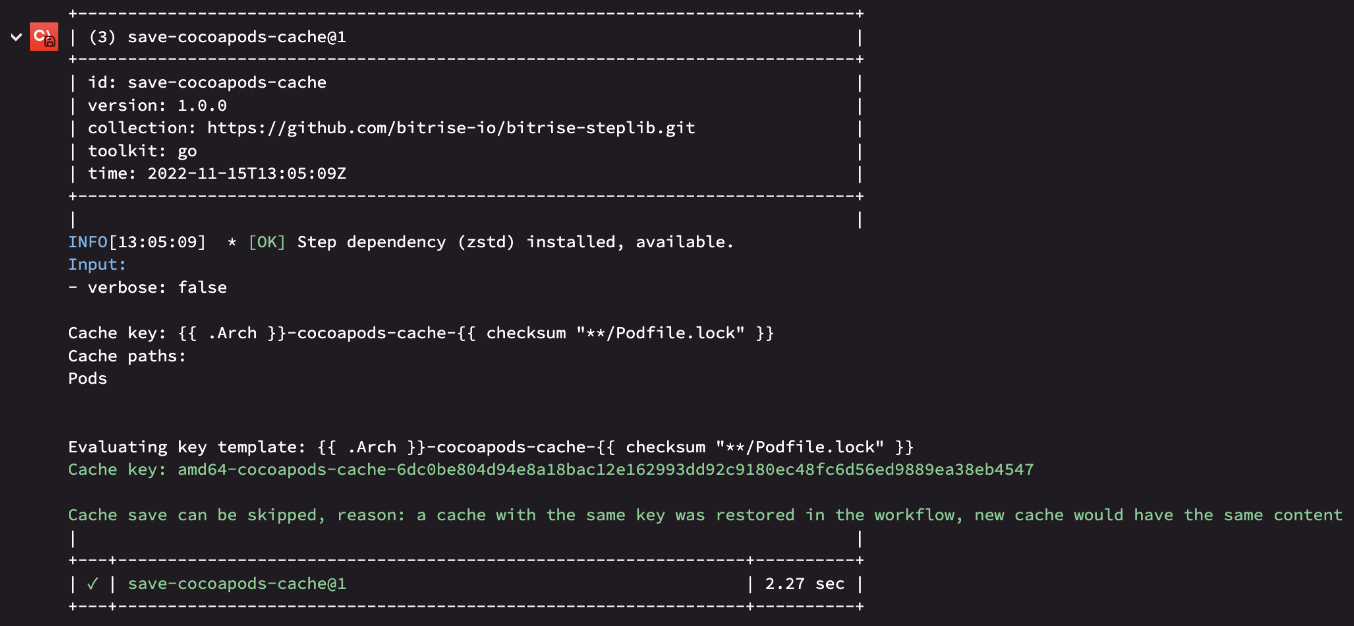
On the other hand, this is what a skipped cache save looks like (Image 6).
*Enable verbose logging through the step inputs in order to see more details by opening the workflow editor.
Tracking caches
At any moment, you can see the current cache entries in App settings. Navigate to App settings > Builds, Manage build caches > and select the Key-based cache tab.
In the Key-based cache tab (see Image 7 below) you can see each cache entry available at the moment, as well as the option to download the cache archive to your local environment for debugging.

Inspecting the cache archive
If you want to see what is exactly inside a cache archive, download and extract it onto your local machine. You can do this by heading over to the cache management UI, as discussed in Tracking caches, and clicking on any of the download buttons in the table.
The cache archive you download is in a file format called .tzst. This is a tar archive with Zstandard compression applied. You need to install the zstd binary on your OS of choice, then you can uncompress the archive with the following command:
tar --use-compress-program="zstd -d" -xf cache-20220919-001015.tzst
Setting up generic steps
If you want to customize and tweak how you cache, don't use dedicated iOS or Android steps. Use generic steps.
Saving the cache conditionally
By default, the save cache steps always run in the workflow but can skip uploading a new entry if the contents would be the same as what was restored in the workflow earlier.
If you want more flexibility, you can skip executing the save cache step altogether. This can be controlled with the run_if property that can be added to any step in a workflow:
steps:
  - save-cache@1:
    run_if: "not .IsPR"
    inputs: ...
The value of the run_if property should be a standard Go template expression and evaluated to false if the step needs to be skipped. If you don’t want to create your own template expressions from scratch, here are some useful examples:
Skip saving the cache in PR builds:
run_if: "not .IsPR"Read an environment variable and skip based on its value:
run_if: |-
  {{ getenv "SAVE_CACHE" | eq "false" }}
Talk to us
We have several steps that can help optimize your workflows. Talk to us today → select Products Features and Plans from the drop-down and put “Caching” in the Further Details box.
Happy caching!