
As I mentioned in a previous article on auto code signing, the process of provisioning and signing an iOS app can be painful. It’s as true for Flutter iOS apps as it is for native apps. And that’s because there are several assets and moving parts that you need to remember, and, along the way, it’s easy to miss or flat out forget to do something. Luckily, Bitrise has your back, and has simplified things!
In this guide, you’ll learn how to use Bitrise to automatically code sign a Flutter (iOS) application using Bitrise.
What is automatic code signing?
Automatic code signing, in this context, means automatically managing the provisioning profiles that are available on your Apple Developer Portal account. This is done by setting up some form of authentication to your Apple account, and then using Bitrise to download and install the provisioning profile for your app during the build process.
So, from a high level, to use auto code signing with Bitrise, you will need to:
- Upload the code signing certificates to Bitrise.
- Connect your Apple Developer Portal account to Bitrise either via Apple ID or via the App Store Connect API.
- Use one of the Bitrise steps that support automatically managing code signing assets
How do you auto code sign with Bitrise?
Recently, as detailed in this article, we’ve simplified the code signing process. The gist is that there are now two ways to automate code signing on Bitrise: using Xcode Build/Archive Step (with iOS Auto Provision Step merged into it) or the 'Manage iOS Code Signing' Step. In both cases, we've reduced the number of things that could go wrong.
In this tutorial we’ll be specifically looking at the process of using the “Xcode Archive & Export for iOS” step to automatically sign assets for a Flutter (iOS) application.
Xcode Archive & Export for iOS
As I previously mentioned, the “Xcode Archive & Export for iOS” step automatically manages your code signing assets, archives and then exports an .ipa file. It accomplishes this by utilizing xcodebuild, a command-line tool that allows you to build, query, analyze, test, and archive operations on your Xcode projects and workspaces.
And because Flutter projects output native iOS binaries, you can use the “Xcode Archive & Export for iOS” within your Flutter-based Bitrise workflow. So, let’s dive in!
Creating code
First things first, in order to be able to sign an app you’re going to need to have some assets like certificates, app identifiers, and provisioning profiles already created and ready to use.
If you don’t already have the necessary code signing files ready, you can generate new files by following the instructions here.
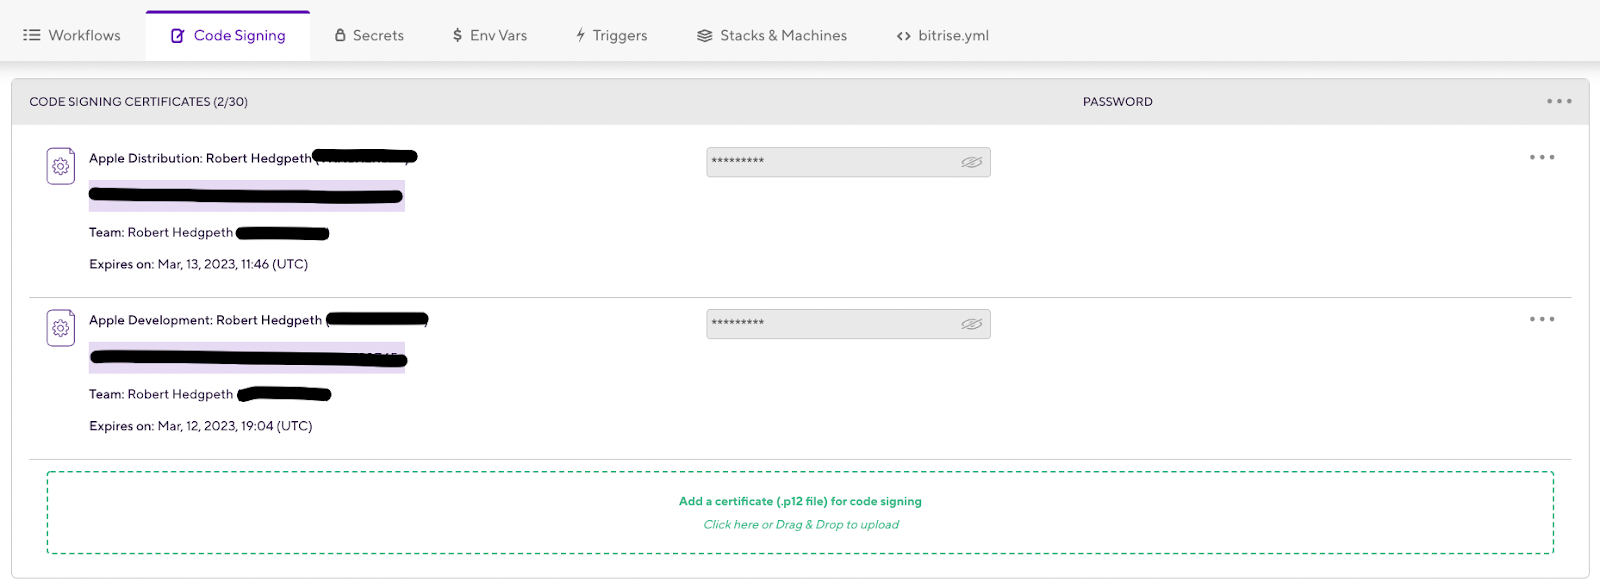
It’s important to note that before you can proceed, all Bitrise iOS code signing methods require you to export and upload your iOS code signing certificates directly to Bitrise.
Provide access to App Store Connect
Next, Bitrise requires access to App Store Connect to be able to access your app’s signing assets.
So, to do this, log into the Apple Developer Portal and navigate to App Store Connect. Then, from there, click “Users and Access”.

Within “Users and Access” in App Store Connect you’ll have the ability to configure two different approaches that Bitrise will use (later on in this tutorial) to connect.
Configure Bitrise for App Store Connect
After configuring your desired approach for establishing an Apple Service connection within the Apple Developer Portal it’s time to jump into Bitrise to hook everything up.
Once you’ve logged into your Bitrise account navigate to your “Profile settings” within your user context menu.
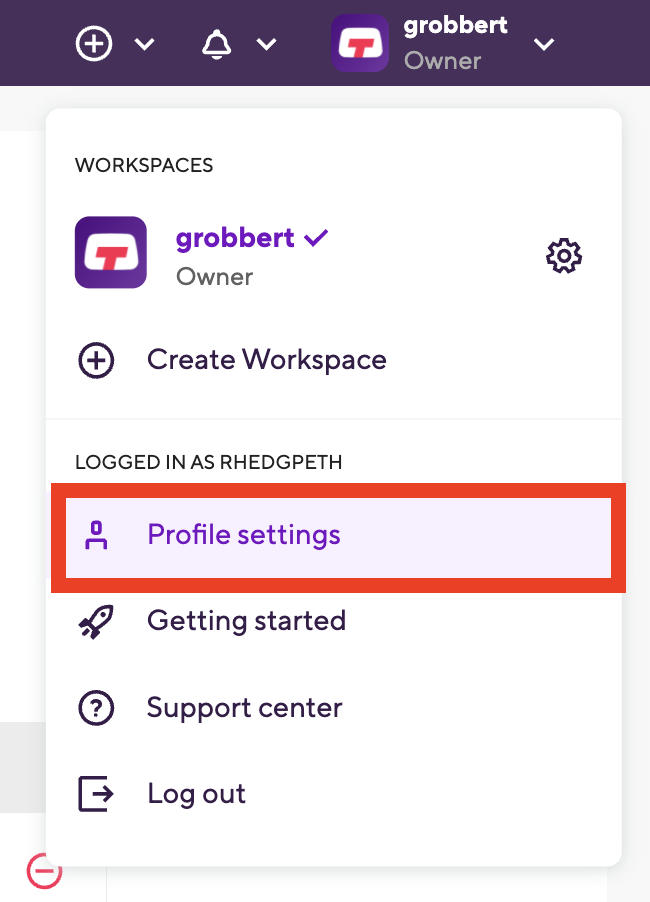
Within your profile settings select the “Apple Service Connection” in the left navigation menu. There you’ll have the ability to configure your Apple Service connection using an API Key (recommended) or Apple ID.

Set up Apple Service connection within your app
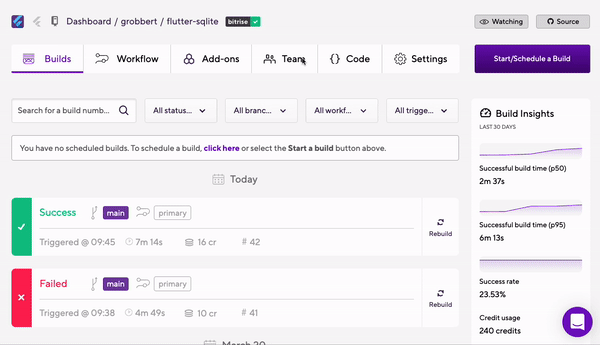
Assuming you have an existing Flutter project within Bitrise, head back to the Bitrise Dashboard and select your app.
Tip: If you haven’t added a Flutter project yet be sure to check out this guide to walk you through the process!
Click the “Teams” and scroll down to the “Apple Service connection” where you can select the connection you’d like to use.
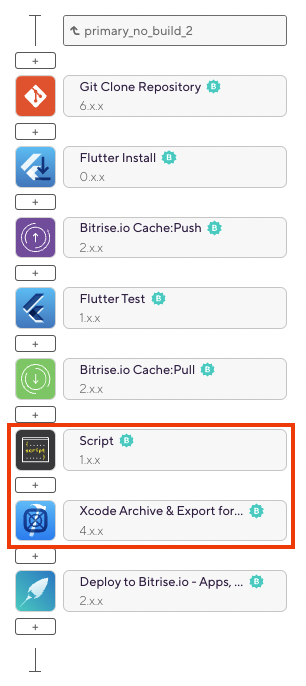
Set up the Bitrise workflow
Finally, it’s time to configure our project workflow. Start by navigating to the “Workflow” tab. If you’ve created a new Flutter project your workflow will look the same or similar to the following by default.
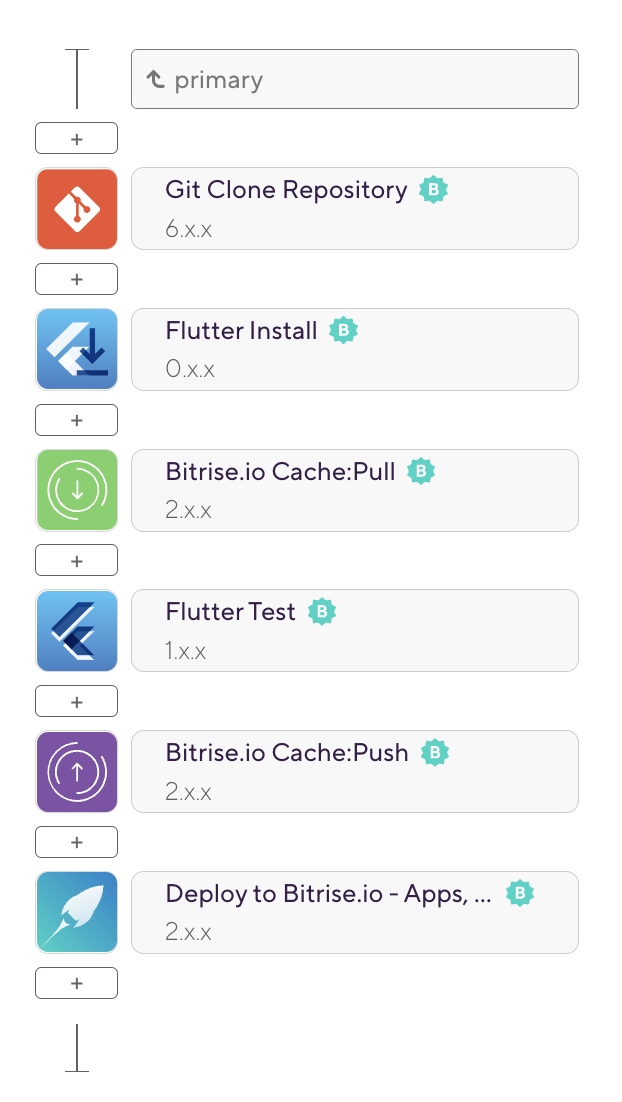
To set up auto code signing for our Flutter iOS app, we’re going to be modifying the workflow by adding and configuring two additional steps; Script and Xcode Archive & Export for iOS.
Script dependency installation (optional)
If your app is Flutter plugins or CocoaPod dependencies of some kind, before you can build and sign the app you’re going to need to pull down and install those dependencies. If your app doesn’t have any dependencies feel free to jump to the next section.
To start you’ll need to add a “Script” Step to your workflow, which can be done by clicking on the (+) button in the Workflow Editor. Search for and click on the “Script” Step, which will add it into your workflow.

Next, all you need to do is add some code that the Step will execute. To do that click the “Script” Step within the workflow editor, which will load the step in the panel directly to the right.
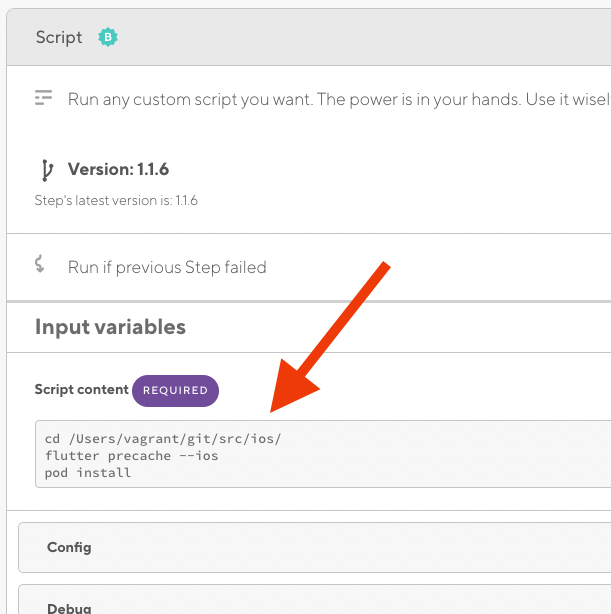
You’ll notice that there is a Script content section, within Input variables, where you can add code. Add the following:
cd /Users/vagrant/git/path-to-your-Flutter-iOS-project

flutter precache –ios

pod install
The bash code above does a couple of things. First, it uses the cd, Change Directory, command to step into the root directory of your Flutter iOS project. Then the flutter precache command is executed, specifically targeting iOS, to populate the Flutter tool’s cache of binary artifacts. It’s also required for the last step, installing the dependencies via pod install.
Xcode Archive & Export for iOS
Next, add the “Xcode Archive & Export for iOS” Step after the “Script” step. This Step will be used to build, sign, and export the .ipa (and other assets).

Following the same steps as before, add the “Xcode Archive & Export for iOS” Step, by clicking the (+) button and searching for the step, after the “Script” Step.
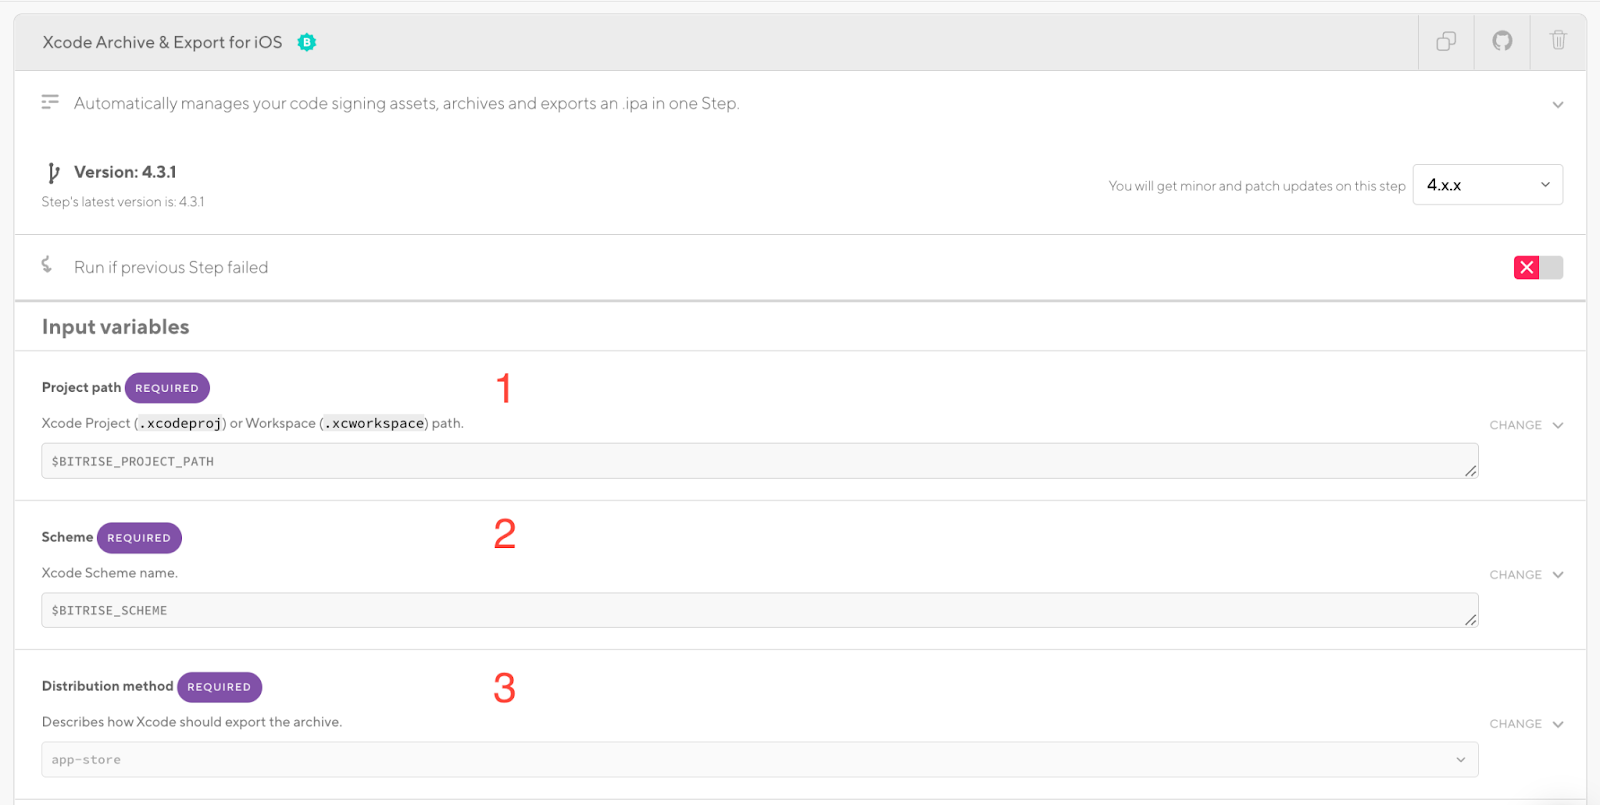
After targeting the “Xcode Archive & Export for iOS” step and loading the details in the panel, scroll to the Input variables section. There you’ll need to supply three configuration settings:
- Project path: the path to the Xcode Workspace within your project.
- Scheme: defines a collection of targets to build, a configuration to use when building, and a collection of tests to execute.
- Distribution method: defines how Xcode should export the archive. The distribution options are development, ad-hoc, app-store, and enterprise.
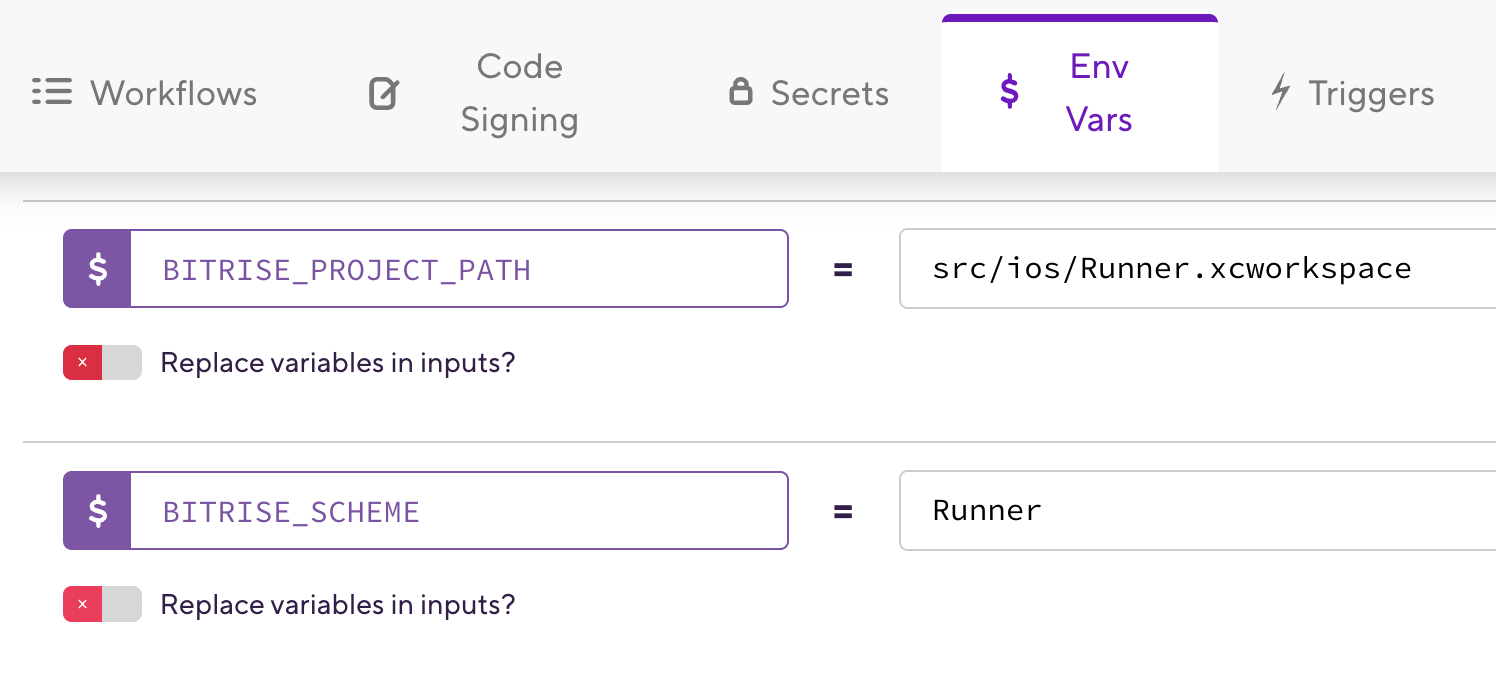
You can specify the Project path and Scheme by defining new environmental variables, within the Env Vars tab.
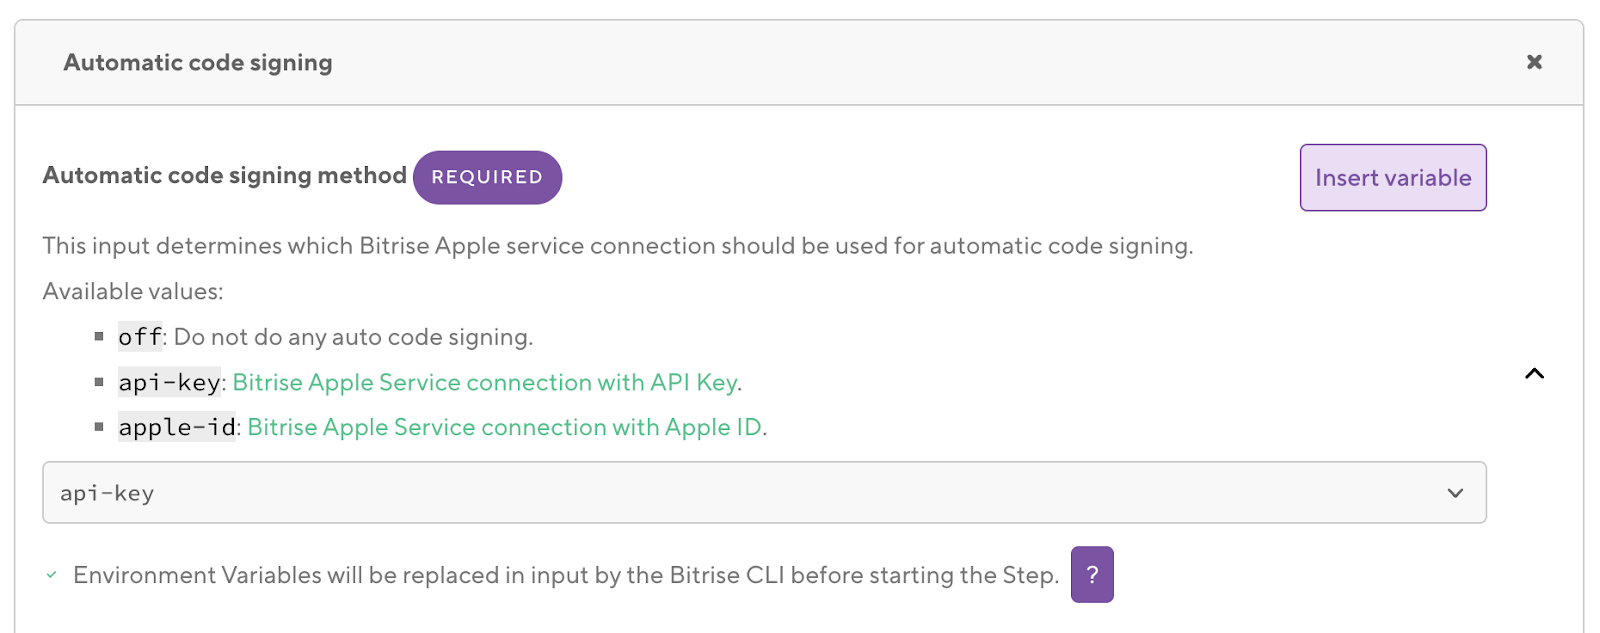
Next, you need to choose the automatic code signing method, which defines which Bitrise Apple Service connection (e.g. API Key or Apple ID) option will be used.
And, finally, if you scroll down just a bit within the Automatic code signing section, you’ll see two required fields, Code signing certificate URL and Code signing certificate passphrase, which have already been configured due to you adding the code signing certificates earlier in this walk-through.
I point this out so you know why you were required to do that step before.

Build & output artifacts
And that’s it, that’s all there is to it. Now that you’ve finished the workflow configuration, save the changes and navigate back to the project landing page to start a new build.
Once the build has completed (hopefully successfully), navigate into the build and view the output within the Artifacts tab.

Next steps
Thank you for reading this article! As you can see, the process of signing your Flutter iOS app is easier than ever with Bitrise and the Xcode Archive & Export for iOS Step. Now all that’s left to do is try it out for yourself! If you’d like to check out this process or any of the other 350+ integration steps available through Bitrise, you can sign up for free here.
If you have any questions or feedback, please reach out to us on Twitter, email, or join the Bitrise Slack to chat with us directly.
Happy building! 🚀

.jpg)
.jpg)
