
In this part I will introduce you to how to write your tests for your Android applications. Although some of the content in this part is not only true for Android applications, but for other platforms as well (such as iOS, or generally for software testing), for the sake of simplicity I'll keep referring to and giving examples for Android.
When you're ready, jump ahead to the other parts in this series:
Part two: Write your tests for your Android libraries and plugins
Part three: Testing on the CI
Part four: Dealing with emulator issues and Android UI test failures on CI
About testing Android apps
The first question that may come up is: how can we categorize tests for Android? I believe we can categorize them with the following two aspects:
- The resources that the test requires.
- The size of the test.
This wording is a bit vague, so let’s find out what I mean by it.
Categorizing by the resources that the test requires
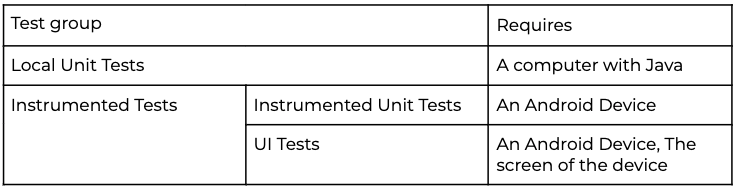
I feel that this is what requires less explanation: we just simply group them by the different resources the tests require. I would say there are two main groups in this case:
- One that does not require a device (physical or virtual): we call them Local Unit tests.
- One that does require a device: we call them Instrumented tests.
Simple, right? Things are much easier seen in this way.

You would rightfully ask, why is this grouping? The reason behind this is the Android Framework. To put in a nutshell, Android framework is the totality of Android APIs and features. Let's start understanding this with a look at the Android Platform architecture:
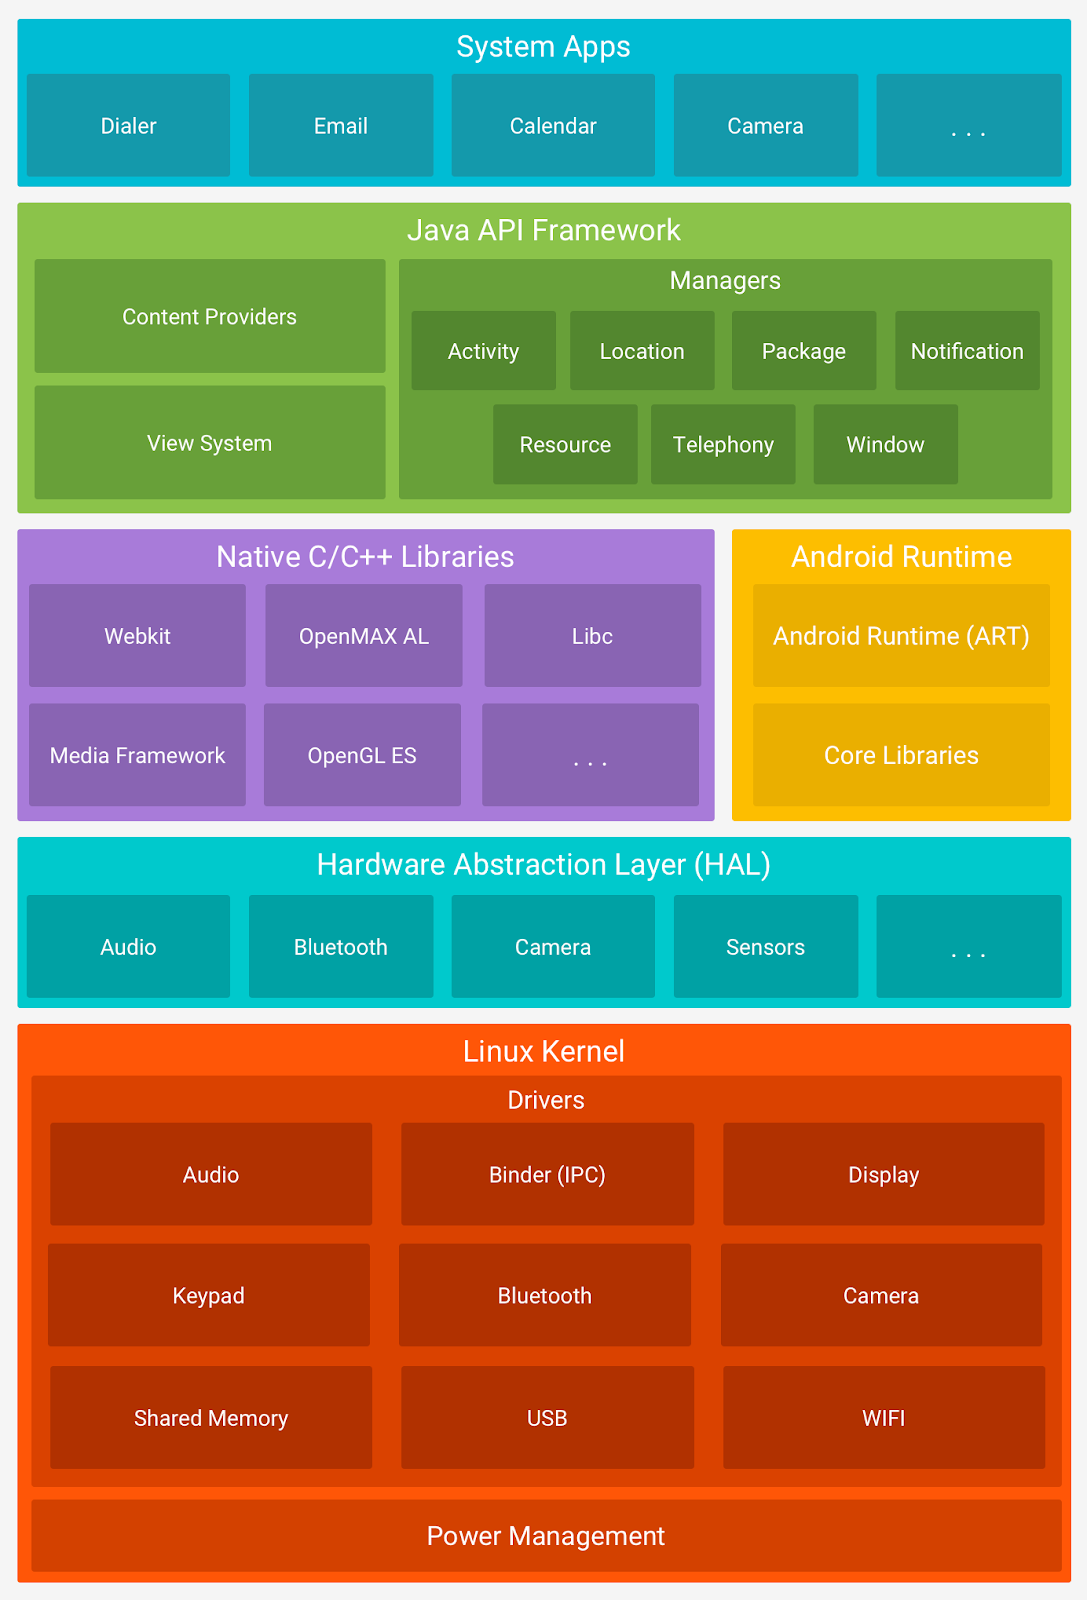
As you can see, there are hierarchical layers in the Android Platform. What is important for us now, is that the Android API calls depend on the Android Runtime (ART), which contains the “Core Libraries”. The “Core Libraries” (also known as “Core Runtime Libraries”) contain and provide the most of the Java programming functionalities. This means we need something that has the ART to be able to execute Android API calls and this is why we need for these tests an Android device (physical or virtual). Note: the predecessor of ART was Dalvik, older Android platforms used that.
If you are interested in the details, I recommend you checking out the platform architecture of Android.
Some of you might have already questioned my last sentences, as it is possible to write tests that use Android API calls without the need of instrumentation (Android device). Yes, it is possible to write tests using Android APIs without the need for instrumentation, but with some limitations: in this case you have to either
- mock your Android API calls (for example with Mockito).
- use a mocked Android framework, for example Robolectric. Note that you can use the AndroidX test libraries which provide Robolectric artifacts.
To keep the scope of this article, I would not go into the details of what is mocking, or how to use Robolectric, I think the official documentation explains it quite well, have a look at it if you need further reading.
Okay, hopefully for now you understand why I described these two groups. But what do they mean from our perspective?
Local Unit Tests: these tests will be executed on the host machine without the need for a device, so they execute quickly and you can launch them instantly. The reason is that these tests can be run on your machine, is that they contain:
- only pure Java calls.
- Android calls that are mocked.
- leverage a mocked Android framework.
A typical example for local unit tests are pure JUnit tests.
Instrumented tests: these tests do require a device to run the tests on. Tests usually run slower than local unit tests. Furthermore, Instrumented tests can be divided into two subgroups:
- Instrumented unit tests: are executed on a device, but do not display/require any User Interface (UI). Use when you want to test something that requires the Android Framework and you want to test it on a device, but does not require UI.
- UI tests: are also executed on a device and do display a User Interface. Suitable to test out UI related requirements. These require the most amount of resources, so usually they are slower even than instrumented unit tests (because for example they have to render the UI too, sounds understandable, right?). I recommend using Espresso and UiAutomator for this type of tests, because they have quite good documentation and as they are maintained by Google.
TL/DR
Takeover
We have the fast local unit test, the medium speed instrumented unit tests and slowly executing UI tests.
Categorizing by the size of the test
First of all, I would like to describe what I mean under the term “size”: to give a very short description, size is the number of different components that the given test is destined to cover. Typically we classify tests to 3 sizes:
- Small tests: validates the behaviour of a single class. Practically unit tests make up this, usually local unit tests, because in most cases testing single classes/methods do not require instrumentation (you can easily mock things if needed).
- Medium tests: validates the behaviour of one or more components of your application. In practice this includes some unit, but mainly integration tests (depending on one or more components are tested), as this involves more complex scenarios, where you often need instrumentation or a high level of mocking.
- Large tests: validates the behaviour of the application from an end-to-end perspective, covers different user journeys. Typically this involves UI testing.
The official Android guide on the Fundamentals of Testing provides good examples of each, I recommend checking it out. Also, a handy tool is the different annotations for test sizes. Not just the usage of these annotations could help you, but in my opinion their documentation are in line with their definition perfectly, it is in line with what I wrote above, so I hope you forgive me copying some part of it here:
- @SmallTest (Execution time < 200 ms): “Small tests should be run very frequently. Focused on units of code to verify specific logical conditions. These tests should runs in an isolated environment and use mock objects for external dependencies. Resource access (such as file system, network, or databases) are not permitted. Tests that interact with hardware, make binder calls, or that facilitate android instrumentation should not use this annotation.”
- @MediumTest (Execution time < 1000 ms): “Medium tests should be focused on a very limited subset of components or a single component. Resource access to the file system through well defined interfaces like databases, ContentProviders, or Context is permitted. Network access should be restricted, (long-running) blocking operations should be avoided and use mock objects instead.”
- @LargeTest (Execution time > 1000 ms): “Large tests should be focused on testing integration of all application components. These tests fully participate in the system and may make use of all resources such as databases, file systems and network. As a rule of thumb most functional UI tests are large tests.”
Note: copied from https://developer.android.com/reference/androidx/test/filters/package-summary
Takeover
We have small sized unit tests, the medium integration tests, and the large functional UI tests.
How to write your tests?
If you pause for a moment and think about the two categorizations I described above, you can probably recognize that we are very lucky, because fast tests can be written easily (because they are small), medium speed tests require moderate efforts and resources, slow tests require large amounts of resources and effort.
From this, you can easily conclude that unit tests are the easiest to
- Change (because they are small)
- Execute (because they require the least amount of resources)
- Maintain (because they are small, and you can check updates quicker)
- Debug (because they require the least amount of resources, and they are small so it can be easily overseen)
Now this is something that a developer likes, when the cheapest is the easiestAlthough the same things for integration tests are a bit more difficult, and UI tests are even more difficult in these aspects, do not forget that integration and UI tests have the advantage of testing things that cannot be tested with unit tests, therefore we cannot avoid them.

The key to effective test writing is the balance of each test type. The goal is to have as many unit tests as you can, somewhat less integration tests, and the least amount of UI tests. And here we are, at the good old Testing Pyramid:

Source: https://developer.android.com/training/testing/fundamentals
Summary
For readers who already had some experience in the topic, I guess there was no surprise, but I cannot emphasize this enough: use the Testing pyramid as your test writing strategy. I really hope that at least I made a small piece on the whys more clear.
Do not fear to reach out to me if you still have any questions or would like to share your opinion. If you liked this please join me on the next part, where I will write about how to test your libraries and plugins.
Check out the benefits of Bitrise for Android here.


.jpg)
